
wechatcanvas
v1.0.1
Published
一个封装了新版微信api的快捷构建小程序海报的npm库,对着设计稿通过简单的链式操作即可完成,无需关心其他
Downloads
2

Readme
WxCanvas
利用canvas微信小程序原生实现的一个绘制微信小程序海报的类,基础库版本>2.9.0。
下面链接中使用的api已被废弃,所以有了本文。
使用场景
该类封装了一些小程序海报生成中常用的方法,方便快速根据设计稿完成画布,减少搬砖时间。除基础功能外支持以下使用:
- 多行文字绘制获得动态高度
- 图片定宽或者定高,另一边自适应
- 圆形图片绘制
文末放全部代码
调用示例
js引入
这取决于你放在哪里,你可以使用npm,也可以直接复制文末源代码,然后直接引入即可
import WxCanvas from '../../utils/canvas.js';需要准备的内容
一段wxml,里面放置了canvas组件,以及一些别的你可能用到的东西,height和width我们采用动态设置的方式,当需要根据文字行数不定,图片高度不定调整时,这是有必要的。
<view class="page">
  <canvas type="2d" id="myCanvas" style='height:{{height}}px;width:{{width}}px;'></canvas>
  <view bindtap="onSave" class="save">保存</view>
</view>
一段wxss,建议调试时置于视图内方便调试,使用时移出视图,用户看到的东西尽量是html+css实现的。
#myCanvas{
  position: absolute;
  left: 50%;
  top: 50%;
  transform: translateX(-50%) translateY(-50%);
  /* left: 100%;
  top: 0%;
  transform: translateX(0%) translateY(0%); */
}
js中只需要简单的声明width和height
Page({

  /**
   * 页面的初始数据
   */
  data: {
    width: 0,
    height: 0
  },

  /**
   * 生命周期函数--监听页面初次渲染完成
   */
  onReady: async function () {
     //演示代码将在这里完成
     //你也可以在用户点击生成时,才执行绘制代码,这取决于你的业务逻辑
  },
})
参数说明
计算画布width和height
// 如果有动态图片高度,文字换行这两种情况才需要如下代码

// 定宽或定高,另一边的长根据图片自适应时,可以提前获得图片信息,此时WxCanvas参数可以是个空options
// 680表示设计稿宽度为680,0表示高度根据图片比例自适应
// 下面这行代码仅作演示
//const autoImageInfo = await new WxCanvas({}).getImageInfo("http://media.tcogid.top/canvas_test.jpg", 680, 0);

// 如果是一段换行文字,需要提前知晓将占用多少宽度 42 :42个字节一行,26:字体大小,仅用于计算这里不能设置字体大小,20:文字行距
const textLineInfo = new WxCanvas({}).getLineHeight("演示局部的文字样式并且是个多行文字or abcdefg,一行显示几个字节得自己实际衡量并且传入参数,一个英文一个字节,一个中文两个字节", 42, 26, 20);

// 如果有动态图片高度,文字换行这两种情况才需要以上代码

const width = new WxCanvas({design: 750}).size(680); //可以使用size方法提前换算设计稿尺寸
const height = new WxCanvas({design: 750}).size(1000); //这里高写死1000并没有利用上面求得数值来计算

// 设置画布宽高
this.setData({width,height});
初始化实例
// 得到的wcvs实例 非promise的支持链式调佣
let wcvs = new WxCanvas({
  el: "#myCanvas",
  design: 750,//设计稿尺寸
  width: 680,//设计稿中画布宽
  height: 1000,//设计稿中画布高
  useDpr: true //是否计算dpr wx.getSystemInfoSync().pixelRatio,调试时可以关,正式时置为true
});

await wcvs.init();// 画布初始化,此时有ctx,尝试log一下wcvs可以看到更多的内容
size()
size 可以单独计算某个设计稿的数值
// 计算字体大小,设计稿为28的字体换算后可直接用于字体大小设置
const fontSize_28 = wcvs.size(28);
const fontSize_26 = wcvs.size(26);
setOptions
options 官方文档中ctx任意可设置的属性,这将影响全局ctx的属性
wcvs.setOptions(
    //设置全局通用的属性,比如填充的颜色
   {
    font: `bold ${fontSize_28}px serif`,
    fillStyle: '#d2665f'
  })
  // 链式调用继续填充一个#e2e2e2的灰色背景,x,y,width,hegiht 与官方相同
  // 除此之外你仍然可以传入第五个参数,与setOptions的属性相同,只不过它并不污染全局ctx的属性,只对当前调用的方法生效,也就是说fillStyle: '#e2e2e2'只对当次矩形填充生效
  .fillRect(0, 0, 680, 1000, {
    fillStyle: '#e2e2e2'
  });
drawImage
当你确定图片的尺寸并且符合你设计稿的要求的,你确实可以这么写,这与你直接ctx.drawImage没有什么区别,只是包装了一下图片信息的处理
//url x  y  w  h
await wcvs.drawImage("http://media.tcogid.top/canvas_test.jpg", 0, 0, 680, 370);

// 当然,业务中也有可能你的海报是左上角坐标确定,但定宽或者定高,另一边的长度需要根据图片宽高比自适应的,该方法会自动换算
// 但由此产生的的不确定宽高,可能会影响你的其他内容位置,因此,这个方法返回 对应设计稿尺寸中的宽、高
//imageInfo, x,y   imageInfo在上述 getImageInfo 方法中返回,x,y为左上角坐标
// 下面这行代码中的autoImageInfo 在计算画布width和height中注释的一行代码中可以找到
// await wcvs.drawAutoImage(autoImageInfo, 0, 0);
fillText
当你确保你的文字不需要换行时,请使用这个 同样的,这里可以接受与setOptions的参数相同的参数可以单独给该行文字设置样式
// text  x  y  options
wcvs.fillText("演示默认文字样式", 20, 450);
fillLineText
需要换行文字时,可以使用这个, 同样的,这里可以接受与setOptions的参数相同的参数
其中textLineInfo 已经在计算画布width和height中提前获取
// text 字符串,x,y :左上角坐标,rs 两行文字之间的间隔 ,options
wcvs.fillLineText(textLineInfo, 20, 550, {
  font: `bold ${fontSize_26}px serif`,
  fillStyle: '#000'
});
fillRect
绘制矩形
// 底部矩形框
wcvs.fillRect(0, 860, 680, 140, {
  fillStyle: 'rgb(0,44,62)'
});
fillArc
绘制圆形
// 圆形白底框,默认使用fill填充,如果只需要一个圆圈,自行修改代码,可用作放小程序码
wcvs.fillArc(600, 930, 60, 0, 2 * Math.PI, {
  fillStyle: '#fff',
  strokeStyle: '#fff',
});
fillArcImage
绘制圆形的图片
可以绘制用户圆形头像,或者圆形小程序码
圆心x,y,半径r,图片地址
await wcvs.fillArcImage(80,930,50,"https://thirdwx.qlogo.cn/mmopen/vi_32/Q3auHgzwzM6j6yx3D156xibNHM6DuHicMicf1J9jLwaLHgL91sdEjVzmxHKpIMuBrJUnncSHzo2rv1fZM0ahqJf9w/132");

await wcvs.fillArcImage(600,930,50,"https://res.wx.qq.com/wxdoc/dist/assets/img/WXACode.fa3d686a.png");
// 最后加一个微信昵称
wcvs.fillText("微信昵称", 160, 935,{fillStyle:'#fff'});保存到手机,以及自己拓展更多的操作
wcvs.ctx 是Canvas 的绘图上下文,你可以直接在这里操作
wcvs.canvas 返回画布,你可以配合 canvasToTempFilePath 以及 wx.saveImageToPhotosAlbum(Object object) 官方api将其保存到本地相册
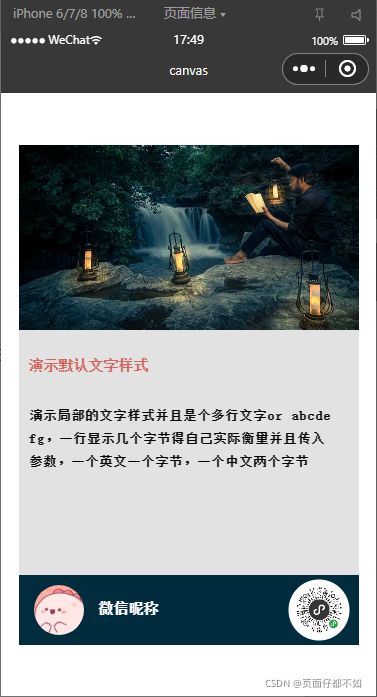
画布效果
完成以上代码时,你可以看到的效果(useDpr为fasle)
WxCanvas 源码
以下是全部代码,你可以直接根据需要进行修改
/**
 * WxCanvas 除init外,所有方法支持链式调
 * init需要 await
 * el        节点id
 * design    设计稿尺寸,这里以750为例,也是比较多使用的 (默认750)
 * width     画布宽  设计稿定的宽,假设680
 * height    画布高  设计稿定的宽,假设1000
 * useDpr    是否开启dpr,建议开启,(默认true),调试时false方便调试用户手机像素密度决定图片实际大小,保存下来才更清晰
 *           用户是不会在小程序中看到画图的过程的
 *           结果是直接保存到手机,如果用户需要预览,请css+html 完成更好
 */
export default class WxCanvas {
  constructor(options) {
    const {
      el,
      design,
      width,
      height,
      useDpr = false
    } = options;
    const dpr = wx.getSystemInfoSync().pixelRatio;
    this.dpr = useDpr ? dpr : 1;
    this.el = el;
    this.design = design || 750;
    this.width = width;
    this.height = height;
  }
  /**
   * 初始化 画布的准备将在次完成
   */
  init() {
    return new Promise((resolve, reject) => {
      const query = wx.createSelectorQuery();
      query.select(this.el).fields({
        node: true,
        size: true
      }).exec((res) => {
        this.canvas = res[0].node;
        this.canvas.width = res[0].width;
        this.canvas.height = res[0].height;
        this.ctx = this.canvas.getContext('2d');
        resolve(this);
      })
    })
  }
  /**
   * 获取转换后给画布的 数值
   * @param {设计稿数值} num
   */
  size(num) {
    return (375 * this.dpr * num) / this.design;
  }
  /**
   * 返回换行之后的文本数组
   * @param {需要换行的字符串} str
   * @param {一行字节个数} num
   */
  getBreak(str, num = 1) {
    let arr = [];
    let item = '';
    let len = 0;
    let start = 0;
    for (let i = 0; i < str.length; i++) {
      let a = str.charAt(i);
      if (a.match(/[^\x00-\xff]/ig) != null) { //\x00-\xff→GBK双字节编码范围
        len += 2;
      } else {
        len += 1;
      }
      if (len >= num || i === (str.length - 1)) {
        item = str.substring(start, i + 1);
        arr.push(item);
        start = i + 1;
        len = 0;
      }
    }
    //获取字符串长度(汉字算两个字符,字母数字算一个)
    return arr;
  }
  /**
   * 获取当前设置之后占用了多少的高,以及绘图数组
   * @param {文字,左上角 x,y轴,一行可以书写的字节数,英文字母1,中文2,每行间隔} text, x, y, num, rs
   */
  getLineHeight(text, num, size, rs) {
    const texts = this.getBreak(text, num, rs);
    const info = {
      texts,
      _h: texts.length * (size + rs),
      num,
      size,
      rs
    };
    return info;
  }
  /**
   * {font : 'bold 100px serif',fillStyle : '#d2665f'} 这将支持更好的个性化
   * @param {ctx所有支持的配置项} options
   */
  setOptions(options) {
    if (!options) {
      return this;
    }
    Object.keys(options).forEach(item => {
      this.ctx[item] = options[item];
    })
    return this;
  }
  /**
   * @param {ctx所有支持的配置项} options
   * @param {ctx画布操作的回调函数} callback
   */
  setTempOptions(options, callback) {
    let tempObj = {}
    Object.keys(options).forEach(item => {
      tempObj[item] = this.ctx[item];
    })
    this.setOptions(options);
    this.ctx.beginPath();
    callback();
    this.ctx.stroke();
    this.setOptions(tempObj);
    return this;
  }
  /**
   * 获取图片信息
   * @param {图片的url 可以是网络,本地代码包,临时路径} url
   * @param {设计稿定宽} w
   * @param {设计稿定高} h
   */
  getImageInfo(url, w, h) {
    return new Promise((resolve, reject) => {
      wx.getImageInfo({
        src: url,
        success: function (res) {
          const r = res.width / res.height;
          let _w = 0,
            _h = 0;
          if (h) { //定高
            _h = h;
            _w = _h * r;
          } else {
            _w = w;
            _h = _w / r;
          }
          res._w = _w;
          res._h = _h;
          resolve(res);
          return this;
        }
      })
    })
  }
  /**
   * 获取可绘制的图片对象
   * @param {图片的url 可以是网络,本地代码包,临时路径} path
   */
  async getImage(path) {
    return new Promise((resolve, reject) => {
      const drImg = this.canvas.createImage();
      drImg.src = path;
      drImg.onload = () => {
        resolve(drImg);
        return this;
      }
    })
  }
  /**
   * 绘图
   * @param {见字意} url, x, y, w, h
   */
  async drawImage(url, x, y, w, h) {
    const info = await this.getImageInfo(url, w, h);
    const drImg = await this.getImage(info.path);
    this.ctx.drawImage(drImg, this.size(x), this.size(y), this.size(w), this.size(h));
    return this;
  }
  /**
   * 自适应高或者宽,绘图
   * @param {getImageInfo返回值} info
   * @param {左上角坐标} x,y
   */
  async drawAutoImage(info, x, y) {
    const drImg = await this.getImage(info.path);
    this.ctx.drawImage(drImg, this.size(x), this.size(y), this.size(info._w), this.size(info._h));
    return this;
  }
  /**
   * 文字
   * @param {文字,左上角 x,y轴} text, x, y
   * @param {ctx 可设置的属性} options
   */
  fillText(text, x, y, options = {}) {
    return this.setTempOptions(options, () => {
      this.ctx.fillText(text, this.size(x), this.size(y));
    });
  }
  /**
   * 可换行文字
   * @param {文字,左上角 x,y轴,一行可以书写的字节数,英文字母1,中文2,每行间隔} text, x, y, num, rs
   * @param {ctx 可设置的属性} options
   */
  fillLineText(info, x, y, options = {}) {
    const {
      texts,
      num,
      size,
      rs
    } = info;
    let _x = x,
      _y = y;
    return this.setTempOptions(options, () => {
      texts.forEach((text, index) => {
        _y = y + (size + rs) * index;
        this.ctx.fillText(text, this.size(_x), this.size(_y));
      });
    });
  }
  /**
   * 绘制矩形
   * @param {左上角 x,y轴,宽度,高度} x, y, width, height
   * @param {ctx 可设置的属性} options
   */
  fillRect(x, y, width, height, options = {}) {
    return this.setTempOptions(options, () => {
      this.ctx.fillRect(this.size(x), this.size(y), this.size(width), this.size(height));
    });
  }
  /**
   * 绘制圆形
   * @param {圆心坐标 x,y轴,半径,圆形起始角度} x,y,r,sAngle,eAngle
   * @param {ctx 可设置的属性} options
   */
  fillArc(x, y, r, sAngle, eAngle, options = {}) {
    return this.setTempOptions(options, () => {
      this.ctx.arc(this.size(x), this.size(y), this.size(r), sAngle, eAngle);
      this.ctx.fill();
    });
  }
  /**
   * 绘制圆形图片
   * @param {圆心坐标 x,y轴,半径 ,图片地址} x,y,r,url
   * @param {ctx 可设置的属性} options
   */
  async fillArcImage(x, y, r, url) {
    let tempStyle = this.ctx.strokeStyle;
    this.ctx.strokeStyle = 'transparent';
    this.ctx.beginPath();
    this.ctx.save();
    this.ctx.arc(this.size(x), this.size(y), this.size(r), 0, 2 * Math.PI);
    this.ctx.clip();
    await this.drawImage(url, x - r, y - r, 2 * r, 2 * r);
    this.ctx.stroke();
    this.ctx.restore();
    this.ctx.strokeStyle = tempStyle;
  }
}