webtask-compiler
v2.2.0
Published
Webtask Compilers for https://webtask.io
Downloads
2
Maintainers
Readme
Webtask Compilers
A collection of useful webtask compilers for use with Auth0 Webtasks.
All you need to use the features below is the webtask CLI.
Static compiler
Webtask context extension
ES6 classes as webtasks
Mocha test-as-a-service
Stripe webhook
Sequence diagram
Twitter scheduler
Static compiler
Host static content (HTML, JS files, CSS) on webtasks and serve over HTTP GET along with a configurable set of HTTP response headers (e.g. Content-Type).
NOTE Serving static content using webtasks is not a good idea in production systems, there are far more efficient and performant ways of doing it. But it is a convenient way to serve frequenty changing static content during development.
Webtask script:
cat > page.txt <<EOF
This is text, but it could also be
HTML, JSON, CSS, or JavaScript.
EOF
Create webtask using static compiler, specify custom HTTP response headers using webtask secrets:
wt create page.txt --name page \
  --meta wt-compiler=https://raw.githubusercontent.com/tjanczuk/wtc/master/static.js \
  -s content-type=text/plain
Webtask context extension
This compiler demonstrates how the webtask context can be enhanced with additional data or properties before the user-defined webtask function is called. In this example, the compiler will fetch the content from a URL specified via the DATA_URL secret and add it to the context object where the webtask function can immediately use it. Similar mechanism can be used to add data from an external database, or add any other utility functions or properties to the webtask context.
Webtask script:
cat > webtask.js <<EOF
module.exports = function (ctx, cb) {
  // The `ctx.externalData` property will be added by the compiler
  cb(null, { length: ctx.externalData.length });
};
EOF
Create webtask using extend_context.js compiler and specify the DATA_URL secret to indicate where the compiler should download external content from:
wt create webtask.js \
  --meta wt-compiler=https://raw.githubusercontent.com/tjanczuk/wtc/master/extend_context.js \
  -s DATA_URL=https://google.com
ES6 classes as webtasks
This compiler demonstrates how a JavaScript class can be used as a programming model for webtasks with simple built-in dispatch mechanism:
- constructor of the class is called once during initialization call and provided with webtask secrets and metadata,
- requests are dispatched to instance methods based on the HTTP verb of the request (you can easily modify dispatch logic to determine method to call using other criteria).
Webtask script:
cat > webtask.js <<EOF
'use strict';

module.exports = class MyWebtask {

  constructor(secrets, meta) {
    this.secrets = secrets;
    this.meta = meta;
  }

  get(ctx, cb) {
    cb(null, { hello: 'from get' });
  }

  post(ctx, cb) {
    cb(null, { hello: 'from post' });
  }

  patch(ctx, cb) {
    cb(null, { hello: 'from patch' });
  }

  // if an HTTP verb is not defined, compiler responds with HTTP 405
};
EOF
Create webtask using class_compiler.js compiler:
wt create webtask.js \
  --meta wt-compiler=https://raw.githubusercontent.com/tjanczuk/wtc/master/class_compiler.js
Mocha test-as-a-service
This compiler allows you to easily implement and configure mocha tests as a webtask, and later run those tests with a simple HTTP call (e.g. via curl).
Webtask script:
cat > test.js <<EOF
describe('sanity', () => {
  it('check', (done) => {
    done();
  })
});
EOF
Create webtask using mocha_compiler.js compiler:
wt create test.js \
  --meta wt-compiler=https://raw.githubusercontent.com/tjanczuk/wtc/master/mocha_compiler.js
You can then run the tests by simply calling the created webtask:

You can pass additional parameters to mocha when creating the webtask, e.g:
wt create test.js \
  --meta wt-compiler=https://raw.githubusercontent.com/tjanczuk/wtc/master/mocha_compiler.js \
  --meta MOCHA_ARGS="--reporter json"
You can override these parameters with URL query params when calling the webtask, e.g:
curl https://tjanczuk.run.webtask.io/mocha-webtask?reporter=json\&timeout=2000You can provide secret parameters to your test code (e.g. API keys) using secrets:
wt create test.js \
  --meta wt-compiler=https://raw.githubusercontent.com/tjanczuk/wtc/master/mocha_compiler.js \
  --secret MY_KEY=12
and they are available within your mocha test code with module.webtask.secrets:
describe('sanity', () => {
  it('check', (done) => {
    console.log('PSSST, MY_KEY is', module.webtask.secrets.MY_KEY);
    done();
  })
});
Stripe webhook
This compiler provides a simple way of creating secure Stripe webhooks which support handling all Stripe events using a convenient programming model.
Webtask script:
cat > stripe-handler.js <<EOF
'use strict';
module.exports = class StripeHandler {
  'charge.succeeded'(data) {
    console.log("You've got money!");
  }
};
EOF
Create webtask using stripe_compiler.js compiler:
wt create stripe-handler.js \
  --meta wt-compiler=https://raw.githubusercontent.com/tjanczuk/wtc/master/stripe_compiler.js
You can then take the resulting URL and use it as a webhook that receives the charge.succeeded event from Stripe.
Other Stripe events
All Stripe events are supported with a simple programming model. Use the stripe_handler.js as a template of your webtask and uncomment any events you wish to handle. The webtask will respond with HTTP 501 to any events received from Stripe that your code does not implement.
wt create https://raw.githubusercontent.com/tjanczuk/wtc/master/stripe_handler.js \
  --name stripe-handler \
  --capture \
  --meta wt-compiler=https://raw.githubusercontent.com/tjanczuk/wtc/master/stripe_compiler.js
wt edit stripe-handler
Authentication
The compiler can optionally enforce Basic authentication supported by Stripe. To set it up, specify the username:password pair as the BASIC_AUTH secret when creating your webtask:
wt create stripe-handler.js \
  --meta wt-compiler=https://raw.githubusercontent.com/tjanczuk/wtc/master/stripe_compiler.js \
  --secret BASIC_AUTH=username:password
You must then configure your webhook in Stripe by specifying the username:password credentials in the webhook URL itself, e.g.
https://username:[email protected]/stripe-handlerUnauthorized requests will be rejected with HTTP 403.
Secrets
You can provide your webhook code with secrets for communicating with external services (e.g. Slack or Twilio):
wt create stripe-handler.js \
  --meta wt-compiler=https://raw.githubusercontent.com/tjanczuk/wtc/master/stripe_compiler.js \
  --secret TWILIO_KEY=abc \
  --secret SLACK_URL=https://...
These secrets can be accessed within the webhook code in the following way:
'use strict';
module.exports = class StripeHandler {
  'charge.succeeded'(data) {
    let twilio_key = this.secrets.TWILIO_KEY;
    let slack_url = this.secrets.SLACK_URL;
  }
};
Calling Stripe APIs
If you specify the STRIPE_KEY as one of the secrets when creating your webtask:
wt create stripe-handler.js \
  --meta wt-compiler=https://raw.githubusercontent.com/tjanczuk/wtc/master/stripe_compiler.js \
  --secret STRIPE_KEY=abc
the compiler will provide you with a preconfigured Stripe client you can use to all Stripe APIs:
'use strict';
module.exports = class StripeHandler {
  'charge.succeeded'(data) {
    this.stripe.customers.create(...);
  }
};
Sequence diagram
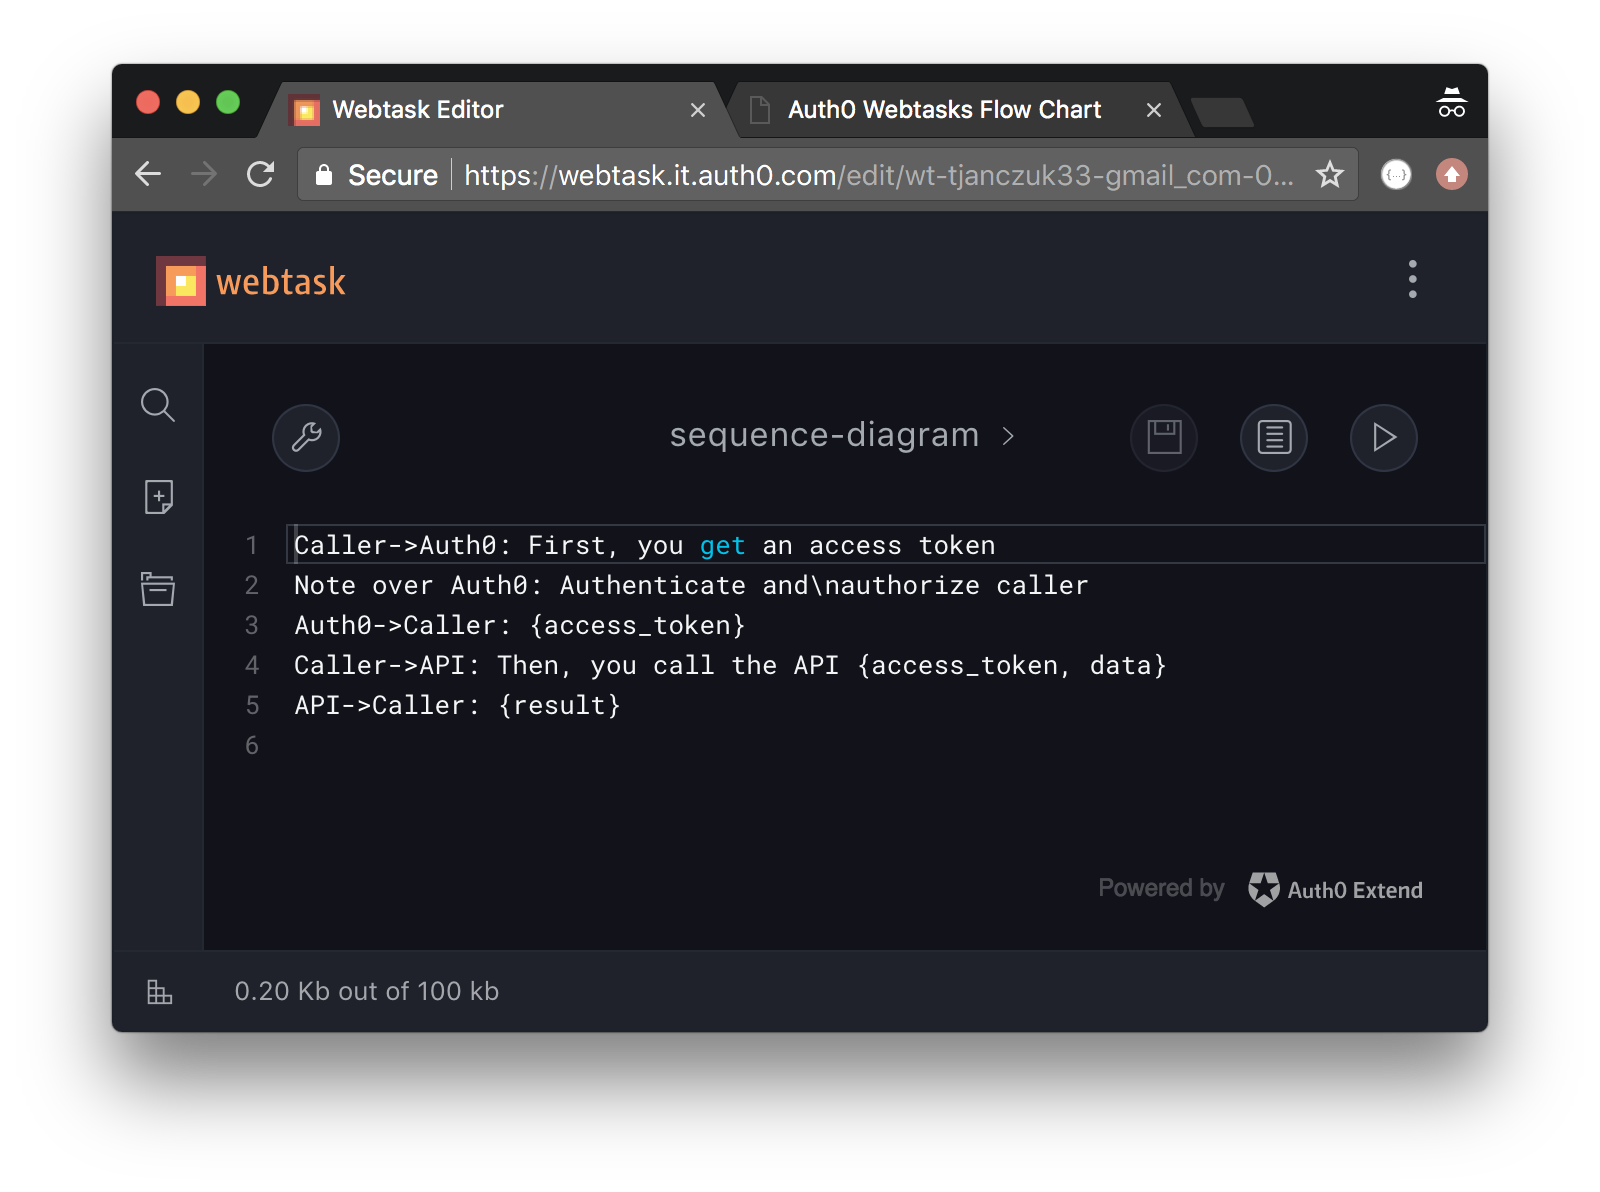
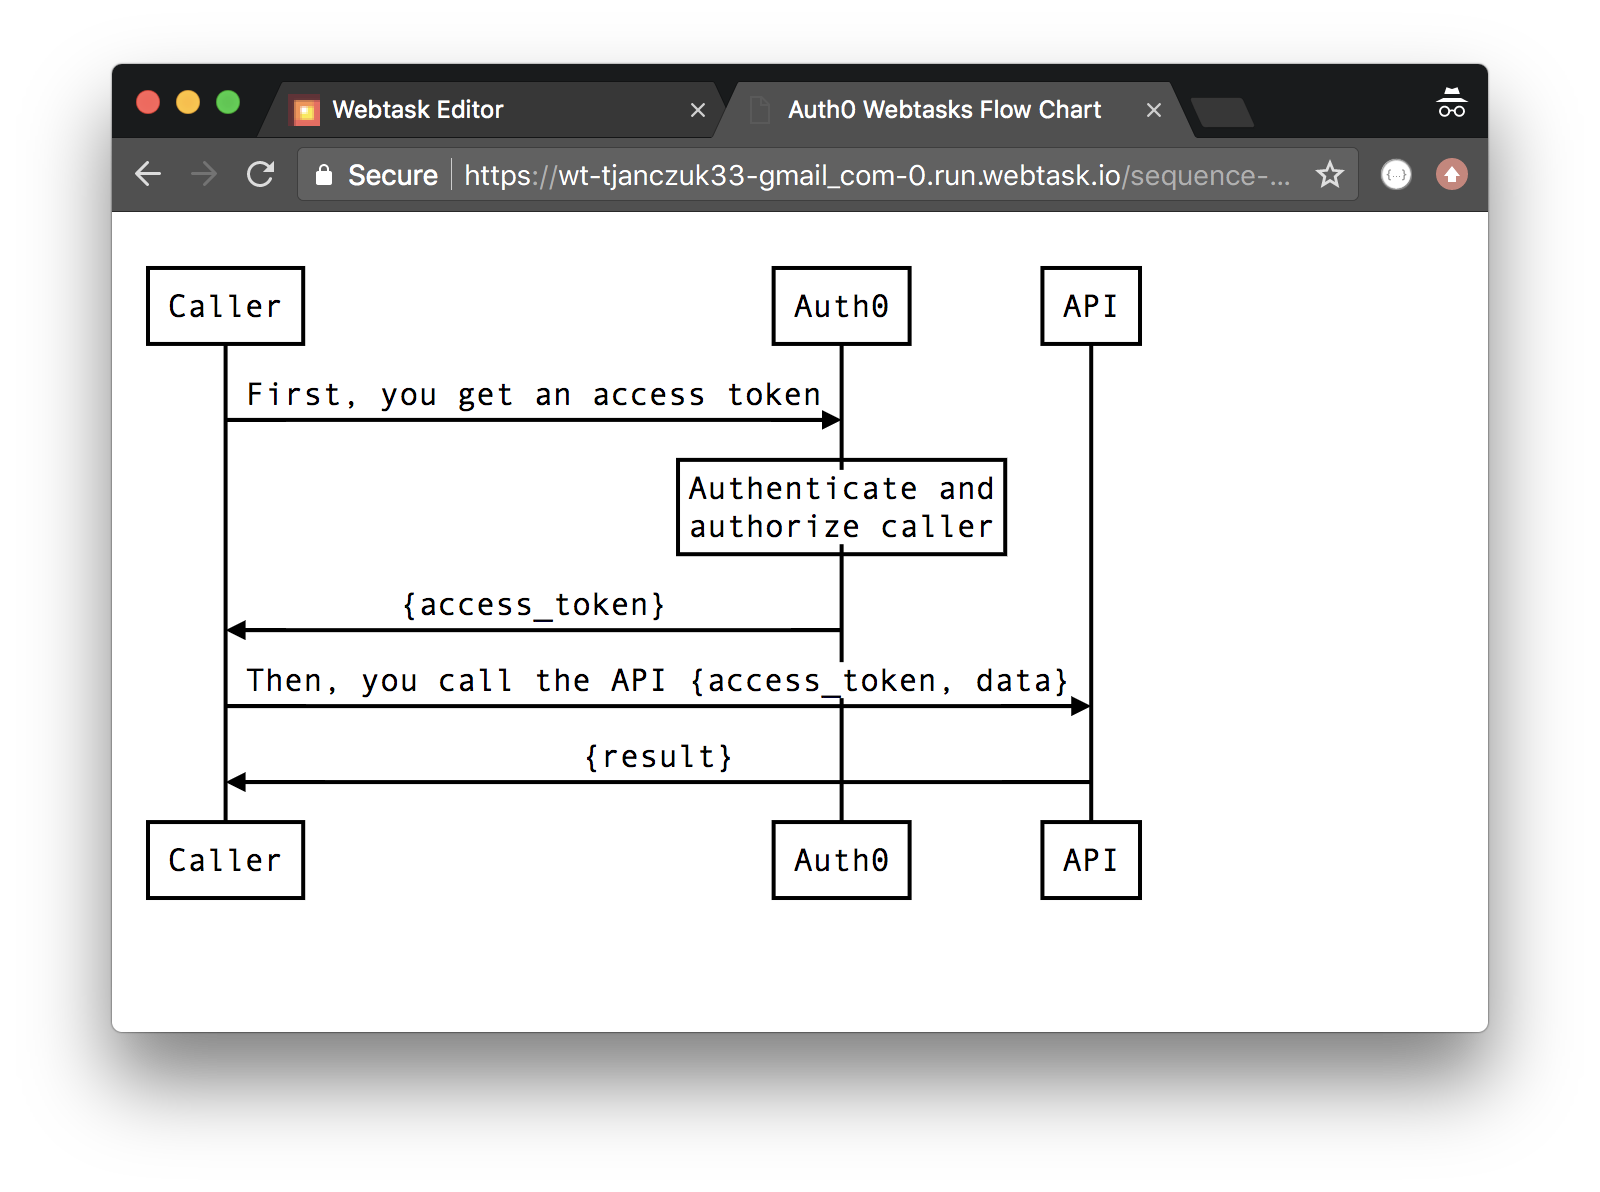
This compiler enables you to create HTTP endpoints that serve HTML showing sequence diagrams. They are implemented as webtasks using the DSL defined by js-sequence-diagrams.


Webtask script:
cat > diagram.txt <<EOF
Caller->Auth0: First, you get an access token
Note over Auth0: Authenticate and\nauthorize caller
Auth0->Caller: {access_token}
Caller->API: Then, you call the API {access_token, data}
API->Caller: {result}
EOF
Create webtask using sequence diagram compiler:
wt create diagram.txt --name diagram \
  --meta wt-compiler=https://raw.githubusercontent.com/tjanczuk/wtc/master/sequence_diagram_compiler.js \
  --meta wt-editor-linter=disabled
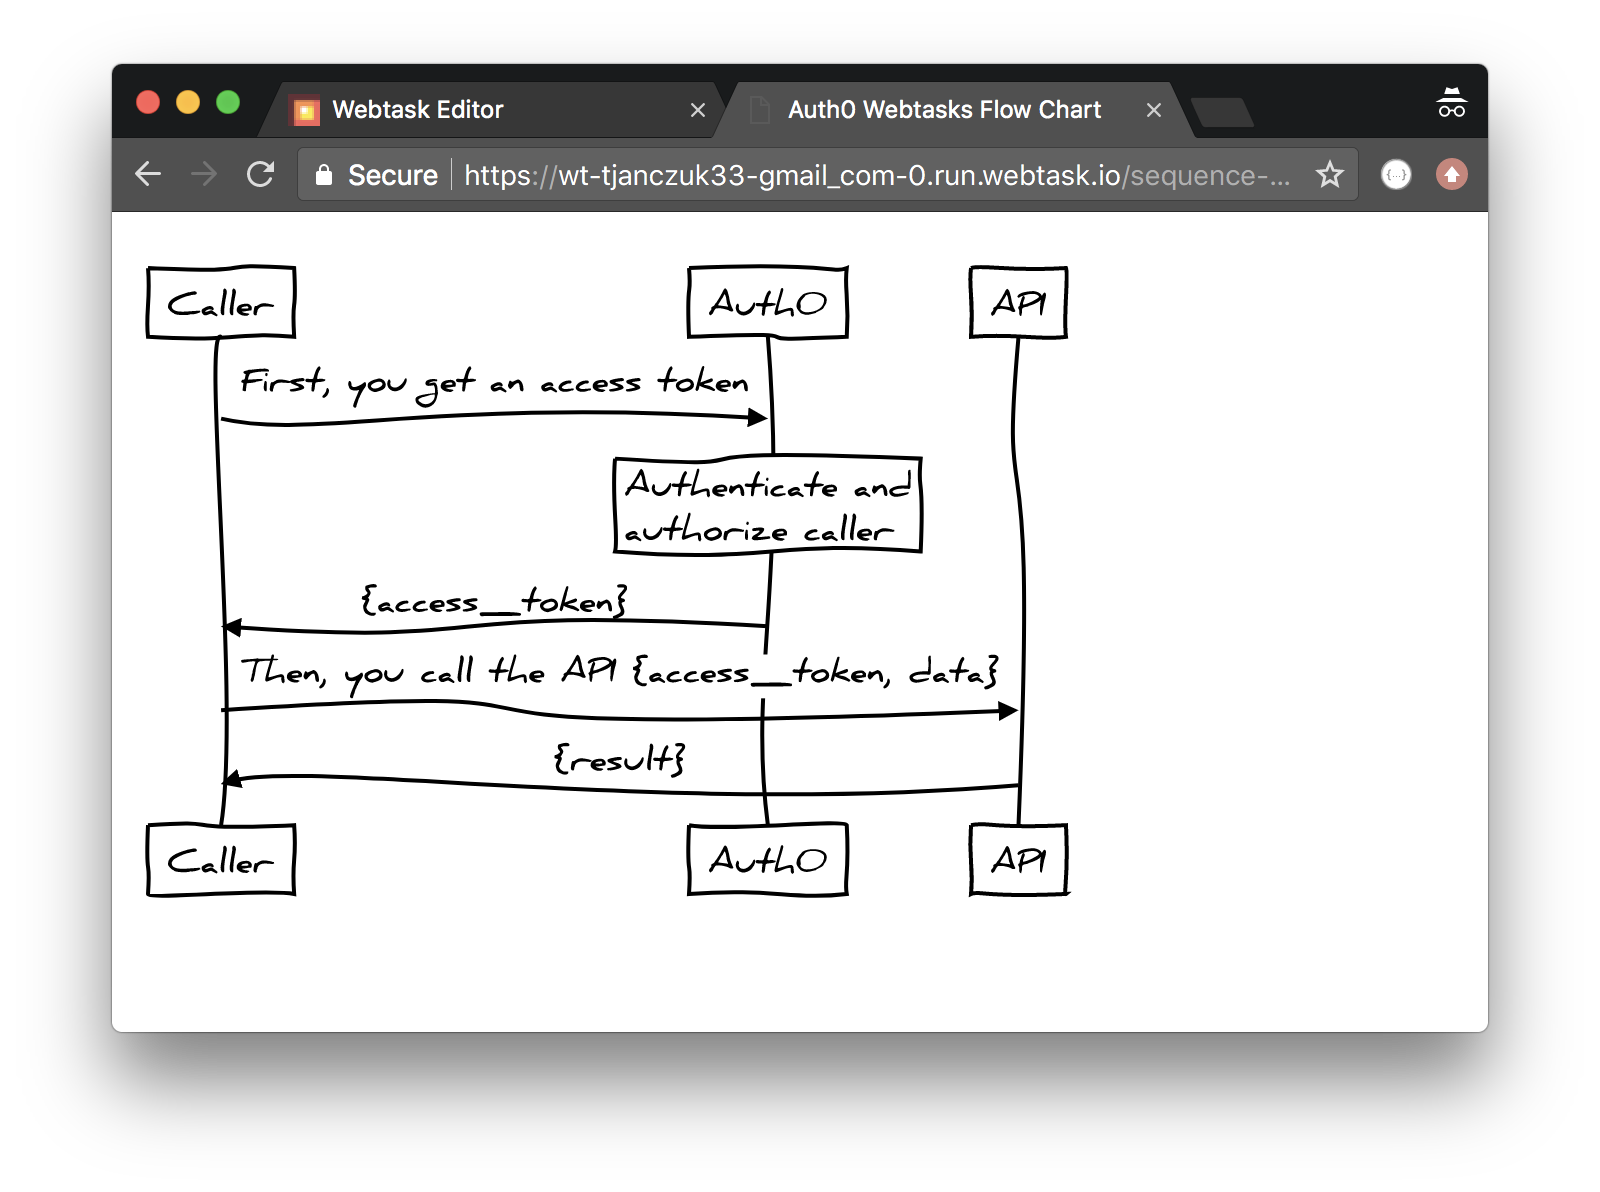
The webtask URL can be customized with the theme URL query parameter, which accepts two values: simple (default) or hand. The hand theme creates a handwritten styled diagram:

Twitter scheduler
This compiler allows you to create a Twitter scheduler which runs as a CRON job on webtasks and sends out tweets from your account given a schedule specified in YAML.
The tweeting schedule is first specified in YAML. You control the tweet text, any media you want to attach to it, and you can specify multiple times at which this tweet is to be sent out. This is just an initial version, you will be able to add or modify this schedule later very easily:
cat > buffer.yaml <<EOF
tweets:
  - text: "I just installed a free Twitter scheduler that uses @auth0_extend and @webtaskio.\n\nCheck out https://github.com/tjanczuk/wtc#twitter-scheduler\n\n#nodejs #serverless"
    media: https://tomasz.janczuk.org/assets/images/b_1.jpg
    schedule:
      - 4/8/2018 09:00 PDT
      - 4/8/2018 15:00 PDT
  - text: "You can do amazing things with webtask.io!\n\n#nodejs #serverless"
    media: https://tomasz.janczuk.org/assets/images/b_2.jpg
    schedule:
      - 4/5/2018 12:00 PDT
EOF
Now create a CRON job that will periodically (every 15 minutes) inspect your schedule and send out any tweets that are due using the twitter compiler:
wt cron create buffer.yaml -n buffer \
  --schedule 15m \
  --no-auth \
  -d webtask-compiler \
  --meta wt-compiler=webtask-compiler/twitter \
  -s TWITTER_CONSUMER_KEY={YOUR_TWITTER_CONSUMER_KEY} \
  -s TWITTER_CONSUMER_SECRET={YOUR_TWITTER_CONSUMER_SECRET} \
  -s TWITTER_ACCESS_TOKEN_KEY={YOUR_TWITTER_ACCESS_TOKEN_KEY} \
  -s TWITTER_ACCESS_TOKEN_SECRET={YOUR_TWITTER_ACCESS_TOKEN_SECRET}
(You can get your Twitter credentials from here).
And that's it, sit back and watch your tweets being sent out!
If you later want to add new tweets or add or modify scheduled times, you can simply edit the YAML representing your schedule:
wt edit bufferThis will open the Webtask Editor allowing you to modify the schedule:

