sr-visualizer
v1.0.13
Published
<p float="left"> <img src="https://raw.githubusercontent.com/tdecker91/visualcube/master/assets/default.png" width="125" /> <img src="https://raw.githubusercontent.com/tdecker91/visualcube/master/assets/scramble.png" width="125" /> <img src="https:/
Downloads
69
Readme
VisualCube TS
Fork of VisualCube, a great Rubik's cube svg image generator. This version is a javascript library that can be used to embed Rubik's cube images in a page, without pre-rendering an image server side.
Most of the original Author's logic remains the same. It has just been moved around into files to help it be a bit more readable. Some typing has also been added.
Logic to determine sticker color and apply algorithms was mostly added as part of this project to work with the original structure. Code for the simulator to apply algorithms is unique to this project and was not ported over from the original php version.
Installation
Install the package using npm
npm install --save sr-visualizerUsage
Import the module
import * as SRVisualizer from 'sr-visualizer'Render a cube by calling cubePNG() and passing in an html element to render the image inside.
SRVisualizer.cubePNG(document.getElementById('element-id'))Default options can be overridden by passing in options to cube. For example you can render higher order cubes. Detailed description for all options will be provided below.
SRVisualizer.cubePNG(element, {
  cubeSize: 4, // 4x4 cube
  width: 500,  // width/height of the svg
  height: 500
})
If you don't want to rebuild all of the configs for your existing images using the php scripts you can provide the url as your options. They will automatically be parsed and applied to the rendered cube.
SRVisualizer.cubePNG(element, 'visualcube.php?pzl=4&size=500')Alternatively you can render the raw SVG element by calling cubeSVG() the same way you would cubePNG()
SRVisualizer.cubeSVG(element)Alternative Usage
If you aren't using webpack or something similar to bundle your application and manage your imports you can include the javascript file on your page manually. But you also need to include svg.js (^2.7.1).
<script src="path/to/svg.js"></script>
<script src="path/to/visualcube/dist/bundle/srVisualizer.min.js"></script>
then you can access the library from window['sr-visualizer']. However, you loose some of the benefits from the typings index.d.ts. Enums like Face, Axis, and Mask will be unavailable.
Also be aware that you must wait for the DOM to be ready before rendering any cube images. You can do this with jQuery's $(document).ready() function, or just listen for the DOMContentLoaded event before rendering an image.
document.addEventListener("DOMContentLoaded", function(event) {
  let SRVisualizer = window['sr-visualizer'];
  SRVisualizer.cubePNG(document.getElementById('example'))
});
Examples
Default
cubePNG(element)
Plan View
cubePNG(element, {
  view: 'plan'
})
Color Schemes
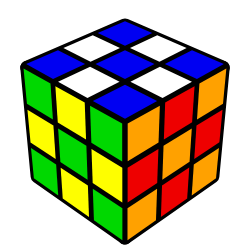
showcasing japanese color scheme
import {cubePNG, Face} from 'sr-visualizer'

cubePNG(element, {
  algorithm: 'M2 E2 S2',
  colorScheme: {
    [Face.U]: '#0000F2',
    [Face.R]: '#FFA100',
    [Face.F]: '#00D800',
    [Face.D]: '#FFFFFF',
    [Face.L]: '#EE0000',
    [Face.B]: '#FEFE00'
  }
})
Transparency
import {cubePNG, Face} from 'sr-visualizer'

cubePNG(element, {
  cubeOpacity: 12,
  stickerOpacity: 50
})
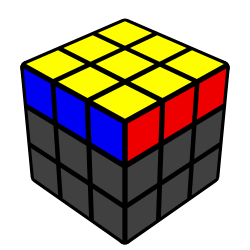
Masking
only showing the last layer
import {cubePNG, Masking} from 'sr-visualizer'

cubePNG(element, {
  mask: Masking.LL
})
Rotation
import {cubePNG, Axis} from 'sr-visualizer'

cubePNG(element, {
  viewportRotations: [
    [Axis.X, -34]
  ]
})
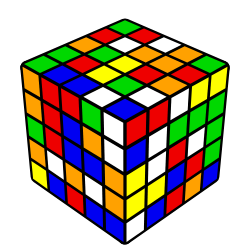
Big Cubes
cubePNG(element, {
  cubeSize: 5,
  algorithm: 'R U Uw2 Bw\' Dw L\' F\' Lw\' Dw Lw\' B Lw2 Bw B2 U2 L\' Fw Rw D\' Rw\' Bw D\' Rw2 L2 B L2 Bw L B\' R\' F\' R\' B\' Dw2 Lw2 D2 Dw\' B Lw L\' R\' Fw Uw2 R2 Bw\' Lw\' B R L\' Dw2 F D2 Bw\' U\' Uw F\' B R\' D2 Bw2'
})
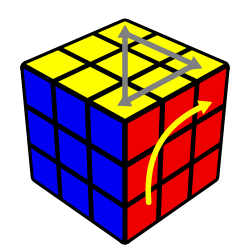
Arrows
cubePNG(element, {
  arrows: 'U0U2,U2U8,U8U0,R6R2R0-s8-i5-yellow'
})
OR
cubePNG(element, {
  arrows: [
    {
      s1: { face: Face.U  n: 0 },
      s2: { face: Face.U, n: 2 },
      scale: 10
    },
    {
      s1: { face: Face.U  n: 2 },
      s2: { face: Face.U, n: 8 },
      scale: 10
    },
    {
      s1: { face: Face.U  n: 8 },
      s2: { face: Face.U, n: 0 },
      scale: 10
    },
    {
      s1: { face: Face.R  n: 6 },
      s2: { face: Face.R, n: 2 },
      s3: { face: Face.R, n: 0 },
      scale: 8,
      influence: 5,
      color: 'yellow'
    },
  ]
});
Documentation
Here is a table of the supported options
| key | value range | default | description |
| --- | ----------- | ------- | ------- |
| dist | 1 to 100 | 5 | Projection Distance |
| algorithm | ([2-9]+)?([UuFfRrDdLlBbMESxyz])(w)?([2\'])? (ex "R U R' U") | | WCA cube notation. |
| case | ([2-9]+)?([UuFfRrDdLlBbMESxyz])(w)?([2\'])? (ex "R U R' U") | | The system displays the cube state which is solved by applying the algorithm |
| backgroundColor | html color codes or names (ex. '#FFF' or 'white') | | |
| cubeColor | html color codes or names (ex. '#000' or 'black') | black | Color cube is drawn as |
| maskColor | html color codes or names (ex. '#000' or 'black') | #404040 | Color masked stickers are drawn as |
| cubeSize | 1 to 17 | 3 | Values from N=(1 to 17) represent an NxNxN cube. Currently only regular cubes are modelled |
| cubeOpacity| 0 to 100 | 100 | Setting this value causes the base cube to be transparent. It means facelets at the back of the cube will also be rendered. A value of 0 gives complete transparency. |
| stickerOpacity | 0 to 100 | 100 | Setting this value causes the facelets to be rendered with transparency |
| colorScheme | { [face: Face]: string } | U -> yellow, R -> red, F -> blue, D-> white, L -> orange, B -> green | Mapping from face to color. Color can be RGB hex value, or html color name. Face is an enum exported from the library. (ex. Face.U, Face.R etc..) |
| stickerColors | Array of colors (string value html color name or color code) | | The order of the colors specified represent the faces in this order: U R F D L B Cube size determines how many definitions you need to fill the cube. A 3x3 cube will need 54 elements in the array. |
| facelets | Array of facelet (u,r,f,...) | | Defines the cube state in terms of facelet positions. u stands for a 'U' facelet (and likewise with rfdlb). Defining a cube state using this method means the cube will be coloured according to the scheme defined by the sch variable. Three special characters are used to indicate the following:n: This is a blank face (coloured grey) o: This is an 'oriented' face (coloured silver)t: This is a transparent face, and will not appear on the cube |
| viewportRotations | [Axis, number][] | [[Axis.Y, 45],[Axis.X, -34]] | Each entry in the sequence is an axis (x, y or z), followed by the number of degrees to rotate in a clockwise direction. Negative values are permitted. Any number of rotations is possible. Axis is an enum exported from the library containing values X, Y and Z |
| view | "plan" | | The view parameter allows special views to facilitate interpretation of different case aspects. This will override any custom viewport rotations passed in.
| width | whole numbers | 128 | Width the svg container will be |
| height | whole numbers | 128 | Height the svg container will be |
| mask | fl, f2l, ll, cll, ell, oll, ocll, oell, coll, ocell, wv, vh, els, cls, cmll, cross, f2l_3, f2l_2, f2l_sm, f2l_1, f2b, line | | Sets parts of the cube to be masked from being colored. Stickers will be rendered gray, so image will focus particular stickers. |
| maskAlg | [UDLRFBudlrfbMESxyz'2 ]* | | Commonly used to perform a rotation on the mask. For example, if you want the picture to highlight the cross on the right side, you can set the mask to cross, and the maskAlg to z' Mask alg will not affect underlying stiker values. The algorithm parameter will not effect the masking. |
| arrows | Arrow[] OR Comma separated list in the form: <a_from><a_to>(<a_via>)?(-i[0-9+])?(-s[0-9+])?(-<color>)? Where <a_x> is: [URFDLB][0-N]+ And: <color> is an html color code or color name. | | Defines a list of arrows to be drawn on the cube. You can either pass in an array of Arrow, or a string value supported by the original author's version. Each arrow is defined with a minimum of two sticker identifiers to indicate where it should be drawn from and to. The optional third sticker identifier indicates which sticker it should pass through if a curved arrow is to be drawn. Arrows may be scaled so that they fall short, or past the centre of each facelet by specifying the s (scale) parameter after a dash. Where curved arrows are drawn the degree to which the arrow deviates from a straight path can be specified via the i (influence) parameter. Arrows may also optionally be assigned individual color, by using a - followed by a color code. Example: U0U2,U2U8,U8U0,R6R2R0-s8-i5-yellow |
Still need to implement from Cride5's version
- Facelet Definition (Defines the cube state in terms of facelet positions)
- Configurable default arrow color
- Transparent view
- Cookie configurable variables
Publishing
> npm run build # compile and bundle assets to `/dist/bundle`
> tsc # compile build assets to `/dist/lib`
> npm publish