simple-vue-timeline
v2.0.9
Published
A timeline vue component
Downloads
71
Maintainers
Readme
simple-vue-timeline


A simple but customizable and reactive timeline vue component which leverages the use of common libraries:
- bootstrap vue components,
- vue-fontawesome
- and fecha date formatting.
If you find it useful, give it a star and please consider buying me a coffee.
Refer to the documentation for further details.
Use github for any issue you encountered or to give me some feedback of your usage.

Getting Started
Installation
npm install --save simple-vue-timelineimport { Vue } from "vue";
import { SimpleTimelinePlugin } from 'simple-vue-timeline';
Vue.use(SimpleTimelinePlugin);Declare third party libraries usage
Since 2.x version, third party usages are no more declared by the simple-vue-timeline itself. It is thus your responsibility to declare them in your vue project which uses simple-vue-timeline.
vue-fontawesome
Refer to vue-fontawesome documentation.
import { FontAwesomeIcon } from '@fortawesome/vue-fontawesome';
import { Vue } from "vue";

Vue.component('font-awesome-icon', FontAwesomeIcon);
bootstrap-vue
Refer to bootstrap-vue documentation. The following plugins must be declared:
- BadgePlugin
- ButtonPlugin
- CardPlugin
- LayoutPlugin
import { Vue } from "vue";
import { BadgePlugin, ButtonPlugin, CardPlugin, LayoutPlugin } from 'bootstrap-vue';

Vue.use(BadgePlugin);
Vue.use(ButtonPlugin);
Vue.use(CardPlugin);
Vue.use(LayoutPlugin);
Style
@import '~simple-vue-timeline/dist/simple-vue-timeline';You must also add the bootstrap style:
@import '~bootstrap/scss/bootstrap';Template Element
Add the element as follows:
template
<simple-timeline :items="items" dateFormat="YY/MM/DD" @timeline-edit="edit" v-on="$listeners"></simple-timeline>Refer to the Vue Class Component Sample section below for a complete sample.
Contribute
Once cloned, you can run the following commands to serve the demo.ts entry point.
npm install
npm run serve
Commit messages
Commit messages must follow the AngularJS's commit message convention also known as conventional-changelog. This repo is commitizen-friendly.
Local Test with npm link
You can use npm link to try the lib integration locally.
Note that you must add a vue.config.js in the project using the lib with the following content
const path = require("path");

// npm link https://github.com/vuejs/vue-cli/issues/4271#issuecomment-585299391
module.exports = {
  configureWebpack: {
    resolve: {
      alias: {
        vue$: path.resolve("./node_modules/vue/dist/vue.runtime.esm.js")
      }
    }
  }
};
Vue Class Component Sample
<template>
  <div>
    <simple-timeline
      :items="items"
      dateFormat="YY/MM/DD"
      @timeline-edit="edit"
      @timeline-copy="copy"
      @timeline-trash="trash"
      v-on="$listeners"
    ></simple-timeline>
  </div>
</template>

<script lang="ts">
import Vue from "vue";
import { Control, Item, Status } from "simple-vue-timeline";
import { Component } from "vue-property-decorator";

@Component
export default class App extends Vue {
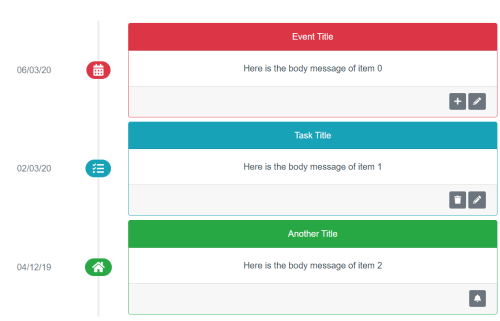
  public items: Item[] = [
    new Item(
      0,
      "calendar-alt",
      Status.DANGER,
      "Event Title",
      [new Control("edit", "pencil-alt"), new Control("copy", "plus")],
      new Date(),
      "Here is the body message of item 0"
    ),
    new Item(
      1,
      "tasks",
      Status.INFO,
      "Task Title",
      [new Control("edit", "pencil-alt"), new Control("trash", "trash")],
      new Date(2020, 2, 2),
      "Here is the body message of item 1"
    ),
    new Item(
      2,
      "home",
      Status.SUCCESS,
      "Another Title",
      [new Control("edit", "bell")],
      new Date(2019, 11, 4),
      "Here is the body message of item 2"
    )
  ];

  public edit(e: any) {
    console.log("edit " + e["eventId"]);
  }

  public copy(e: any) {
    console.log("copy " + e["eventId"]);
    const item: Item = this.items.find(item => item.id == e["eventId"]) as Item;
    const clone = new Item(
      this.items.length,
      item.icon,
      item.status,
      item.title,
      item.controls,
      item.createdDate,
      item.body
    );
    this.items.push(clone);
  }

  public trash(e: any) {
    console.log("trash " + e["eventId"]);
    this.items.pop();
  }
}
</script>
