
service-mock-middleware
v1.3.9
Published
express mock middleware http webpack webpack-dev-server
Downloads
239


Readme
![]()
这是express的一个简单的中间件,它通过拦截html页面上发出的ajax请求与mock配置文件中URL进行匹配,如果匹配成功则直接返回mock配置文件中返回的mock数据。mock配置位置默认为webpack入口文件同级目录下的mock文件夹下的index.js文件。
使用这个中间件的好处如下:
1、在服务端没有提供接口的情况下进行一个真实的http请求数据的mock,进行正常的业务开发,提高开发效率。
2、mock配置文件可以接收到前端ajax请求过来的参数,并且可以根据不同的请求参数,返回不同的mock数据。
3、在开发过程中我们经常会遇到服务端的某个接口出现错误问题,例如:服务端的一个状态改变的接口,出现错误。这时候就会阻塞我们的业务流程,以前我们可能就需要等待服务的修复后才能继续往下开发。使用这个mock中间件我们在开发阶段可以按照正常的业务流程返回正确的mock数据,等服务端接口修复了我们把mock数据开关一关马上就可以验证效果。
4、这个mock中间件只用于开发阶段,而且mock数据不会造成代码污染,就是当你对你的项目进行生产环境的代码构建时完全不需要关心mock数据,不需要做任何的配置,mock的数据也不会被打包。传统前端的mock数据拦截,如果不使用webpack全局变量的区分,mock数据会被打包到生产环境的代码中,而且它并没有发出一个真实的http请求。
5、使用、配置简单、灵活、支持请求参数接收,可以返回灵活丰富的mock数据,满足各种业务场景。
// example/webpack.config01.js
const path = require('path');
const HtmlWebpackPlugin = require('html-webpack-plugin');
const bodyParser = require('body-parser');
const serviceMockMiddleware = require('service-mock-middleware');

module.exports = {
    mode: 'development',
    entry: {
        app: path.resolve(__dirname, 'src', 'demo1', 'index.js'),   // 必须使用绝对路径
        main: path.resolve(__dirname, 'src/demo2/main.js')          // 必须使用相对路径
    },
    output: {
        filename: '[name].[hash].js',
        path: path.resolve(__dirname, 'dist')
    },
    devtool: 'inline-source-map',
    devServer: {
        /**
         * 提供在服务器内部所有其他中间件之前执行自定义中间件的能力。
         * @param app
         * @param server
         */
        before(app, server) {
          // 创建 application/json parser(POST请求) 解析器中间件:它把post请求参数放在req.body中
            app.use(bodyParser.json());
            // POST 创建 application/x-www-form-urlencoded URL编码解析器中间件
            app.use(bodyParser.urlencoded({ extended: false }));
            // 使用service-mock-middleware中间件
            app.use(serviceMockMiddleware({
              webpackConfig: module.exports, // 必传参数,webpack配置
              server 	 // 必传参数,webpack-dev-server对象,用于控制浏览器刷新
            }));
        }
    },
    plugins: [
        new HtmlWebpackPlugin({
            template: path.resolve(__dirname,'src/common/index.html'),        // html模版
            filename: path.resolve(__dirname, 'dist', 'index.html'),          // html输出位置
            title: 'index',                            // html默认标题
            chunks: ['app' ]                           // entry对象的key,一个key就是一个chunk
        }),
        new HtmlWebpackPlugin({
            template: path.resolve(__dirname, 'src', 'common', 'index.html'),
            filename: path.resolve(__dirname, 'dist', 'main.html'),
            title: 'main',
            chunks: [ 'main' ]
        })
    ]
}2、webpack入口文件的同级目录下创建mock配置文件:
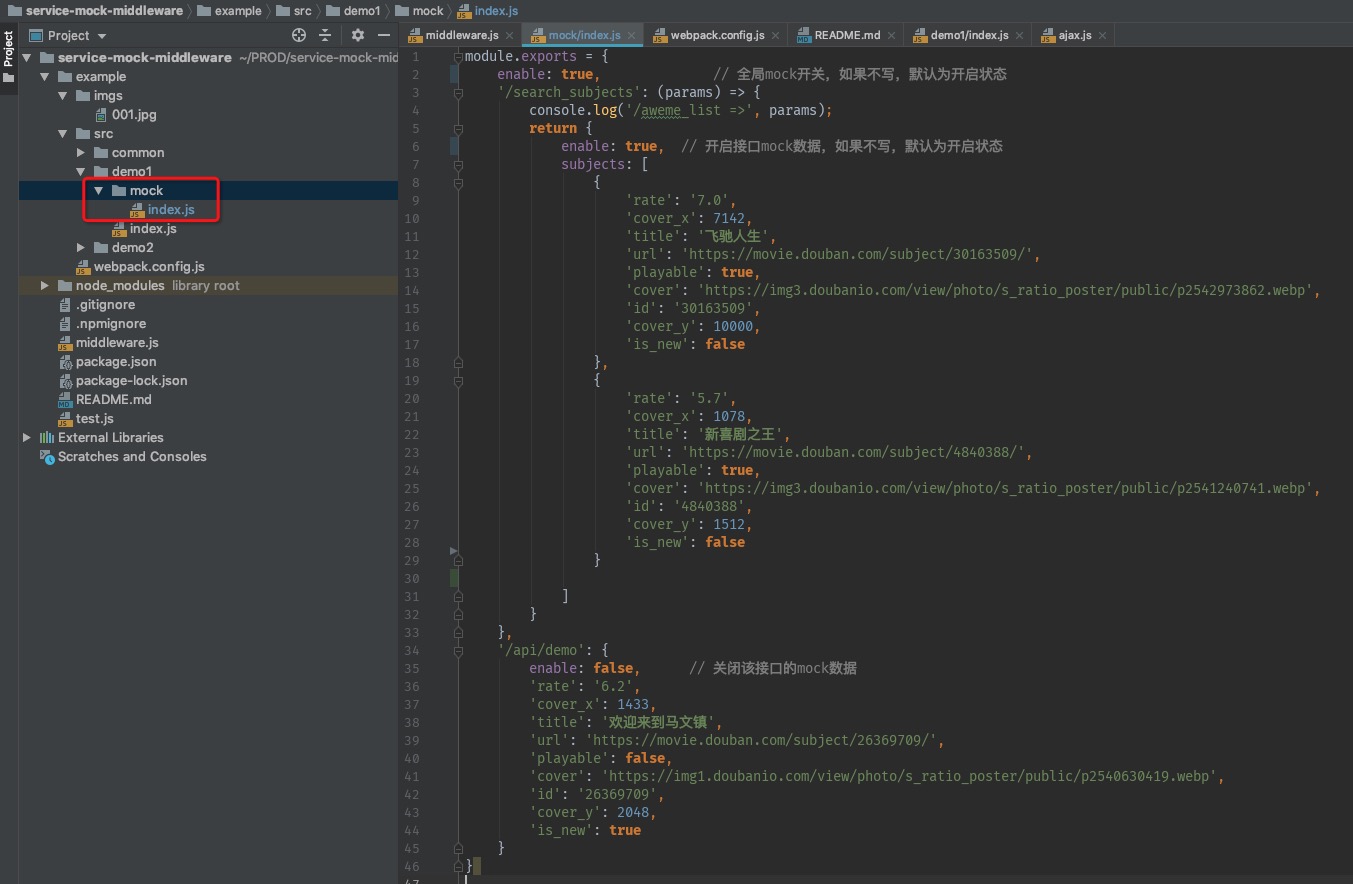
// example/src/demo01/mock/index.js      mock配置文件,key就是接口的URL地址,value可以是对象,或者函数,函数更灵活,函数有三个参数,分别是:请求参数,request对象,response对象
module.exports = {
    enable: true,              // 全局mock开关,如果不写,默认为开启状态,如果设置为false,表示关闭整个配置文件的mock配置,等服务端的接口准备ready后,可以将这个字段设置为false
    '/search_subjects': (params, req, res) => {
        console.log('/aweme_list =>', params);
        return {
            // enable: true,  // 开启接口mock数据,如果不写,默认为开启状态
            subjects: [
                {
                    'rate': '7.0',
                    'cover_x': 7142,
                    'title': '飞驰人生',
                    'url': 'https://movie.douban.com/subject/30163509/',
                    'playable': true,
                    'cover': 'https://img3.doubanio.com/view/photo/s_ratio_poster/public/p2542973862.webp',
                    'id': '30163509',
                    'cover_y': 10000,
                    'is_new': false
                },
                {
                    'rate': '5.7',
                    'cover_x': 1078,
                    'title': '新喜剧之王',
                    'url': 'https://movie.douban.com/subject/4840388/',
                    'playable': true,
                    'cover': 'https://img3.doubanio.com/view/photo/s_ratio_poster/public/p2541240741.webp',
                    'id': '4840388',
                    'cover_y': 1512,
                    'is_new': false
                }

            ]
        }
    },
    '/api/demo': {
        enable: false,      // 关闭该接口的mock数据
        'rate': '6.2',
        'cover_x': 1433,
        'title': '欢迎来到马文镇',
        'url': 'https://movie.douban.com/subject/26369709/',
        'playable': false,
        'cover': 'https://img1.doubanio.com/view/photo/s_ratio_poster/public/p2540630419.webp',
        'id': '26369709',
        'cover_y': 2048,
        'is_new': true
    }
}3、发送ajax请求,获取mock数据:
// example/src/demo01/index.js
import $ from '../common/ajax'
$.get('/search_subjects', res => {
    console.log('/search_subjects =>', res);
})
$.get('/api/demo');浏览器输入:http://localhost:8080/index.html 和 http://localhost:8080/main.html 查看效果
运行效果:
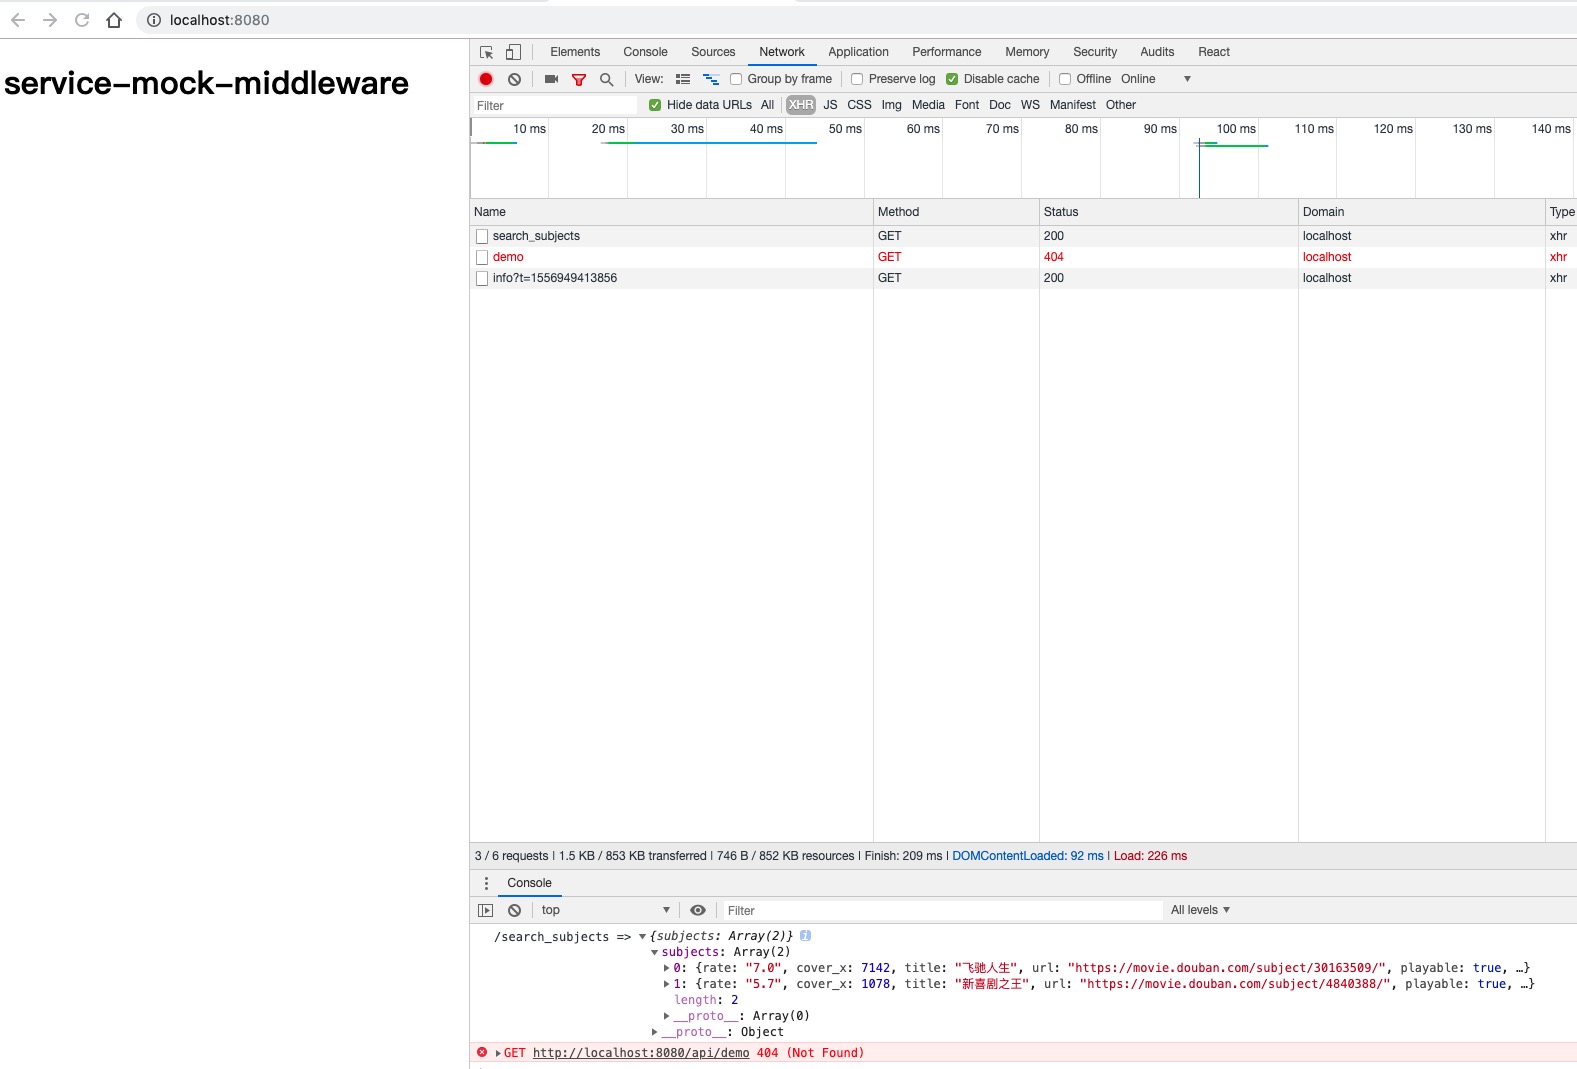
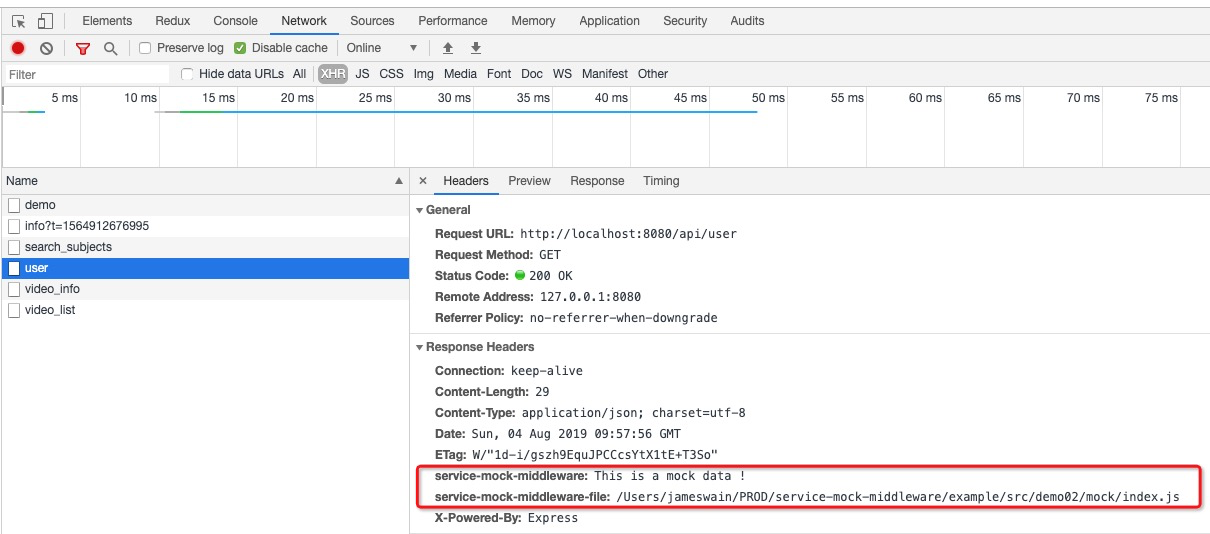
- 通过运行结果,我们可以发现 /search_subjects 接口走的就是我们编写的mock数据,而 /api/demo 的mock开关没有打开,所以没有走mock数据,而且mock配置文件每次改变保存浏览器都会自动刷新。
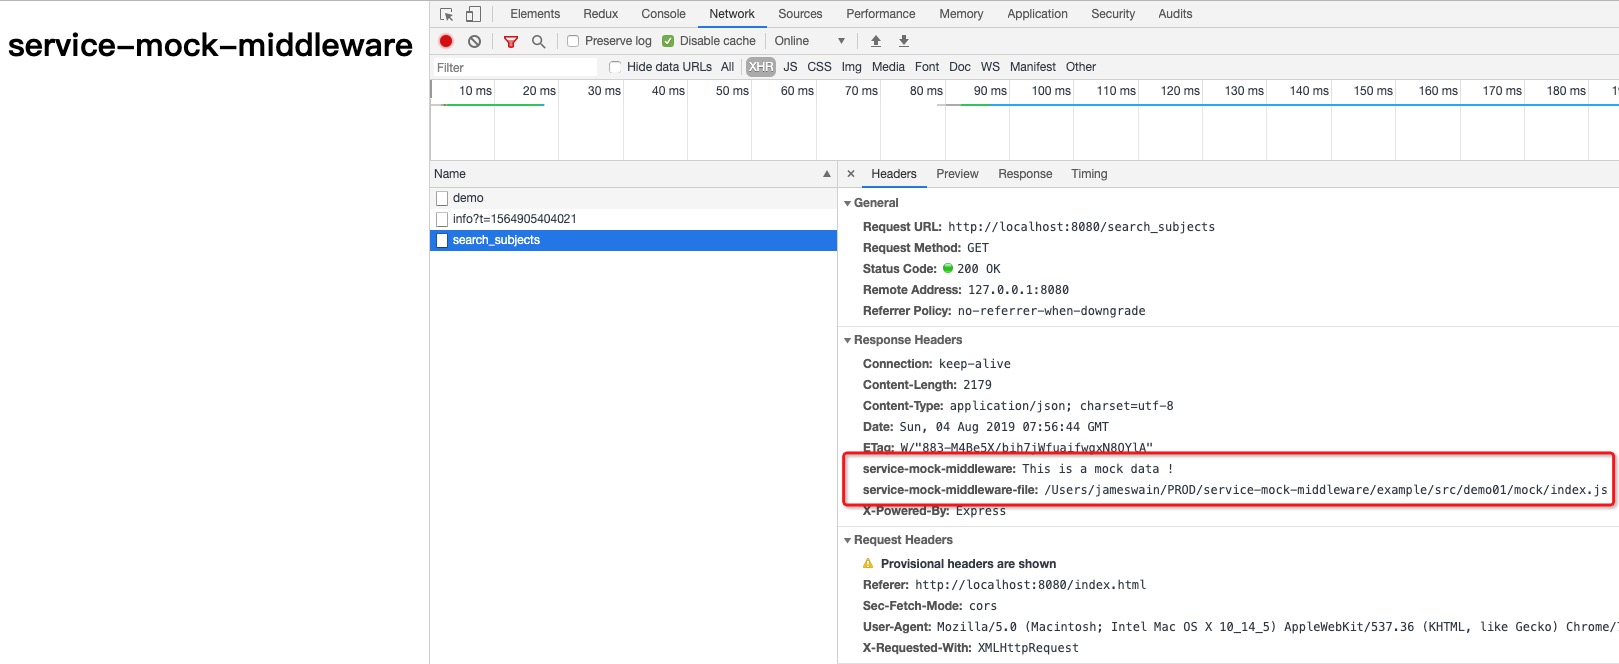
- 如果你的ajax请求走的是mock数据,它的
response会多了一个service-mock-middleware的响应头告诉你,你这个http请求走的是mock数据,service-mock-middleware-file响应头告诉你匹配的mock配置文件。
- 不仅如此,我们的终端(Terminal)也会有一个表格告诉你,你当前访问的接口mock的开关状态
const serviceMockMiddleware = require('service-mock-middleware');
const options = { webpackConfig, server };
const smw = serviceMockMiddleware(options)
| 参数名称 | 是否必传 | 描述 |
| --------------- | -------- | ------------------------------------------------------------ |
| webpackConfig | 是 | webpack配置 |
| server | 否 | webpack-dev-server对象,用于控制浏览器刷新,不传则不主动刷新浏览器 |
| filename | 否 | 设置mock配置文件所在的文件夹或文件的相对路径,相对于webpack的entry路径。例1:filename: '/mock-data/other.js'例2:filename: '/mock-data/'例3:filename: '/mock-data' |
| publicPath | 否 | devServer.publicPath,当devServer配置中配置了publicPath字段后,就必须要把这个配置传给该中间件 |
git clone https://github.com/Jameswain/service-mock-middleware.git   // 克隆源码到本地磁盘
npm install				      // 安装依赖
npm run example01		    // 运行例子01,访问http://localhost:8080
npm run example02		    // 运行例子02,访问http://localhost:8080
npm run example03		    // 运行例子03,访问http://localhost:8080
npm run example04				// 运行例子04,访问http://localhost:8080
const path = require('path');
const HtmlWebpackPlugin = require('html-webpack-plugin');
const bodyParser = require('body-parser');
const serviceMockMiddleware = require('../middleware');
module.exports = {
mode: 'development',
entry: [
path.resolve(__dirname, 'src', 'demo01', 'index.js'), // 必须使用绝对路径
path.resolve(__dirname, 'src/demo02/main.js') // 必须使用绝对路径
],
output: {
filename: '[name].[hash].js',
path: path.resolve(__dirname, 'dist')
},
devtool: 'inline-source-map',
devServer: {
/**
* 提供在服务器内部所有其他中间件之前执行自定义中间件的能力。
* @param app
* @param server
*/
before(app, server) {
// 创建 application/json parser(POST请求) 解析器中间件:它把post请求参数放在req.body中
app.use(bodyParser.json());
// POST 创建 application/x-www-form-urlencoded URL编码解析器中间件
app.use(bodyParser.urlencoded({ extended: false }));
// 使用mock中间件
app.use(serviceMockMiddleware({ webpackConfig: module.exports, server }));
}
},
plugins: [
new HtmlWebpackPlugin()
]
}2、在第一个入口文件对应的mock文件夹中进行mock数据配置:
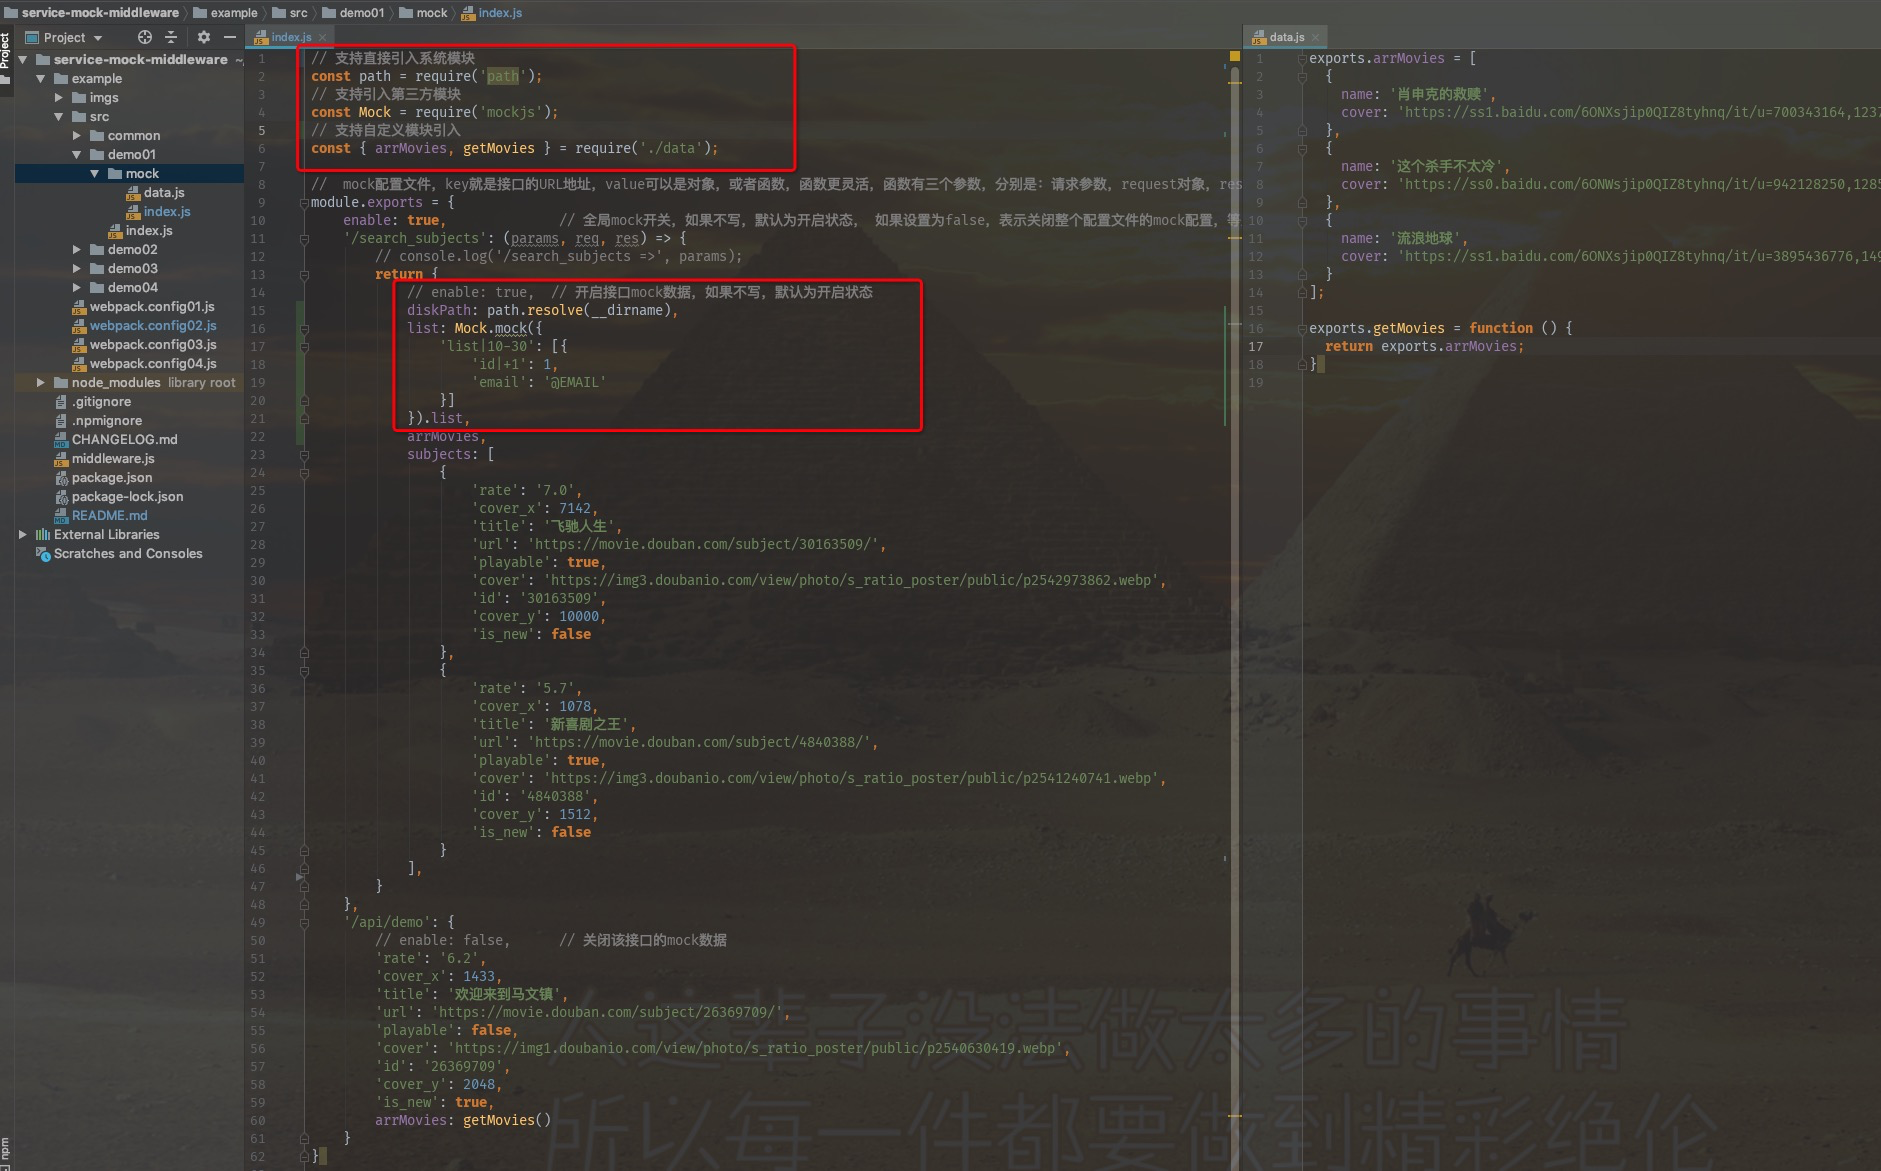
- example/src/demo01/mock/index.js
- example/src/demo01/mock/data.js
- 在
index.js文件中引入了mockjs模块和path模块进行生成mock数据,并返回;实际上你可以在mock配置文件中引入任何你需要使用到的第三方数据进行数据mock。
3、在第一个入口文件中发送ajax请求:
import $ from '../common/ajax'
$.get('/search_subjects', res => {
    console.log('/search_subjects =>', JSON.parse(res));
});
$.get('/api/demo');4、在第二个入口文件对应的mock文件夹中进行mock数据配置:
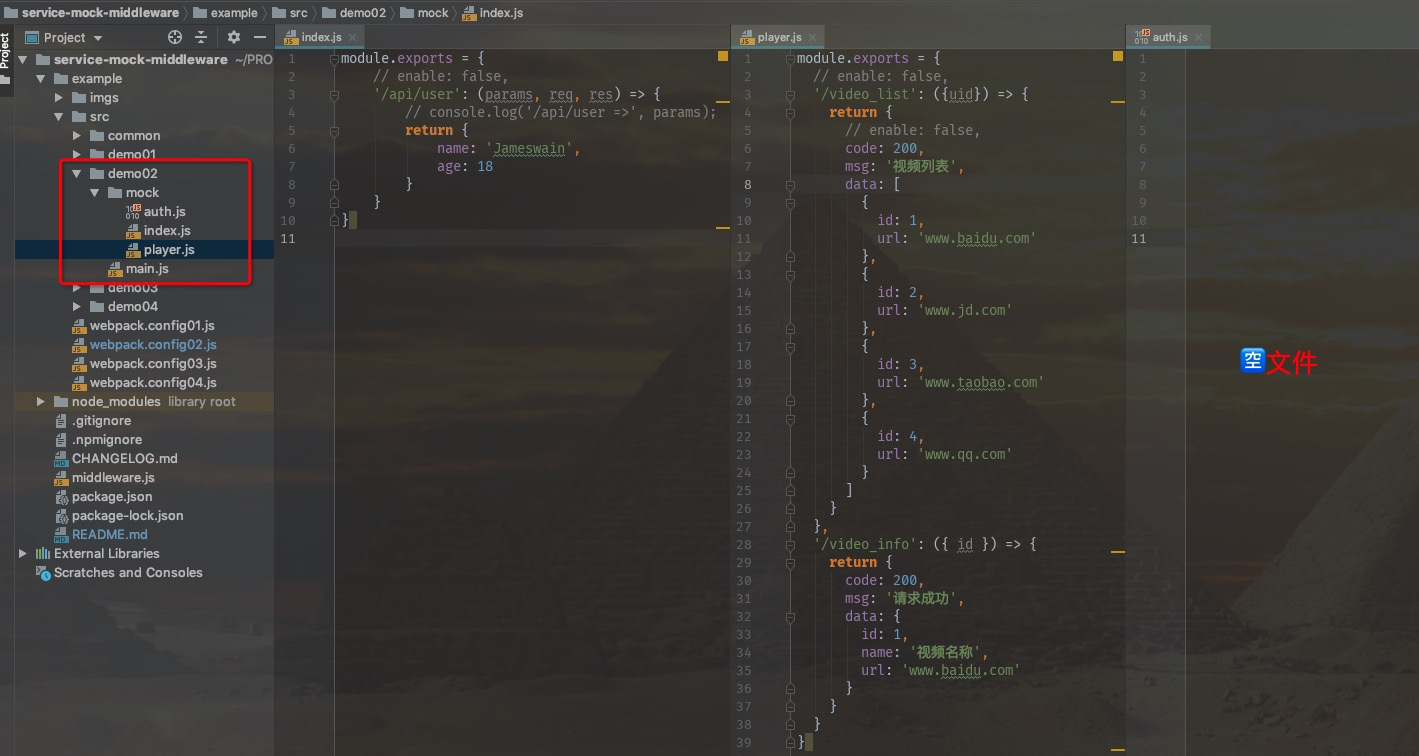
demo02/mock文件夹中有三个mock配置文件,其中auth.js文件是空的,service-mock-middleware会自动过滤掉这种文件,service-mock-middleware中间件会自动识别index.js和player.js文件中的mock数据配置,这种mock配置文件拆分比较适合在大型PC项目中进行使用。
5、在第二个入口文件中发送ajax请求:
import $ from '../common/ajax'
console.log('main.js.....');
$.get('/api/user');
$.get('/video_list');
$.get('/video_info');6、启动命令查看效果:
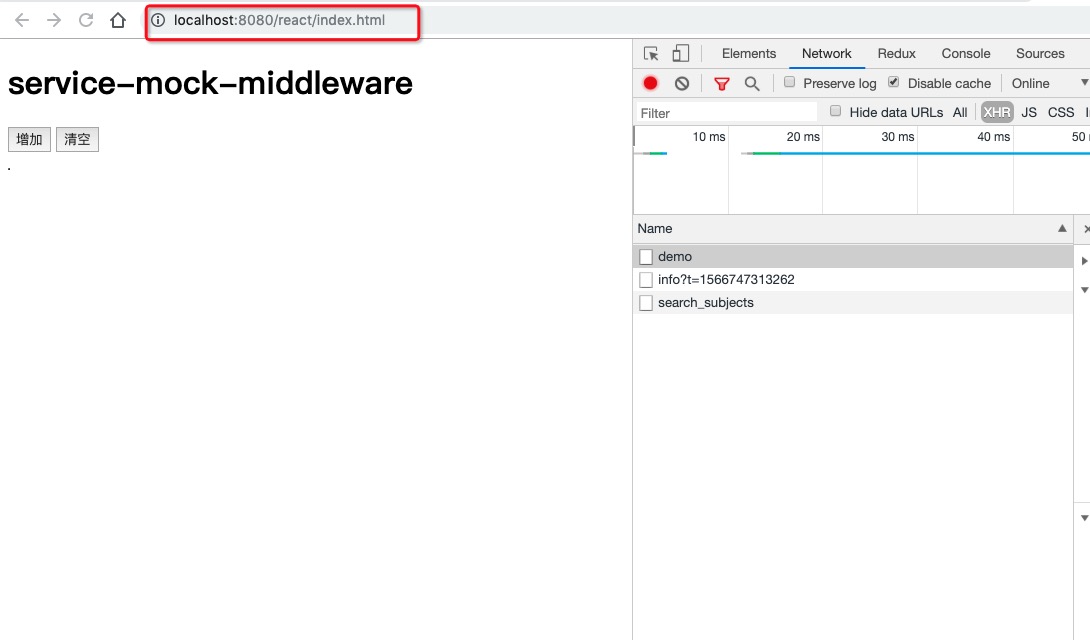
浏览器访问http://localhost:8080/ 查看运行效果,你可以尝试修改mock配置文件,观察返回数据的结果。
1、在webpack的配置文件中使用service-mock-middleware中间件:
// example/webpack.config03.js
const path = require('path');
const HtmlWebpackPlugin = require('html-webpack-plugin');
const bodyParser = require('body-parser');
const serviceMockMiddleware = require('service-mock-middleware');

module.exports = {
    mode: 'development',
    entry: path.resolve(__dirname, 'src', 'demo03', 'index.js'),
    output: {
        filename: '[name].[hash].js',
        path: path.resolve(__dirname, 'dist')
    },
    devtool: 'inline-source-map',
    devServer: {
        /**
         * 提供在服务器内部所有其他中间件之前执行自定义中间件的能力。
         * @param app
         * @param server
         */
        before(app, server) {
            // 创建 application/json parser(POST请求) 解析器中间件:它把post请求参数放在req.body中
            app.use(bodyParser.json());
            // POST 创建 application/x-www-form-urlencoded URL编码解析器中间件
            app.use(bodyParser.urlencoded({ extended: false }));
            // 使用mock中间件
            app.use(serviceMockMiddleware({ webpackConfig: module.exports, server }));
        }
    },
    plugins: [
        new HtmlWebpackPlugin({
            template: path.resolve(__dirname,'src/common/index.html'),          // html模版
            filename: path.resolve(__dirname, 'dist', 'index.html'),            // html输出位置
        })
    ]
}2、在mock配置文件中实现增删改查:
// example/src/demo03/mock/index.js
//  mock配置文件,key就是接口的URL地址,value可以是对象,或者函数,函数更灵活,函数有三个参数,分别是:请求参数,request对象,response对象
const ARR_ROLES = 'ARR_ROLES';
module.exports = {
    /**
     * 增
     * @param params 请求参数
     * @param req 请求对象,通过它获取请求相关信息
     * @param req.app 表示服务级范围,app.set存储数据到服务上,服务没有关闭数据就一直在。
     * @param rep 响应对象,通过它设置响应信息
     */
    '/api/add': (params, req, res) => {
        // 从req.app中获取数据
        const arrRoles = req.app.get(ARR_ROLES) || [];
        // 角色数组前边添加数据
        arrRoles.unshift(params);
        // 将添加的数据保存到req.app里
        req.app.set(ARR_ROLES, arrRoles);
        return {
            status: 0,
            message: '增加成功'
        };
    },
    /**
     * 删
     * @param params 请求参数
     * @param req 请求对象,通过它获取请求相关信息
     * @param rep 响应对象,通过它设置响应信息
     */
    '/api/del': ({ id }, { app }, res) => {
        const arrRoles = app.get(ARR_ROLES);
        arrRoles.splice(id, 1);
        app.set(ARR_ROLES);
        return {
            status: 0,
            message: '删除成功'
        }
    },
    /**
     * gai改
     * @param id
     * @param app
     */
    '/api/edit': (params, { app }) => {
        const arrRoles = app.get(ARR_ROLES);
        arrRoles[params.id] = params;
        app.set(ARR_ROLES);
        return {
            status: 0,
            message: '修改成功'
        }
    },
    /**
     * 查
     * @param params 请求参数
     * @param req 请求对象,通过它获取请求相关信息
     * @param rep 响应对象,通过它设置响应信息
     */
    '/api/list': (params, req, res) => {
        const arrRoles = req.app.get(ARR_ROLES) || [];
        return arrRoles;
    },
    /**
     * 清空
     * @param params
     * @param req
     * @param res
     */
    '/api/clear': (params, req, res) => {
        req.app.set(ARR_ROLES, []);
        return {
            status: 0,
            message: '清空成功'
        }
    }
}3、在模版文件中添加两个按钮和一个表格元素:
<!--
example/src/common/index.html
-->
<!DOCTYPE html>
<html lang="en">
<head>
    <meta charset="UTF-8">
    <meta name="viewport" content="width=device-width, initial-scale=1.0">
    <meta http-equiv="X-UA-Compatible" content="ie=edge">
</head>
<body>
    <h1>service-mock-middleware</h1>
    <p>
        <button id="add">增加</button>
        <button id="clear">清空</button>
    </p>
    <p>
        <table border="1" cellpadding="0" cellspacing="0">
            <tbody>
            </tbody>
        </table>
    </p>
</body>
</html>4、在mock文件夹中添加一个data.json文件,里边存放一部分mock数据:
{
  "arrRoles": [
    {
      "name": "孙膑",
      "cover": "https://gss1.bdstatic.com/-vo3dSag_xI4khGkpoWK1HF6hhy/baike/s%3D220/sign=df1fde4da5d3fd1f3209a538004f25ce/aa18972bd40735fabb5903da93510fb30f240823.jpg"
    },
    {
      "name": "庞涓",
      "cover": "https://gss3.bdstatic.com/-Po3dSag_xI4khGkpoWK1HF6hhy/baike/s%3D220/sign=a9f5340cb2096b63851959523c328733/30adcbef76094b360f1ce8ceafcc7cd98d109d03.jpg"
    },
    {
      "name": "苏秦",
      "cover": "https://gss1.bdstatic.com/-vo3dSag_xI4khGkpoWK1HF6hhy/baike/s%3D220/sign=4af0c8374ea7d933bba8e3719d4bd194/86d6277f9e2f07086d7bd823e524b899a901f293.jpg"
    },
    {
      "name": "张仪",
      "cover": "https://gss1.bdstatic.com/9vo3dSag_xI4khGkpoWK1HF6hhy/baike/s%3D220/sign=8325bce706d162d981ee651e21dfa950/242dd42a2834349b82169ca6c5ea15ce36d3be85.jpg"
    },
    {
      "name": "王翦",
      "cover": "https://gss3.bdstatic.com/-Po3dSag_xI4khGkpoWK1HF6hhy/baike/s%3D220/sign=dc207cda8ad6277fed12353a18381f63/7acb0a46f21fbe0930422b7566600c338744adb7.jpg"
    },
    {
      "name": "李牧",
      "cover": "https://gss2.bdstatic.com/9fo3dSag_xI4khGkpoWK1HF6hhy/baike/s%3D220/sign=ba358f12f6f2b211e02e824cfa806511/ae51f3deb48f8c543ee32c4e37292df5e0fe7f9b.jpg"
    },
    {
      "name": "商鞅",
      "cover": "https://gss3.bdstatic.com/-Po3dSag_xI4khGkpoWK1HF6hhy/baike/s%3D220/sign=0062472cc78065387feaa311a7dca115/95eef01f3a292df5738f6e77b1315c6034a87300.jpg"
    },
    {
      "name": "李斯",
      "cover": "https://gss0.bdstatic.com/-4o3dSag_xI4khGkpoWK1HF6hhy/baike/s%3D220/sign=571d776dc68065387feaa311a7dda115/95eef01f3a292df524f05e36b0315c6034a873e6.jpg"
    },
    {
      "name": "吕不韦",
      "cover": "https://gss3.bdstatic.com/7Po3dSag_xI4khGkpoWK1HF6hhy/baike/s%3D220/sign=f90021bd306d55fbc1c671245d234f40/11385343fbf2b2114c84c82dc78065380cd78e2f.jpg"
    },
    {
      "name": "乐毅",
      "cover": "https://gss0.bdstatic.com/-4o3dSag_xI4khGkpoWK1HF6hhy/baike/s%3D220/sign=63f40882a5ec8a13101a50e2c7029157/5ab5c9ea15ce36d3e1e1af5d36f33a87e850b1f1.jpg"
    },
    {
      "name": "白起",
      "cover": "https://gss2.bdstatic.com/9fo3dSag_xI4khGkpoWK1HF6hhy/baike/s%3D220/sign=9aa4f3880f3b5bb5bad727fc06d2d523/2e2eb9389b504fc267f24226e9dde71190ef6d60.jpg"
    },
    {
      "name": "田单",
      "cover": "https://gss2.bdstatic.com/-fo3dSag_xI4khGkpoWK1HF6hhy/baike/s%3D220/sign=8719fe71d054564ee165e33b83df9cde/d53f8794a4c27d1e1c56f9a616d5ad6eddc43864.jpg"
    }
  ]
}5、在入口文件中编写增删改查逻辑:
import $ from '../common/ajax'
import { arrRoles } from './mock/data'

/**
 * 查询
 */
function list() {
    $.getJSON('/api/list', arrRoles => {
        const arrHtmls = arrRoles.map(({ name, cover }, i) => (`
        <tr>
          <td align="center">${i + 1}</td>
          <td width="60" align="center">${name}</td>
          <td><img src="${cover}" alt=""/></td>
          <td width="100" align="center">
            <button id="del-${i}" val="${i}">删除</button>
            <button id="edit-${i}" val="${i}">修改</button>
          </td>
        </tr>
      `));
        document.querySelector('tbody').innerHTML = arrHtmls.join('');
    });
}

/**
 * 添加
 */
function add() {
    document.querySelector('#add').addEventListener('click', function () {
        $.post('/api/add?age=28', arrRoles[parseInt(Math.random() * arrRoles.length)], function (res) {
            console.log(res);
            list();
        });
    });
}

/**
 * 删除
 */
function del(id) {
    $.get(`/api/del?id=${id}`, function (res) {
        console.log(res);
        list();
    });
}

/**
 * 修改
 */
function edit(id) {
    $.post(`/api/edit`, { id, ...arrRoles[parseInt(Math.random() * arrRoles.length)] } , function (res) {
        console.log(res);
        list();
    });
}

/**
 * 清空
 */
function clear() {
    $.get(`/api/clear`, function (res) {
        console.log(res);
        list();
    });
}

function body() {
    document.querySelector('body').addEventListener('click', function (e) {
        const arr = e.target.id.split('-');
        console.log(arr)
        if (arr[0] === 'del') {
            del(arr[1])
        } else if (arr[0] === 'edit') {
            edit(arr[1]);
        } else if (arr[0] === 'clear') {
            clear();
        }
    });
}

document.addEventListener('DOMContentLoaded', function () {// 删除
    add();
    body();
    list();
});6、运行命令,查看效果:
npm run example03 //浏览器访问:http://localhost:8080/index.html
如果你的devServer配置了publicPath属性,那你就必须要把publicPath属性传给service-mock-middleware,否则会出现路径匹配失败。