
react-table-copy-wrapper
v1.0.3
Published
A wrapper for ReactTable that provide additional functionalities
Downloads
26

Readme
ReactTableCopyWrapper
![]()
![]()
A wrapper that provides functionalities to select and copy cells from ReactTables.
Run Demo
To run the demo, you need to download a copy of this project. In your local copy of the project, complete the following:
- Build the component by typing this in the terminal:
yarn build- Run the example demo page by typing this next:
cd example
yarn start- The demo page will load up to
localhost:3000by default. It will load 3 ReactTables which have this wrapper attached to it.
Selecting Cells
Each row and column in the ReactTable has a state to track if it is selected or not.
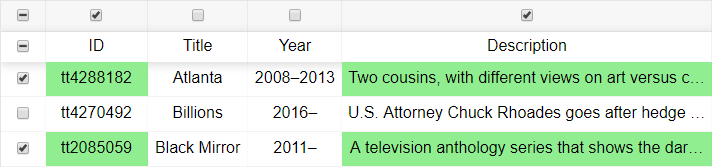
A cell is only considered selected when both its row and column is selected.
When a cell is selected, its background turns green. If it becomes unselected, its background returns to white.
There are 2 ways to select cells:
1. Checkbox Selectors
This method is best used for selecting a large number of cells.
Row & Column Selectors
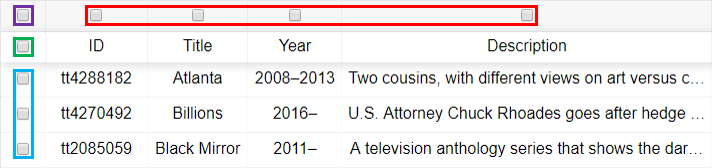
Upon initialisation, all checkbox selectors in the table are unchecked.
The Row Selectors and Column Selectors are found in the blue and red boxes respectively. They represent the state (selected/unselected) of the row or column they lie in.
When the row or column's Selector is checked, it is selected. Otherwise, when its Selector is unchecked, it is unselected.
Clicking on a Row or Column Selector will toggle that row or column's state.
The All Row Selector & All Column Selector
The All Row Selector and All Column Selector can be found in the green and purple boxes respectively. They represent whether every row or column in the table is selected respectively.
Clicking on them will toggle the state of every row or column in the table respectively.
When they are checked, every row or column in the table is selected respectively. When they are unchecked, every row or column in the table is deselected respectively.
Indeterminate State
The All Row Selector and All Column Selector have a third state called "Indeterminate". This state represents that neither all or none of the rows or columns in the table are selected respectively.
They will land in this state when an individual Row or Column Selector is clicked on respectively.
If they are clicked on while being indeterminate, they will become unchecked. As such, every row or column in the table will be deselected respectively.
2. Specific Cell Selector
This method is best used for selecting a small number of cells.
Clicking on an individual cell will select or deselect it by altering the state of its row and column.
If the cell is unselected, either its row, column or both are unselected. When it is clicked on, both its row and column will become selected, thus selecting the cell.
If the cell is already selected, both its row and column are selected. When it is clicked on, both its row and column will be deselected, thus deselecting the cell.
Note that it is possible for multiple cells to be selected or deselected at once with this method. This is because the clicked cell's row and column states are affected, potentially affecting other cells in the same column or row. This ensures that the selected cells always produce a table when copied and pasted.
Copying Selected Cells
Once you have selected which cells you want to copy, you can now copy them to your clipboard.
There are 2 ways to copy cells:
1. Copy Shortcut Command
This method is best used when copying from a single ReactTable.
Pressing Control+C for Windows, or Command+C for Mac, will copy the selected cells of the last table to be interacted with.
Note: If there is a cursor selection on the page, that selection will be copied instead.
2. Copy Selected Cells Button
This method is best used when copying from one ReactTable after another.
A "Copy Selected Cells" button is added at the top of each ReactTable. Clicking it will copy the selected cells in its table.
Note: This method is not affected by which table was the last to be interacted with.
Pasting Cells
Once the cells are copied, they can be pasted into any application that is able to render a table, such as Microsoft Excel, Word or Outlook.
The pasted output will be a table with only the selected cells and their headers. Its style is not dependent on that of the ReactTable.
Default Style
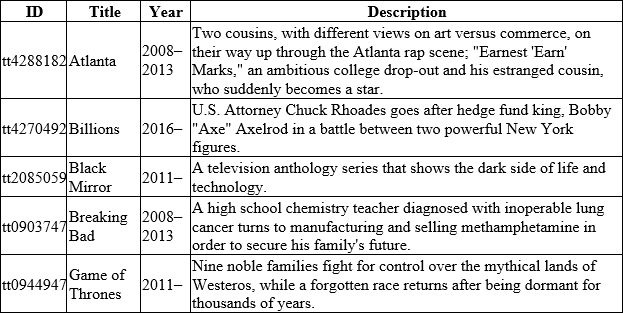
By default, the pasted output will be a table with black text and borders and bolded headers.
Custom Style
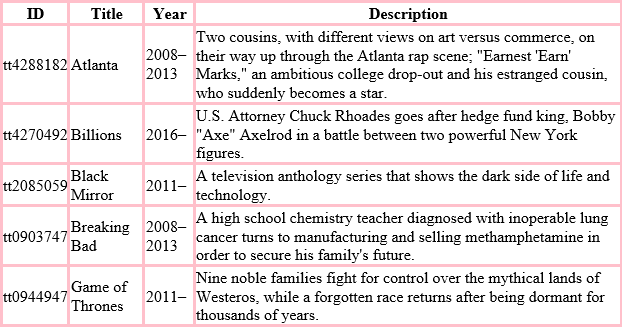
In the demo, Table 3 shows an example of how a custom style could be applied to a ReactTable's pasted output. If cells copied from Table 3 are pasted, the pasted table will have a pink border applied onto it.
To see how a custom style is implemented, refer to the "Add the Table" segment in the "Incorporation" section below.
Incorporation
Installing Component to Projects
Run the following in your project terminal.
npm install react-table-copy-wrapperDefine Data Source
Create a JSON file to serve as the ReactTable's source of data. It must contain 2 arrays to store the information of the table's headers and rows.
"headers": [
      {
        "Header": "ID",
        "accessor": "imdbID"
      },
      {
        "Header": "Title",
        "accessor": "title"
      },
      {
        "Header": "Year",
        "accessor": "year"
      },
      {
        "Header": "Description",
        "accessor": "description"
      }
    ],
The header array should contain JSON objects that each represent a column in the table.
The Header value will be the name of the header in the table. The accessor value will be the key to determine which part of a row's information will be placed under that header.
The items in the header array should match the number and order of columns to be displayed in the ReactTable. For example with the above header array, the table's order of columns will be ID, Title, Year, then Description.
"rowData": [
      {
        "title": "Atlanta",
        "year": "2008–2013",
        "description": "Two cousins, with different views on art versus commerce, on their way up through the Atlanta...",
        "imdbID": "tt4288182"
    },
    {
        "title": "Billions",
        "year": "2016–",
        "description": "U.S. Attorney Chuck Rhoades goes after hedge fund king, Bobby \"Axe\" Axelrod in a battle...",
        "imdbID": "tt4270492"
    },
    {
        "title": "Black Mirror",
        "year": "2011–",
        "description": "A television anthology series that shows the dark side of life and technology.",
        "imdbID": "tt2085059"
    }
]
The rowData array should contain JSON objects that each represent a row in the table.
The table determines what information is placed under each column by matching each key to a header's accessor value.
Add Table to Page
Once a ReactTable's data source has been created, it can be created with this wrapper attached to it and added to a page.
Import the Component
The first step is to import React and the wrapper to your React component.
import React, { Component } from "react";
import ReactTableCopyWrapper from "react-table-wrapper";
You should also import ReactTable's default table style. Otherwise, the ReactTable may not render to look like a table.
import "react-table/react-table.css";Next, import the ReactTable's data source.
import data from "./anywhere/data.json";Add the Table
You can add the wrapper to a React component using 4 props:
- tableId (string): Used as an HTML ID on the page to identify the table. Ensure that it is unique on the page.
- title (string): Used as the title that appears above at the top of the ReactTable.
- headers (array): Used to create the table headers.
- data (array): Used to create the table rows.
class Example extends Component {
...
render () {
    return (
      <ReactTableCopyWrapper
          tableId="Table1"
          title="Table 1"
          headers={data.headers}
          data={data.rowData}
      />
    )
  }
}
You can also add an optional prop:
- pasteStyle (string): HTML style tag. Used to define a custom style for the pasted table output.
render () {
    return (
      <ReactTableCopyWrapper
          tableId="Table3"
          title="Table 3"
          headers={data.headers}
          data={data.rowData}
          pasteStyle="<style>table {border-collapse: collapse;}
          table, td, th {border: 3px solid pink;}</style>"
      />
    )
}