react-native-tpicker
v0.1.1
Published
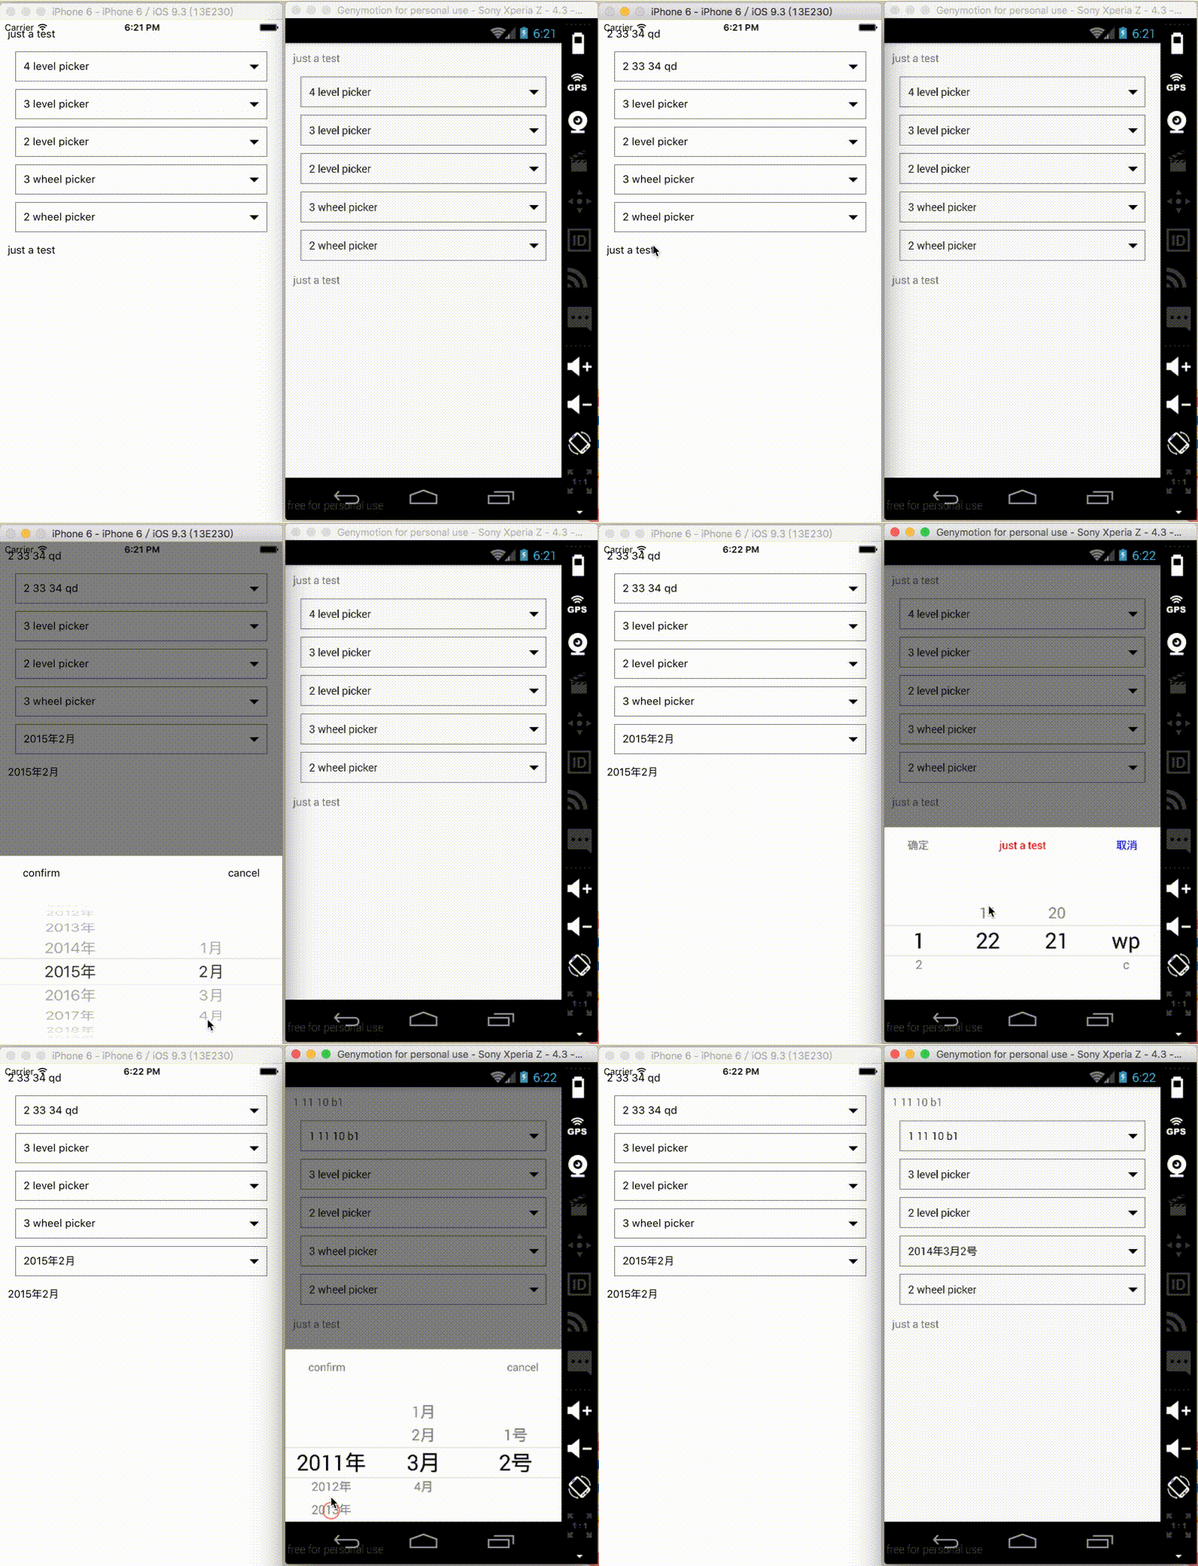
react native Picker component for both Android and iOS.
Downloads
7
Readme
###The React-Native-Picker react native Picker component for both Android and iOS.
###Attention
- This project has already transfered to react-native-picker-xg, and will not update.
- For more about this project ,see react-native-picker in the github. ###The environment
- node v6.1.0
- npm v3.9.3
- react v15.0.2
- react-native v0.26.2
Main
- The drawing of the wheel of the android come from react-native-picker-android.
- For the iOS, using PickerIOS as the basic.
How to install
npm install react-native-tpicker --saveExample

Two ways:
- the first one
react-native init pubtest
npm install react-native-tpicker --save

change the index.android.js or the index.ios.js into:
/**
* Sample React Native App
* https://github.com/facebook/react-native
*/

import React, { Component } from 'react';
import {
 AppRegistry,
 View,
 Text,
 StyleSheet,
 Platform,
 PickerIOS,
 TouchableOpacity,
 TextInput,
 TouchableHighlight
} from 'react-native';
import {Cpicker,Tpicker} from 'react-native-tpicker';


let wheel2 = [
 {
   amc: {
     name: '2011年',
   },
   alfa: {
     name: '2012年',
   },
   aston: {
     name: '2013年',
   },
   audi: {
     name: '2014年',
   },
   austin: {
     name: '2015年',
   },
   borgward: {
     name: '2016年',
   },
   buick: {
     name: '2017年',
   },
   cadillac: {
     name: '2018年',
   },
   chevrolet: {
     name: '2019年',
   },
 },
 {
   amc1: {
     name: '1月',
   },
   alfa1: {
     name: '2月',
   },
   aston1: {
     name: '3月',
   },
   audi1: {
     name: '4月',
   },
 },
]
let wheel3 = [
 {
   amc: {
     name: '2011年',
   },
   alfa: {
     name: '2012年',
   },
   aston: {
     name: '2013年',
   },
   audi: {
     name: '2014年',
   },
   austin: {
     name: '2015年',
   },
   borgward: {
     name: '2016年',
   },
   buick: {
     name: '2017年',
   },
   cadillac: {
     name: '2018年',
   },
   chevrolet: {
     name: '2019年',
   },
 },
 {
   amc1: {
     name: '1月',
   },
   alfa1: {
     name: '2月',
   },
   aston1: {
     name: '3月',
   },
   audi1: {
     name: '4月',
   },
 },
 {
   cadillac2: {
     name: '1号',
   },
   chevrolet2: {
     name: '2号',
   },
 }

];

let level3Data =
{
 "四川":{
   "成都":["青羊区","武侯区","温江区"],
   "绵阳":["绵阳中学","核弹基地"],
   "广安":["容县","武胜"]
 },
 "浙江":{
   "杭州":["西湖","银泰","玉泉"],
   "绍兴":["X1","X2","X3"],
   "place":["Y1","Y2","Y3","Y4","Y5"],
 },
 "some":{
   "place1":["Z1","Z2","Z3"],
   "place2":["Z4","Z5","Z6","Z7"],
   "place3":["A1","A2","A3","A4","A5","A6"],
 }
}
let level2Data = {
 "四川":["w","e","q"],
 "浙江":["ww","ee","qq"],
}
let level4Data={
 "1":{
   "11":{
     "10":['a1','b1','c1'],
     "01":['d1','f1'],
   },
   "22":{
     "20":['w','d','qq'],
     '21':['wp','c'],
   },
 },
 "2":{
   "33":{
     "34":['e','qd','cd'],
     "56":['dw','vf','we'],
   },
   "09":{
     "v":['bb','t','bd'],
     'p':['vd','der','f'],
   }
 }
}

class TpickerEx extends Component {
 constructor(props, context){
   super(props, context);
   this.state = {
     str:"just a test",
     str1: "just a test",
   }
 }


 render() {
   return (
     <View style={testStyle.container}>
       <Text style={{margin:10}}>{this.state.str}</Text>
       <Cpicker
         inputValue={"4 level picker"}
         level = {4}
         selectIndex = {[0,1,1,0]}
         data = {level4Data}
         visible = {false}
         transparent = {true}
         onResult = {(str)=>{
                               this.setState({str:str});

                               }}
       >
       </Cpicker>
       <Cpicker
         inputValue={"3 level picker"}
         level = {3}
         selectIndex = {[0,1,0]}
         data = {level3Data}
         visible = {false}
         transparent = {true}
       >
       </Cpicker>
       <Cpicker
         inputValue={"2 level picker"}
         level = {2}
         selectIndex = {[0,1]}
         data = {level2Data}
         visible = {false}
         transparent = {true}
       >
       </Cpicker>
       <Tpicker
         inputValue ={"3 wheel picker"}
         inputStyle = {testStyle.textInput}
         confirmBtnText = {"confirm"}
         cancelBtnText = {"cancel"}
         data = {wheel3}
         selectIndex = {[0,2,1]}
         visible = {false}
         transparent = {true}
       >
       </Tpicker>
       <Tpicker
         inputValue ={"2 wheel picker"}
         inputStyle = {testStyle.textInput}
         confirmBtnText = {"confirm"}
         cancelBtnText = {"cancel"}
         data = {wheel2}
         selectIndex = {[0,2]}
         onResult ={(str) => {
                 this.setState({str1:str});
                 }}
         visible = {false}
         transparent = {true}
       >
       </Tpicker>
       <Text style={{margin:10}}>{this.state.str1}</Text>
     </View>

   );
 }
}

const testStyle = StyleSheet.create({
 container: {
   flex: 1,
   justifyContent: 'center',
   alignItems: 'stretch',
 },

})
AppRegistry.registerComponent('pubtest', () => TpickerEx);
- the second one(in this way, please make sure the version of the react matches the need of the react-native)
- download the zip from the github
npm install react --save npm install react-native --save npm install react-native-vector-icons --save- the example has already in the index.android.js and index.ios.js
Properties
- selectIndex: [number] ,initial selected item
- selfStyle: CSS-layout, the innerContainer's style
- inputStyle: CSS-layout, the textInput's style
- confirmBtnText: string, the text of the confirm button
- cancelBtnText: string, the text of the cancel button
- confirmBtnStyle: CSS-layout, the confirm button's style
- cancelBtnStyle: CSS-layout, the cancel button;s style
- enable: bool, to enable or disable the textInput
- inputValue: string, the initial text of the textInput
###Method
- onResult: function, to expose the result you chose.
###Data structure Basicly, you can realize as more as wheels as you like if you follow the data structure we set for you. However, take the size of the phone into consideration, we do not recommend more than 4 wheels.
- For the basic pickers: It's an array, the count of the wheel depends on how many objects you have. And the content of the wheel depends on the name of one objects of the outer objects.
let wheel2 = [
  {
    amc: {
      name: '2011年',
    },
    alfa: {
      name: '2012年',
    },
    aston: {
      name: '2013年',
    },
    audi: {
      name: '2014年',
    },
    austin: {
      name: '2015年',
    },
    borgward: {
      name: '2016年',
    },
    buick: {
      name: '2017年',
    },
    cadillac: {
      name: '2018年',
    },
    chevrolet: {
      name: '2019年',
    },
  },
  {
    amc1: {
      name: '1月',
    },
    alfa1: {
      name: '2月',
    },
    aston1: {
      name: '3月',
    },
    audi1: {
      name: '4月',
    },
  },
]- For the cascade wheels: It'a an object in total, and the keys of one object become the content of the wheel. The last wheel's content is an array.
let level3Data =
{
  "四川":{
    "成都":["青羊区","武侯区","温江区"],
    "绵阳":["绵阳中学","核弹基地"],
    "广安":["容县","武胜"]
  },
  "浙江":{
    "杭州":["西湖","银泰","玉泉"],
    "绍兴":["X1","X2","X3"],
    "place":["Y1","Y2","Y3","Y4","Y5"],
  },
  "some":{
    "place1":["Z1","Z2","Z3"],
    "place2":["Z4","Z5","Z6","Z7"],
    "place3":["A1","A2","A3","A4","A5","A6"],
  }
}
For more information, you can see the examples.
