npm package discovery and stats viewer.

Discover Tips

  • General search

    [free text search, go nuts!]

  • Package details

    pkg:[package-name]

  • User packages

    @[username]

Sponsor

Optimize Toolset

I’ve always been into building performant and accessible sites, but lately I’ve been taking it extremely seriously. So much so that I’ve been building a tool to help me optimize and monitor the sites that I build to make sure that I’m making an attempt to offer the best experience to those who visit them. If you’re into performant, accessible and SEO friendly sites, you might like it too! You can check it out at Optimize Toolset.

About

Hi, 👋, I’m Ryan Hefner  and I built this site for me, and you! The goal of this site was to provide an easy way for me to check the stats on my npm packages, both for prioritizing issues and updates, and to give me a little kick in the pants to keep up on stuff.

As I was building it, I realized that I was actually using the tool to build the tool, and figured I might as well put this out there and hopefully others will find it to be a fast and useful way to search and browse npm packages as I have.

If you’re interested in other things I’m working on, follow me on Twitter or check out the open source projects I’ve been publishing on GitHub.

I am also working on a Twitter bot for this site to tweet the most popular, newest, random packages from npm. Please follow that account now and it will start sending out packages soon–ish.

Open Software & Tools

This site wouldn’t be possible without the immense generosity and tireless efforts from the people who make contributions to the world and share their work via open source initiatives. Thank you 🙏

© 2024 – Pkg Stats / Ryan Hefner

position

v1.1.0

Published

简单实用的定位工具,将一个 DOM 节点相对于另一个 DOM 节点进行定位操作。

Downloads

33

Readme

Position


spm package Build Status Coverage Status

简单实用的定位工具,将一个 DOM 节点相对于另一个 DOM 节点进行定位操作。


安装

$ npm install spm -g
$ spm install position

定位原理

Position 组件的定位原理是,通过两个对象分别描述定位元素及其定位点,然后将其定位点重合。

比如有基准元素 A 和 目标元素 B ,先设定 A 的定位点为左上角,B 的定位点为中央。 则分别描述为 { element: A, x: 0, y: 0 }{ element: B, x: '50%', y: '50%' },然后将 B 的中央定位到 A 的左上角,就完成了定位。

定位原理如下图,x 代表横轴,y 代表纵轴。
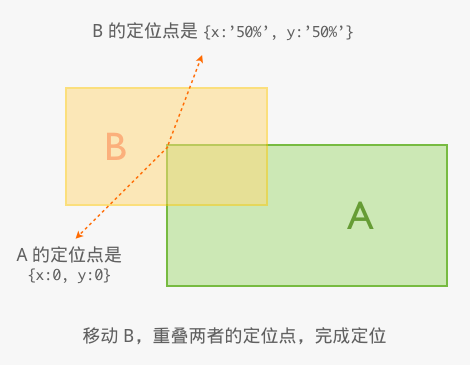
定位原理

使用说明

pin Position.pin(pinObject, [baseObject])

基础定位方法,接收两个参数。

  1. pinObject:目标定位元素,必选。

    类型为字面量对象 { element: a, x: 10, y: 10 },element 为需定位元素, x 和 y 表示定位元素的定位点。

    也可简单写成 DOM 节点 a,相当于 { element: a, x: 0, y: 0 },表示定位点是节点左上角。

  2. baseObject:基准定位元素,可选。

    类型为字面量对象 { element: b, x: 10, y: 10 },element 为基准定位元素,x 和 y 表示基准定位元素的定位点。

    也可简单写成 DOM 节点 a,相当于 { element: a, x: 0, y: 0 },表示定位点是节点左上角。

    当 element 缺省时,表示 pinObject 相对屏幕可见区域的左上角定位。比如可以写成

    Position.pin(a, { x: 10, y: 10 });    // 这样后一个参数可简单理解为偏移量

    或写成

    Position.pin({ element: a, x: -10, y: -10 });

center Position.center(pinElement, [baseElement])

居中定位,接收两个参数,将 pinElement 定位在 baseElement 元素的中央位置。

  1. pinElement:定位节点,必选。

  2. baseElement:基准定位节点,可选。缺省时表示将 pinElement 定位在屏幕中央。

VIEWPORT Position.VIEWPORT

当前可视区域的伪元素,当需要相对于当前可视区域定位时,上述参数的 element 可传入 Position.VIEWPORT。

比如相对于屏幕中央定位:

Position.pin(
    { element: a, x: 'center', y: 'center' }, 
    { element: Position.VIEWPORT, x: 'center', y: 'center' }
);

或写成

Position.center(a, Position.VIEWPORT);

最佳实践

  1. 定位元素到可视区域左上角

    Position.pin(a, { x: 0, y: 0 });    // 后一个参数可理解为偏移量
  2. 定位元素到基准元素位置向右偏移 20px

    Position.pin(a, { element: b, x: '20px', y: 0 });
  3. 定位元素到基准元素下方 20px 的位置

    Position.pin(a, { element: b, x: 0, y: '100%+20px' });
  4. 定位元素到基准元素正中央

    Position.center(a, b);
  5. 定位元素到基准元素右方中间位置

    Position.pin(a, { element: b, x: 'right', y: 'center' });

    或者

    Position.pin(a, { element: b, x: '100%', y: '50%' });
  6. 定位元素到可视区域中央

    Position.center(a);

注意事项

  • IE8 下,当文档流中定位元素在基准元素的相邻前方,并且不是body的第一个元素时,基准元素有可能会因为未 reflow 而导致 margin-top 失效,所以要尽量避免定位元素与基准元素相邻并在其之前。