
pgfy
v1.5.5
Published
A Node.js Toolbox for API and Microservices development.
Downloads
32
Maintainers
 danihenrique
Readme
PgFy — A Node.js Toolbox for API and Microservices development.
![]()
![]()
PgFy automatically generate the CRUD endpoints for your Postgres database. Allowing you easily extend it using components pattern.
Features
- Auto-generate: Automatically generates endpoints for your database;
- Pre-configured: Fastify comes pre-configured with some of the best plugins available;
- Extensible: Extends your API using "Components pattern";
- Microservices support: Easily scale your application using "Microservice pattern";
- Cache support: Easily cache your data using built-in Redis Client;
- Authentication support: Easily add authentication for your endpoints;
- Log management: Easily access all your logs;
- BlackBox Testing support: Adds your input and output specs for Runtime Testing;
- Postgres Migrations support: Easily manage your migrations;
- Uploader support: Easily upload files/images to the Cloud;
- Email support: Easily send emails;
- APM support: Catch Exceptions and be notified;
- Auto-Documentation: Access all available API endpoints using Swagger UI.
Table of Contents
- Motivation
- Getting started
- Tools built-in
- Postgres Database
- Authentication support
- Cache with built-in Redis client
- Log management
- Uploader Support
- Email Support
- APM Support
- Advanced Usage
- FAQ
- Contribution
- License
Motivation
My motivation for creating this tool was facilitate API and Microservices development. Inspired on LoopBack Framework.
Getting Started
Installation
It's available as an npm package.
Install PgFy locally via npm:
$ npm install --save pgfyTools built-in
Creating API's
PgFy Api is based on Fastify Framework, a fast and low overhead web framework, for Node.js.
How to use PgFy Api?
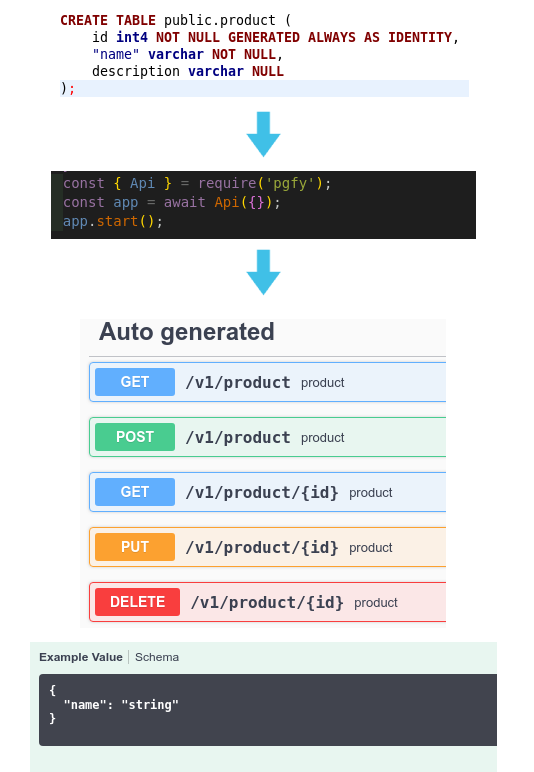
app.js
const { Api } = require('pgfy');
const app = await Api({});
app.start();
The Api option automatically generates CRUD (Create, Read, Update, Delete) endpoints for your Postgres database. It's Plug-and-play and requires zero code. It also generates documentation, which is available at http://localhost:3000/documentation.
Plugins pre-configured:
NPM Modules pre-configured:
// my-new-component/controller.js
const users = [
  { user: 'barney', age: 36, active: true },
  { user: 'fred', age: 40, active: false },
  { user: 'pebbles', age: 1, active: true },
];
const usersActive = api.modules._.find(users, 'active');
console.log('Users active: ', usersActive);
// my-new-component/controller.js
const locationSet = {
Toronto: { latitude: 43.6667, longitude: -79.4167 },
Blumenau: { latitude: -26.920609799999998, longitude: -49.0745791 },
};
// Add your locations using the ".geo" instance.
api.geo.addLocations(locationSet, (err, reply) => {
if (err) console.error(err);
});
const options = {
withCoordinates: true, // Will provide coordinates with locations, default false
// withHashes: true, // Will provide a 52bit Geohash Integer, default false
withDistances: true, // Will provide distance from query, default false
order: 'ASC', // or 'DESC' or true (same as 'ASC'), default false
units: 'km', // or 'km', 'mi', 'ft', default 'm'
// count: 100, // Number of results to return, default undefined
accurate: true, // Useful if in emulated mode and accuracy is important, default false
};
const KM = 20;
api.geo.nearby(
{
latitude: request.params.latitude,
longitude: request.params.longitude,
},
KM,
options,
(err, locations) => {
if (err) return api.response(reply, 404, 'Locations not found!', {});
return api.response(reply, 200, 'Locations found', locations);
}
);Creating Microservices
PgFy Service uses the CoteJS framework, a Node.js library for building zero-configuration microservices.
MACHINE 1
/*
  In your API controller.js
*/
...
api.requester.send({
  type: 'ping',
  body: request.body,
  params: request.params,
}, (err, responseWithPong) => {
  if (err) return api.response(reply, 500, 'Timeout', {});
  return api.response(reply, 200, responseWithPong, {});
});
MACHINE 2
/*
  In your app.js
*/

const { Service } = require('pgfy');
const microservice = await Service('YOUR_SERVICE_FOLDER_NAME', {});

/*
  In your SERVICE /YOUR_SERVICE_FOLDER_NAME/management/router.js
*/
...
responder.on('ping', controller.ping);

/*
  In your SERVICE /YOUR_SERVICE_FOLDER_NAME/management/controller.js
*/
...
const controllers = {
  ping: async (req, cb) => {
    try {
      return cb(null, 'Pong');
    } catch (e) {
      return cb(e.message, false);
    }
  }
}
Postgres database
PgFy uses MassiveJS as a data mapper for Node.js that goes all in on PostgreSQL and fully embraces the power and flexibility of the SQL language and relational metaphors. Providing minimal abstractions for the interfaces and tools you already use, its goal is to do just enough to make it work with your data as easy and intuitive as possible, then get out of your way.
Massive is not an object-relational mapper (ORM)! It doesn't use models, it doesn't track state and it doesn't limit you to a single entity-based metaphor for accessing and persisting data. Massive connects to your database and introspects its schemas to build an API for the data model you already have: your tables, views, functions, and easily-modified SQL scripts.
Want to know more about Massive.js?
Database as API with PostgreSQL and Massive.js - Dian Fay at NDC Conferences
...
/*
  Retrieval
*/

// FindOne
const testFindOne = await db.some_database.findOne({ id: 1});

// Find All
const testFind = await db.some_database.find({ status: 'PENDING' });

// Count
const testCount = await db.some_database.count({ id: 1 });

/*
  Persistence
*/

// Save
const testSave = await db.some_database.save({ name: 'Daniel', age: 33 });

// Update
const rowId = 1;
const testUpdate = await db.some_database.update(rowId, { name: 'Daniel', age: 33 });

// Delete
const rowId = 1;
const testSave = await db.some_database.destroy(rowId);
MassiveJS advanced usage
Migrations Management
 const { Migrations } = require('pgfy');
 const migrations = await Migrations({});
 migrations.execute();
PgFy Migrations will search for SQL migrations files at "/$PROJECT_FOLDER/migrations/". Remember that you can change the database using environment variables.
Authentication support
Facebook Auth OAuth 2.0
Create and configure your app inside Facebook Developers page.
Set the environment variables 'PGFY_FACEBOOK_CLIENT_ID' and 'PGFY_FACEBOOK_CLIENT_SECRET' to enable it. Also set the variable 'PGFY_OAUTH2_FACEBOOK_CALLBACK_URI' for your domain like 'https://www.myapp.com/login/facebook/callback'. All those informations, must be same from Facebook Developers page.
How to persist the Facebook User profile in your database?
If you set the environment variable 'PGFY_FACEBOOK_PERSIST_PROFILE' to true, the following user object will be saved in your user table configured on 'PGFY_AUTH_USER_TABLE'.
const newUser = {
  name: 'String',
  email: 'String',
  gender: 'String',
  location: 'String',
  picture: 'String',
  facebook: 'Number',
  total_friends: 'Number',
};
JSON WebToken
To enable JSON WebToken Authentication, set the environment variable 'PGFY_AUTH_JWT_SECRET'.
// In your Login controller
...
// Validate your user (username/email and password), if its ok create a token and send back to the user
const token = api.jwt.sign(request.body);
reply.send({ token });
The API will validate all requests for a 'v1' endpoint, eg: '/v1/user/:userId', and also that it's not a '/login' or '/signup', looking to the Authorization header, eg: 'Bearer your_token_here'.
Session Authentication with Redis
To enable Session Authentication, set the environment variable 'PGFY_AUTH_SESSION_SECRET'.
Create a login component and set your User session, passing your User data with the required user_id field. Checkout Cache with built-in Redis client to know how to configure Redis Client.
// In your API login controller.js
...
// Set the user session object with your authenticated User object.

let session = await request.session.get();
if (session.user_id === undefined) {
  await request.session.set({
    user_id: 1, // Required field
    name: 'Guest',
  });
}
session = await request.session.get();
console.log(session);
// {id: "wPRh9dJBMnPagvChI+mvNpGw", user_id: "1", name: "Guest"}
// In your API logout controller.js
...
// Cleanup the User Session
const status = await request.session.store.delete_all('user_id', 1); // return true if successful Cache with built-in Redis client
How to setup the Redis inside PgFy?
You just need to configurate the environment variables 'PGFY_CACHE_REDIS_HOST' and 'PGFY_CACHE_REDIS_PORT', PgFy will automatically connect to it, and expose our built-in Redis Client into the Api/Service instance.
/*
  In your API controller.js
*/
function Controller(api, componentName) {
  const { redis } = api;
  const controllers = {
    helloWorld: async (request, reply) => {
      // GET or SAVE using IDs
      const paramId = 1;
      const foundId = await service.redis.get(paramId);
      if (!foundId) {
        const saveDataWithId = await service.redis.set(paramId,{ name: 'Save by ID' });
      }
      // GET or SAVE using Ojects
      const paramsObject = { id: 1 };
      const foundObject = await service.redis.get(paramsObject);
      if (!foundObject) {
        // Change the default EXPIRATION TIME in minutes.
        // You can also change globally using environment variables
        const saveDataWithObject = await service.redis.set(paramsObject,{ name: 'Save by object' }, 10);
      }
    },
  };
  return controllers;
}
module.exports = Controller;
Log management
Timber. io
Timber is a new kind of cloud-based logging system designed for applications and developers. Spend less time debugging and more time shipping.
How to enable Timber. io inside PgFY to catch all logs automatically? In your ".env" file, set your environment variable for Timber Key:
PGFY_LOGGER_TIMBER_KEY='YOUR_TIMBER_KEY'Uploader Support
Multipart/Form-data
To handle upload files in your controllers using Multipart/Form-dataset, the environment variable 'PGFY_UPLOAD_MEMORY_STORAGE' to true.
// In your API Router
...
api.post(
  `/v1/${componentName}/signup`,
  {
    preHandler: api.upload.toMemory.single('YOUR_FIELD_NAME'),
    schema: swagger.signup.schema
  },
  controller.signup
);
Amazon S3 Bucket
To Enable the Amazon S3 support, you need to set the environment variables 'PGFY_AWS_ACCESS_KEY' and 'PGFY_AWS_SECRET_ACCESS'. You must enable the Uploader support above, to handle the files in your controller.
If you want to upload an image and at the same time create a thumbnail, pass the parameter true, by default the Thumbnail will have the size 200x200, you can change it using the environment variables 'PGFY_AWS_S3_THUMB_WIDTH'.
// In your API controller
...
// Create the image file name
const keyName = `fileName.${imageExtension}`;
// Upload using Multipart/form-data
const imagesByMultiPart = await api.uploadToS3({
  bucket: 'YOUR_BUCKET_PATH',
  key: keyName,
  fileName: request.file.originalname,
  buffer: request.file.buffer, // File buffer
  acl: 'public-read',
  thumbnail: true, // Create a thumbnail. eg: profileImage-200x200.png
});
// Upload using Base64 data
const imagesByMultiPart = await api.uploadToS3({
  bucket: 'YOUR_BUCKET_PATH',
  key: keyName,
  buffer: request.body['YOUR_JSON_BASE64_FILED-HERE'],
  ContentEncoding: 'base64',
  acl: 'public-read',
  thumbnail: true, // Create a thumbnail. eg: profileImage-200x200.png
});
Email Support
Nodemailer
Nodemailer it's the most famous Email library. To enable it, you need to set the environment variables.
How to create your Nodemailer templates
.
└── emails
    └── YOUR_TEMPLATE_NAME
        ├── html.pug
        └── subject.pug
html.pug
p Hi #{name}subject.pug
= `Hi ${name}, welcome!!!`How to use Nodemailer inside your controller
// Inside your API controller
...
const { nodemailer } = api.email;
nodemailer.sendTemplate(
  'USER_EMAIL_HERE',
  { name: 'Demo' },
  'YOUR_TEMPLATE_NAME',
);
SendGrid
SendGrid it's a really easy and cheap email service. It allows you to create a powerful template using your website. To enable it, you need to set the environment variables.
...
const { sendgrid } = api.email;
const data = {
  name: 'Test'
}
sendgrid.sendTemplate = ('EMAIL_TO', data, 'YOUR_TEMPLATE_ID');
APM Support
Sentry
Sentry is an error tracking that helps developers monitor and fix crashes in real time. Iterate continuously. Boost efficiency. Improve user experience.
How to enable Sentry inside PgFY to catch all exceptions automatically? In your ".env" file, set your environment variable for Sentry DSN:
PGFY_APM_SENTRY_DSN='YOUR_SENTRY_DSN'/*
In your API controller.js
*/
function Controller(api, componentName) {
const controllers = {
helloWorld: async (request, reply) => {
try {
// Your code here...
return true;
} catch (e) {
// Send the error to APM method
api.apm(api, e);
return false;
}
},
};
return controllers;
}
module.exports = Controller;Advanced Usage
Controlling PgFy with environment variables
PgFy uses environment variables as your configuration guide. You can create a new file with ".env" name inside your project root folder, that will be loaded in your O.S as environment variables.
Terminal
$cat ./.env

PGFY_DATABASE_PG_DATABASE='your_database'
...
Here's a list of environment variables supported by PgFy:
| Variable name | Description |
| ----------------------------------------: | :----------------------------------------------------------------------------------------------------------------- |
| PGFY_API_NAME | API instance name. Default 'API'. |
| PGFY_API_HOST | API instance host. Default 127.0.0.1. |
| PGFY_API_PORT | API instance port. Default 3000. |
| PGFY_LOGGER_FILE | Enable API instance logger. Default false. |
| PGFY_API_COMPONENTS_PATH | The path to extend the API with components. Default '/src/components'. |
| PGFY_SERVICE_PATH | The path for your services. Default '/src/services'. |
| PGFY_DATABASE_PG_HOST | Postgres host. Default 127.0.0.1. |
| PGFY_DATABASE_PG_PORT | Postgres port. Default 5432. |
| PGFY_DATABASE_PG_DATABASE | Postgres database name. Default 'postgres'. |
| PGFY_DATABASE_PG_USER | Postgres username. Default 'postgres'. |
| PGFY_DATABASE_PG_PWS | Postgres password. Default ''. |
| PGFY_DATABASE_PG_SOFTDELETE | Postgres enable soft delete support using deleted table field. Default false |
| PGFY_DATABASE_MONGODB_URL | MongoDB Uri. Default 'mongodb://localhost:27017'. |
| PGFY_CACHE_REDIS_HOST | Redis host. |
| PGFY_CACHE_REDIS_PORT | Redis port. |
| PGFY_CACHE_REDIS_GEOREDIS | Redis Geolocation addon. Default true. See Using Redis Geolocation Addon |
| PGFY_CACHE_REDIS_EXPIRE_TIME | Redis Cache expiration time in minutes. Default 1 minute. |
| PGFY_EMAIL_SENDGRID_API_KEY | Your SendGrid Api key. |
| PGFY_EMAIL_SENDGRID_FROM | Your SendGrid From email contact, to be used when you send the messages. |
| PGFY_EMAIL_NODEMAILER_SERVICE | Set your Nodemailer Service. E.g: 'gmail' |
| PGFY_EMAIL_NODEMAILER_FROM | Your Nodemailer From email contact, to be used when you send the messages. |
| PGFY_EMAIL_NODEMAILER_USER | Your Nodemailer Authentication user. |
| PGFY_EMAIL_NODEMAILER_PASS | Your Nodemailer Authentication password. |
| PGFY_TLS_KEY_PATH | TLS Key Path. Default your $PROJECT_FOLDER/server.key. |
| PGFY_TLS_CERT_PATH | TLS Cert Path. Default your $PROJECT_FOLDER/server.cert. |
| PGFY_APM_SENTRY_DSN | Your Sentry DSN. |
| PGFY_LOGGER_TIMBER_KEY | Your Timber Key. |
| PGFY_PAYMENTS_GERENCIANET_CLIENT_ID | GerenciaNet Client ID. |
| PGFY_PAYMENTS_GERENCIANET_CLIENT_SECRET | GerenciaNet Client Secret. |
| PGFY_PUSH_NOTIFICATION_APNS_KEY_PATH | Apple APNS key path. Default your $PROJECT_FOLDER/key.pem |
| PGFY_PUSH_NOTIFICATION_APNS_CERT_PATH | Apple APNS Cert path. Default your $PROJECT_FOLDER/cert.pem |
| PGFY_PPUSH_NOTIFICATION_GCM_API_KEY | Google GCM API Key. |
| PGFY_OAUTH2_FACEBOOK_START_PATH | Facebook OAuth2.0 login endpoint. Default '/login/facebook'. |
| PGFY_OAUTH2_FACEBOOK_CALLBACK_URI | Facebook OAuth2.0 callback URI. Default 'https://localhost:3000/login/facebook/callback'. |
| PGFY_FACEBOOK_CLIENT_ID | Facebook OAuth2.0 Client ID. |
| PGFY_FACEBOOK_CLIENT_SECRET | Facebook OAuth2.0 Client Secret. |
| PGFY_FACEBOOK_PERSIST_PROFILE | Facebook OAuth2.0 persist user profile into the user database. Default false |
| PGFY_AUTH_JWT_SECRET | Enable the JSON WebToken support setting your JWT secret. |
| PGFY_AUTH_JWT_EXPIRES_IN | JSON WebToken expires in '10h' by Default |
| PGFY_AUTH_SESSION_SECRET | Authentication Session Secret. Example: 'a secret with minimum length of 32 characters' |
| PGFY_AUTH_SESSION_LOGIN | Authentication Session login endpoint. Default is '/login' |
| PGFY_AUTH_SESSION_MAX_AGE | Authentication Session max age. Default is '28 days' |
| PGFY_AUTH_USER_TABLE | Authentication user database table. Default table is 'user' |
| PGFY_AUTH_USER_TABLE_LOGIN_FIELD | Login field for User table authentication. Default field is 'email' |
| PGFY_AUTH_USER_TABLE_PASSWORD_FIELD | Password field for User table authentication. Default field is 'password' |
| PGFY_SWAGGER_HOST_PORT | Swagger URI. Default '127.0.0.1:3000'. |
| PGFY_SWAGGER_ROUTE_PREFIX | Swagger route access. Default '/documentation'. |
| PGFY_SWAGGER_INFO_TITLE | Swagger Title. Default 'Swagger UI'. |
| PGFY_SWAGGER_INFO_DESCRIPTION | Swagger Description. Default 'Swagger UI - API Documentation'. |
| PGFY_UPLOAD_MEMORY_STORAGE | Enable the Upload support using the Fastify-multer plugin. Default false. |
| PGFY_AWS_ACCESS_KEY | Enable the Amazon S3 Bucket upload support setting your AWS Access Key. |
| PGFY_AWS_SECRET_ACCESS | Enable the Amazon S3 Bucket upload support setting your AWS Secre Key. |
| PGFY_AWS_S3_THUMB_WIDTH | Amazon S3 Bucket Thumb Width. Default 200 |
CLI
PgFy CLI
Terminal

If you installed locally:
$node ./node_modules/pgfy

If you installed globally:
$pgfy

? Which template do you want to create? (Use arrow keys)
❯ A new Api component
  A new Service

? Which template do you want to create? A new Api component
? Type the name my-new-component
How to extend the PgFy API using components?
By default, the PgFy Api will check your env variable PGFY_API_COMPONENTS_PATH (by default is 'src/components') looking for new components.
Take a look for what is a "component" inside PgFy.
/src/components
  |-- my_new_compoment
      |-- controller.js
      |-- route.js
      |-- swagger.js
      |-- test.js
function Routes(api, componentName, swagger, controller) {
try {
// api: instance, where you can set new routes.
// componentName: The name you choosed for you component.
// swagger: Swagger config specifications for your controllers.
// controller: Your functions avaliables for your routes.
api.get(
`/v1/${componentName}/hello-world`,
swagger.helloWorld,
controller.helloWorld
);
return controller;
} catch (e) {
console.log(`Error loading routes for ${componentName}:`, e.message);
return e.message;
}
}
module.exports = Routes;function main(api, componentName) {
/*
Fastify: Validation and Serialization document
https://www.fastify.io/docs/latest/Validation-and-Serialization/
*/
const swagger = {
helloWorld: {
schema: {
description: 'helloWorld',
tags: [componentName],
summary: componentName,
querystring: {
type: 'object',
properties: {
offset: { type: 'string' },
limit: { type: 'number' },
},
},
params: {},
body: {},
security: [
{
Bearer: [],
},
],
},
},
};
return swagger;
}
module.exports = main;function Controller(api, componentName) {
const { db } = api;
const controllers = {
helloWorld: async (request, reply) => {
api.response(reply, 200, 'Hello World', {});
},
};
return controllers;
}
module.exports = Controller;function tests(api, componentName) {
const contracts = {};
/*
PgFy will look for contracts for your Controllers.
They need to have the same method name. E.g: controller.helloWorld()
and contracts.helloWorld().
Than you can add one or more test cases as the sample below.
PgFy will check if the status, message or data are different as
it should be passing the requests inputs you want to.
*/
contracts.helloWorld = () => {
const testCase = {};
testCase['Hello-World-Test'] = {
request: {
body: {},
query: {},
params: {},
},
status: 200,
message: 'Hello World',
data: {},
};
return testCase;
};
return { contracts };
}
module.exports = tests;How to create Services?
By default, the PgFy Service will check your env variable PGFY_SERVICE_PATH (by default is '/src/services') looking for new services.
Take a look for what is a "Service" inside PgFy.
/src/services
  |-- user
    |-- management (A component of the User Service)
        |-- controller.js
        |-- route.js
        |-- test.js
async function loadRoutes(responder, controller) {
try {
responder.on('hello', controller.helloWorld);
return true;
} catch (e) {
return false;
}
}
module.exports = loadRoutes;function controller(service) {
const { db } = service;
const controllers = {
helloWorld: async (req, cb) => {
try {
return cb(null, 'Hello World');
} catch (e) {
return cb(e.message, false);
}
},
};
return controllers;
}
module.exports = controller;function tests(service) {
const contracts = {};
/*
PgFy will look for contracts for your Controllers.
They need to have the same method name. E.g: controller.helloWorld()
and contracts.helloWorld().
Than you can add one or more test cases as the sample below.
PgFy will check if the err and response are different as
it should be passing the requests inputs you want to.
*/
contracts.helloWorld = () => {
const testCase = {};
testCase['Hello-World-Test'] = {
request: {
body: {},
query: {},
params: {},
},
error: null,
response: 'Hello World',
};
return testCase;
};
return { contracts };
}
module.exports = tests;Add Fastify plugins?
Offcourse. To add a new plugin, pass it inside your API configuration:
Terminal

$npm install --save fastify-oas
const app = await Api({
plugins: [
{
name: 'fastify-oas',
options: {},
},
],
});Add NPM modules?
Definitely. To add a new NPM module, pass it inside your API configuration:
const app = await Api({
  modules: [
    {
      variable: 'moment',
      name: 'moment',
      options: {},
    },
  ],
});
console.log('Modules: ', app.modules.moment);
FAQ
Is PgFy a Fastify fork?
No. PgFy it's the Fastify framework, pre-configured, with some tools that allow you growth your application easily using components pattern.
Can I override the auto generated endpoints?
Yes. Create a new component, set the same Route path for your new Controller.
Contribution
PgFy is under constant development for personal use. If you would like to see a new feature implemented or want to contribute a new feature, you're welcome to open an issue to discuss it and we will be more than happy to help.
If you choose to make a contribution, please fork this repository and then submit a pull request.
MIT License
Copyright (c) 2019 Daniel Henrique. Built in Blumenau ❤️.
Permission is hereby granted, free of charge, to any person obtaining a copy of this software and associated documentation files (the "Software"), to deal in the Software without restriction, including without limitation the rights to use, copy, modify, merge, publish, distribute, sublicense, and/or sell copies of the Software, and to permit persons to whom the Software is furnished to do so, subject to the following conditions:
The above copyright notice and this permission notice shall be included in all copies or substantial portions of the Software.
THE SOFTWARE IS PROVIDED "AS IS", WITHOUT WARRANTY OF ANY KIND, EXPRESS OR IMPLIED, INCLUDING BUT NOT LIMITED TO THE WARRANTIES OF MERCHANTABILITY, FITNESS FOR A PARTICULAR PURPOSE AND NONINFRINGEMENT. IN NO EVENT SHALL THE AUTHORS OR COPYRIGHT HOLDERS BE LIABLE FOR ANY CLAIM, DAMAGES OR OTHER LIABILITY, WHETHER IN AN ACTION OF CONTRACT, TORT OR OTHERWISE, ARISING FROM, OUT OF OR IN CONNECTION WITH THE SOFTWARE OR THE USE OR OTHER DEALINGS IN THE SOFTWARE.