pau-flux
v0.0.3
Published
Yet another Flux implementation, but now with views :)
Downloads
3
Readme
Pau's Flux Implementation
Yet another Flux implementation, but now with views :)
Table of Contents
Basics
Here this framework basic concepts are shown.
Flux architecture
Flux is an application architecture defined by the nice guys at Facebook for client-side web development. The main idea is to avoid the bi-directional MVC data binding in favor of an uni-directional action flow. This is achieved by the definition of three main components:
- a dispatcher that is in charge to receive all the requests by the other components (called actions) and to trigger the corresponding callbacks;
- some stores in which the data are stored;
- some view-controllers that render the contents on the page and trigger actions.
A tipical flux application can be shaped as the following:

For a complete overview about the flux architecture, you can read this blog post.
Web components
Web components are a collection of standards enabling a developer to wrap markup and styles into custom HTML elements.
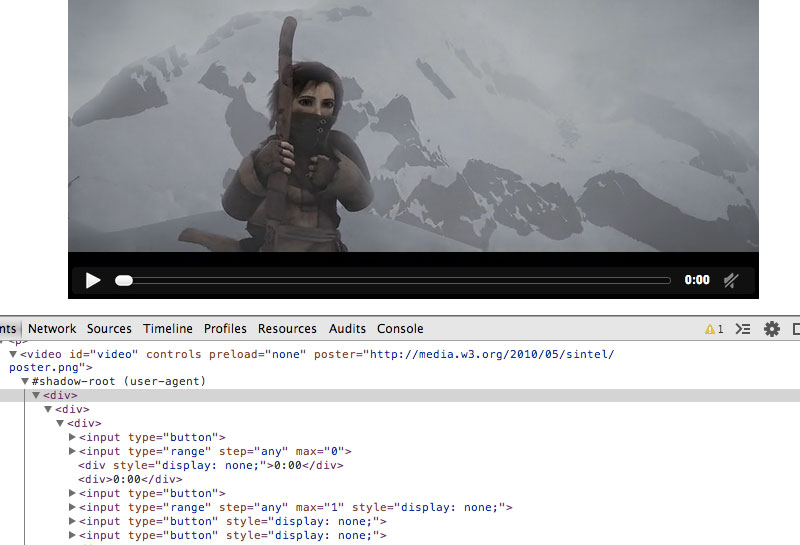
A typical example of web components is the <video> tag.

As you can see in the picture above, when a video tag is included in a web page, the browser renders a player whose markup is wrapped into a so called shadow DOM. Moreover, the video player can be configured by using the <video> tag attributes.
In the same way, you can create custom and reusable components you can import in a web page and customize by using a predefined API.
For an extensive introduction to web components, please take a look to this css-tricks article.
Putting things together
This project puts together this two concepts in order to create a complete framework for web applications.
Here a web application is seen as a set of custom elements, updated every time the relative store data changes, who trigger actions on the flux dispatcher.
The custom elements view updates are performed by using the good Matt-Esch virtual-dom algorithm inspired by the work of the Facebook team.
Creating a web application
The following example shows how to create a complete web application using this framework. This example is included into the source code in the example/ folder.
In order to run the example, lanch the relative npm script
$ npm run serveand then navigate to http://localhost:3000 with your browser (use Google Chrome if you don't want to enable Firefox experimental flags).
Structure
You can structure a flux web application as defined below:
myapp/
|
` index.html
` main.js
` elements/
  |
  ` app/
    |
    ` app.html
    ` dispatcher.js
  ` headereditor/
    |
    ` headereditor.html
    ` dispatcher.js
The index.html page contains the import of the main elements.
<html>
  <head>
    <script src="/flux.js"></script>
    <link rel="import" href="/elements/app/app.html">
  </head>
  <body>
    <my-app store="main"></my-app>
    <script src="main.js"></script>
  </body>
</html>
Usually, you don't need to do big things here, all the application relative configuration are defined by the app element.
The main.js script just trigger the initialization action.
(function() {
  F.Dispatcher().dispatch('init');
}());
Defining a new element
A new flux element is defined by a view, implemented into an HTML file, and a dispatcher script.
Below, the view of the header editor is showed.
<script src="dispatcher.js"></script>

<flux-view name="header-editor">

  <template>
    <div>
      <label>Header editor:</label>
      <input type="text" value="{{ header }}" id="headerField"></input>
    </div>
    <div>
      <h4>Instructions:</h4>
      <p>Type a new value into the input box and then change the focus.</p>
    </div>
  </template>

  <script>
F.registerListeners('header-editor', function(ee) {
  var formModel = {};

  ee('headerField::keyup', function(evt) {
    formModel.header = evt.target.value;
  });

  ee('headerField::change', function() {
    var d = F.Dispatcher();
    d.dispatch('setHeader', formModel);
  });

});
  </script>

</flux-view>
The element name is defined by the name attribute of the <flux-view> tag.
The <template> tag defines the markup and the style for the element. From this HTML, the virtual-dom is created and it is compiled by using the Handlebars framework.
In this example, we also register listeners for the DOM generated by the template. In particular, on #headerField changes, the dispatcher setHeader action is dispatched.
Dispatcher actions are defined by the dispatcher.js file, showed below.
(function() {
  var d = F.Dispatcher();
  d.handleAction('setHeader', function(payload) {
    var s = F.Store('main');
    s.getData().header = payload.header;
    s.notify();
  });
}());
An action is registered by the dispatcher handleAction function using the action name and the callback function. The callback function has as arguments the arguments passed to the dispatch method.
When the new element is used, you can specify the store to use using the element store attribute as shown by the app.html element.
<link rel="import" href="/elements/headereditor/headereditor.html">
<script src="dispatcher.js"></script>

<flux-view name="my-app">

  <template>
    <div>
      <h1>{{ header }}</h1>
    </div>
    <div>
      <header-editor store="main"></header-editor>
    </div>
  </template>

</flux-view>

