
oaks-post
v1.5.7
Published
This is a pure ES module focused on 'Markdown file batch processing' in the static blog scenario
Downloads
116
Maintainers
 neil.ji
Readme
简介
文档 / Documents
- 中文
- ~~English~~ have been discontinued (2/28/2024, v1.5.0) because of I don't have enough time to translate so many words. Sorry for that.
oaks-post是什么?
- 轻量级,高性能的 Markdown to JSON 库;
- 提供静态博客网站常见功能:列表、分页、排序、归档、标签、分类等;
- 适用于 Nodejs(注意,不兼容 v14.0.0 之前版本)
oaks-post要解决什么?
针对自建静态博客网站,oaks-post旨在提供一种跨平台的 Markdown 数据解析及存储方案。
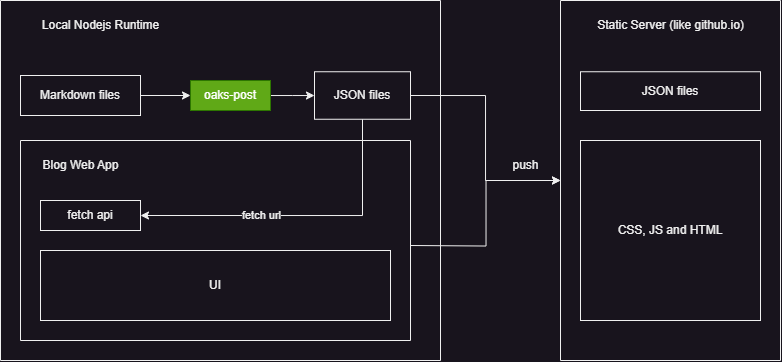
在oaks-post的帮助下,无需关注 Markdown 解析、列表分页、文章分类等逻辑,可以选用任意 UI 框架搭建自己的博客 App.
只要遵循oaks-post所约定的数据格式,即可将业务逻辑简化为单纯的数据展示。
功能
已实现:
- Markdown to JSON:
- 文章详情:批量解析 Markdown 文件,生成同名 JSON 文件;
- 文章列表:生成
posts.json,包含所有博客文章的基本信息; - 文章分类:
- Tag :更灵活,不体现层级关系;
- Category :更严谨,有层级关系,类似于文件系统中的目录;
- 文章摘要:长内容会按行数或指定的特殊标记(如
<!--more-->)截取出摘要; - 分页:将
posts.json中的数据分割到若干 JSON 文件中,生成posts_[page].json; - 排序:对 posts 进行基于时间或自然语言的排序;
- Front Matter:支持解析 Front Matter 元数据;
- 命令行脚本:便于集成到类似 Github Actions 这种 CI/CD 工作流中,详见命令行脚本;
- 性能优化:
- 跳过已处理过的文件;
- 借助分页功能可以实现按需加载;
- 流式读写,提高大文件处理效率;
- 并行优先,异步处理流程合理且高效;
- 类型检查:完整的 Typescript 类型定义,良好的代码提示;
TODO List:
- JSON 压缩/解压缩
- Archive
- 文章数据统计
- 生成 RSS XML
- 根据 Markdown 目录结构,自动生成 Category
- 日志打印美化
如有新需求或发现 Bug,欢迎创建 issues 一起讨论,或者在线参与新功能投票。
安装
首先,确保 Nodejs 版本号高于 v14.0,否则可能出现兼容性问题。
node -v然后进入指定项目目录,并执行以下指令局部安装oaks-post
npm install oaks-post或者进行全局安装:
npm install oaks-post -g使用
调用如下:
import { PostsManager, sortDateAscend } from "oaks-post";

async function run() {
  const posts = new PostsManager({
    baseUrl: "https://neil-ji.github.io/",
    inputDir: "markdown",
    outputDir: "json",
    collection: {
      itemsPerPage: 5,
      sort: sortDateAscend(),
    },
  });

  // Use this method clean all outputted files.
  // await posts.clean();

  await posts.start();
}在决定使用oaks-post之前,你可以通过codesandbox.io免费创建一个 Devbox,选择 Nodejs 模板,然后进行以下配置,即可在浏览器中运行所有示例代码:
- 登录 codesandbox.io 并创建 Devbox;
- 选择 Nodejs 模板,其他选项默认即可;
- 安装
oaks-post; - 创建目录
markdown,该目录下创建若干 markdown 文件,例如hello.md; - 在
index.js中编写示例代码; - 控制台中输入
npm start,或在已执行 start 的控制台内点击 restart 按钮;
注意,由于是在线环境,IO 操作需要稍等片刻才能看到结果(没有结果请刷新),这是服务器到浏览器的延迟所决定的,非性能问题。
配置
你可以传入一个对象以控制 PostsManager 的行为,具体如下:
inputDir: string:必填,可传入相对或绝对路径,解析相对路径将默认以process.cwd()为参照物,它代表你的 markdown 文件所在目录;outputDir: string:必填,解析规则同inputDir,它代表oaks-post输出的 json 文件的存放目录;baseUrl?: string:可选,默认为空字符串"",它将作为 posts.json 中各 post 的 url 前缀;collection?: object:可选,控制posts.json的解析及生成;sort?: (a: PostItem, b: PostItem) => number:可选,它决定了posts.json中 posts 数组的排列顺序,具体用法见排序;excerpt?: object可选,用于截取摘要,具体用法见博客摘要:rule: PostsExcerptRule:必填,枚举类型,可选值如下:PostsExcerptRule.ByLines:按行数截取。PostsExcerptRule.CustomTag:按自定义标记截取。PostsExcerptRule.NoContent:强制返回空字符串;PostsExcerptRule.FullContent:不做分割,直接返回 Markdown 内容;
lines?: number:可选,指定所截取内容的行数,空行不计,代码块视作一行。tag?: string:可选,截取到指定标记,默认为<!--more-->.
itemsPerPage?: number:可选,指定该值将开启分页功能,默认不启用,具体用法见分页;
tag?: object:可选,控制tags.json的解析及生成;sort, excerpt, itemsPerPage同上;propName?: string:指定 Front Matter 中记录 Tag 信息的属性名,默认为tag;
category?: object:可选,控制categories.json的解析及生成;sort, excerpt, itemsPerPage同上;propName?: string:指定 Front Matter 中记录 Category 信息的属性名,默认为category;rule?: PostsCategoriesAnalyzeRule:可选,枚举类型,可选值如下:PostsCategoriesAnalyzeRule.FrontMatter:默认值,从 Front Matter 中解析 Category 信息;PostsCategoriesAnalyzeRule.Disable:忽略 Category 配置,不解析 Category,也不会生成任何文件;
命令行脚本
命令行脚本通过posts.config.json配置PostsManager,除以下配置项外,都与配置中的参数定义相同:
sort有以下四种取值,分别对应四个内置排序函数"date ascend",时间升序;"date descend",时间降序;"lex ascend",自然语言升序;"lex descend",自然语言降序;
excerpt.rule有以下四种取值,对应上文excerpt.rule的四种枚举:"ByLines""CustomTag""NoContent""FullContent"
category.rule有两种取值,同上:"FrontMatter""Disable"
命令行脚本全部参数如下:
--init, -i:根据你的输入创建posts.config.json;--clean, -c:执行前清空旧文件;--build, -b:开始批处理 Markdown 文件;
注意,局部安装和全局安装,应当使用不同方式调用命令行脚本,见下文。
全局脚本
通过以下指令调用oaks-post命令行脚本:
oaks-post -i -b局部脚本
在package.json的 scripts 项中添加一条指令:"oaks-post": "oaks-post",如下:
{
  "scripts": {
    "oaks-post": "oaks-post"
  }
}然后通过以下指令调用oaks-post命令行脚本:
npm run oaks-post -i -b博客详情
每个 Markdown 文件都会生成同名 JSON 文件,属性定义如下:
interface Post {
  /** Markdown front matter */
  frontMatter: PostFrontMatter;

  /** Markdown content */
  content: string;
}

interface PostFrontMatter {
  [key: string]: any;
}
文章列表
该文件用于获取全量文章列表,oaks-post会收集所有 Markdown 处理后的 JSON 数据,并写入posts.json,属性定义如下:
interface Posts {
  /** Partial or all posts */
  posts: PostsItem[];

  /** URLs of posts pages */
  postsPages?: string[];
}

interface PostsItem extends ExcerptedPost {
  /** Unique identifier of a post */
  hash?: string;

  /** URL of a post */
  url?: string;
}

interface ExcerptedPost {
  /** Markdown front matter */
  frontMatter?: PostFrontMatter;

  /** Excerpt from Markdown content */
  excerpt?: string;
}

interface PostFrontMatter {
  [key: string]: any;
}
博客分类
Category 和 Tag 都是常用的 Markdown 文章分类方法,它们的具体区别如下:
Category(分类)是一种相对静态的分类方式,通常用于对网站文章进行广泛的分组。我们可以将它们视为 WordPress 网站的一般主题或目录。分类具有层级结构,这意味着我们可以创建子分类(sub-category)。例如,图书馆就常常使用分类来整理书籍。
Tag(标签)则用于描述文章的具体细节。它更加灵活,不受严格的层级限制。标签可以是关键词、话题、作者、地理信息等。与分类不同,一篇文章可以有多个标签,也可以没有标签。标签更加自然地从具体对象的属性中总结出来,而不需要事先定义。
Category
Category 相关配置定义如下:
interface PostsClassifierOptions extends PostsListBase {
  /** Control posts categories analyzing. */
  rule?: PostsCategoriesAnalyzeRule;

  /** Specify prop name in the markdown front matter to replace default prop `category`. */
  propName?: string;
}

interface PostsListBase {
  /** Sort posts array */
  sort?: (a: PostsItem, b: PostsItem) => number;

  /** Settings for post excerpt analyzing */
  excerpt?: PostsExcerptOptions;

  /** Enable paginate and specify max items count of per page */
  itemsPerPage?: number;
}
如果你在 Front Matter 中以category: [root, sub category]形式标识文章分类,则无需传入propName,否则你需要通过propName指定分类数组的键名。
注意 category 书写规则是固定的:元素顺序表示嵌套层级,例如category: [root, sub category 1, sub category 2],root 是根分类,sub category 1 是 root 的子分类,同理,sub category 2 是 sub category 1 的子分类,依此类推。
分页、排序、摘要参见下文。
启用 Category 特性,会生成categories.json文件,包含所有 categories 及文章信息,数据格式被定义为PostCategoriesItem[]如下:
interface PostCategoriesItem extends Posts {
  /** Category name */
  category: string;

  /** Subcategories */
  subcategories: PostCategoriesItem[];
}

interface Posts {
  /** Partial or all posts */
  posts: PostsItem[];

  /** URLs of posts pages */
  postsPages?: string[];
}
categories 是树形结构存储的,以下是一个简单的数据遍历举例:
import rawData from "./json_categories/categories.json";

const data: PostCategoriesItem[] = JSON.parse(rawData);

function access(data: PostCategoriesItem[]) {
  data.forEach(({ posts, postsPages, category, subcategories }) => {
    // access data as your wish
    console.log(posts);

    // access subcategories recursively
    access(subcategories);
  });
}

access(data);
Tag
Tag 相关配置定义如下:
interface PostsTaggerOptions extends PostsListBase {
  /** Specify prop name in the markdown front matter to replace default prop `tag`. */
  propName?: string;
}
interface PostsListBase {
  /** Sort posts array */
  sort?: (a: PostsItem, b: PostsItem) => number;

  /** Settings for post excerpt analyzing */
  excerpt?: PostsExcerptOptions;

  /** Enable paginate and specify max items count of per page */
  itemsPerPage?: number;
}
如果你在 Front Matter 中以tag: [js, es6, promise]形式标识文章分类,则无需传入propName,否则你需要通过propName指定标签数组的键名,且书写 tag 无需考虑元素顺序,所有标签都是平级的。
分页、排序、摘要参见下文。
启用 Tag 特性,会生成tags.json文件,包含所有 tag 及文章信息,数据格式被定义为PostTagsItem[]如下:
interface PostTagsItem extends Posts {
  /** Tag name */
  tag: string;
}

interface Posts {
  /** Partial or all posts */
  posts: PostsItem[];

  /** URLs of posts pages */
  postsPages?: string[];
}
博客摘要
通过excerpt灵活控制博客摘要的截取规则,具体如下。
按行数截取摘要
按行数截取是默认行为,Markdown 多行代码块语法会被识别为 1 行,另外,空行不会计算在内。
截取前 5 行示例如下:
const posts = new PostsManager({
  // ...others
  collection: {
    excerpt: {
      rule: PostsExcerptRule.ByLines,
      lines: 5,
    },
  },
});
按指定标记截取摘要
支持按照 Markdown 文件内的自定义标记进行内容截取,选择该规则后可以不提供 tag,此时截取标记默认为<!--more-->,这是 hexo 的流行写法。
当然你也可以提供任意你自己自定义的 tag,推荐使用 Markdown 注释语法来定义 tag.
const posts = new PostsManager({
  // ...others
  collection: {
    excerpt: {
      rule: PostsExcerptRule.CustomTag,
      tag: "<!--YOUR_TAG-->",
    },
  },
});
Markdown 文件中使用 tag 如下:
Hello
Hello

<!--YOUR_TAG-->

Hello
Hello
Hello
Hello
Hello
Hello
所生成的 JSON 数据:
{
  "posts": [
    {
      // ...others
      "excerpt": "Hello\nHello\n\n"
    }
  ]
}
分页
当你需要分页或滚动加载数据时,通过itemsPerPage启用分页功能,默认不分页,传入非法数据时会使用默认值 10.
启用分页时,会在对应列表的输出目录下创建pages目录,分页文件命名格式为posts[segment]_[page].json:
- segment:列表所属的 Tag 或 Category 名;
- page:代表页码,属性定义如下:
数据格式如下:
interface PostsPage {
  /** Aggregate of posts pages */
  pages: number;

  /** Current page index */
  current: number;

  /** Posts list of each page */
  posts: PostsItem[];

  /** URL of current page */
  url: string;

  /** URL of previous page */
  prev?: string;

  /** URL of next page */
  next?: string;
}
排序
你可以通过sort定义posts.json以及posts_[page].json中的文章排列顺序,oaks-post内置了常用的几种排序,你可以参照以下例子去使用:
import { sortDateAscend } from "oaks-post";

const posts = new PostsManager({
  // ...others
  sort: sortDateAscend(),
});
内置排序函数:
sortDateAscend:按时间升序排列;sortDateDescend:按时间降序排列;sortLexOrderAscend:按自然语言升序排列;sortLexOrderDescend:按自然语言降序排列;
上述内置排序函数的签名是类似的,它们的参数如下:
propName?: string:用于指定 Front Matter 中的排序字段。对于时间排序,默认值为date;对于字符串排序,默认值为title;format?: (propValue: any) => any:用于格式化 propName 对应的 value,其返回值会代替 propValue 参与排序;
按时间排序
举例 1:指定created字段以时间升序排列。
import { sortDateAscend } from "oaks-post";

const posts = new PostsManager({
  // ...others
  sort: sortDateAscend("created"),
});
举例 2:对于非 ISO 标准的时间字符串格式,可以通过format将其标准化为 Javascript Date 类型。
import { sortDateAscend } from "oaks-post";

const posts = new PostsManager({
  // ...others
  sort: sortDateAscend("created", (value) => {
    const result = value.match(/^([0-9]{4})_([0-9]{2})_([0-9]{2})$/);

    if (!result) {
      console.error("Failed match date string.");
      return new Date();
    }

    return new Date(result[1], result[2], result[3]);
  }),
});上述例子中,通过正则表达式捕获形如YYYY_MM_DD的非标准时间格式的年、月、日,并传入 Date 构造函数。
如果你对正则表达式并不熟悉,那么推荐你使用流行的时间处理库完成这一步,如:moment.js, day.js, date-fns, .etc.
按自然语言排序
首先声明,自然语言排序不同于字符编码排序,具体表现在:
字符编码排序是基于字符的二进制表示进行排序的。例如,在 ASCII 编码中,字符 A 的编码是 65,而字符 B 的编码是 66,所以在字符编码排序中,A 会排在 B 前面。
自然语言排序则更接近人类的排序习惯。例如,自然语言排序会将字符串"2"排在"11"前面,因为 2 小于 11。但在字符编码排序中,"11"会排在"2"前面,因为字符 1 的编码小于字符 2。
你可以借助内置函数sortLexOrderAscend/sortLexOrderDescend来实现自然语言排序,它的参数同sortDateAscend类似,唯一的区别就是:format 必须返回字符串。
举例:指定headline字段以自然语言升序排列。
import { sortLexOrderAscend } from "oaks-post";

const posts = new PostsManager({
  // ...others
  sort: sortLexOrderAscend("headline"),
});
自定义排序
对于特殊场景,你可以自定义自己的排序函数 sort,其函数签名为sort?: (a: PostItem, b: PostItem) => number;.
如果你熟悉 Javascript 的话,那么你应该不会对该函数签名感到陌生,因为它就是Array.prototype.sort的参数签名,posts就是通过该原型方法实现的原地排序。