node-red-contrib-cec
v1.0.2
Published
Node-Red contributed nodes for interacting with cec-enabled devices on a HDMI switch, such as a TV or digital receiver
Downloads
39
Readme
Node-Red-Contrib-Cec
Node-Red contributed nodes for interacting with cec-enabled devices on a HDMI switch, digital receiver and/or a TV - control and monitor your entertainment system using a Raspberry Pi.
Overview
The goal of this software is to make it easy for makers to automate interactions with entertainment systems via the HDMI CEC protocol, via the awesome Node-RED Framework.
To do this, it leverages the great work of:
- cec-monitor by Pablo González of Senzil, and
- libcec by PulseEight.
It includes 4 nodes as follows:
- cec-input - input node that receives CEC messages from a HDMI bus.
- cec-output - output node that sends CEC commands to the HDMI bus.
- cec-state - tracks and stores the status of all the devices connected to the HDMI CEC bus by listening to the cec messages.
- cec-config - provides connection details for connecting to the cec serial port.
Installation
Before installing this node-red module, you first need to install the cec-utils software from PulseEight. Instructions vary depending on your operating system and distribution. Complete instructions are available from the PulseEight Github Repo, or if TL;DR, quick guide follows:
Debian/Raspbian/Ubuntu
$ sudo apt-get update && sudo apt-get install cec-utilsRedhat/CentOS/Scientific/Fedora
$ sudo yum install cec-utilsmacOS (Macports)
See the MacPorts website if you don't have it installed.
$ sudo port install libcecInstalling node-red-contrib-cec
Install node-red-contrib-cec by following the adding nodes instructions from the Node-RED Getting Started Documentation.
The following instructions use npm.
Or if TL;DR, as the user running Node-RED type:
cd $HOME/.node-red
npm install node-red-contrib-cec
Usage
To use the node, launch or re-launch Node-RED (see running Node-RED for help getting started).
A cec example flow is available that highlights all the features of this node, and is illustrated below. You can copy and paste this flow into Node-RED and tinker to get a feel for how it works.
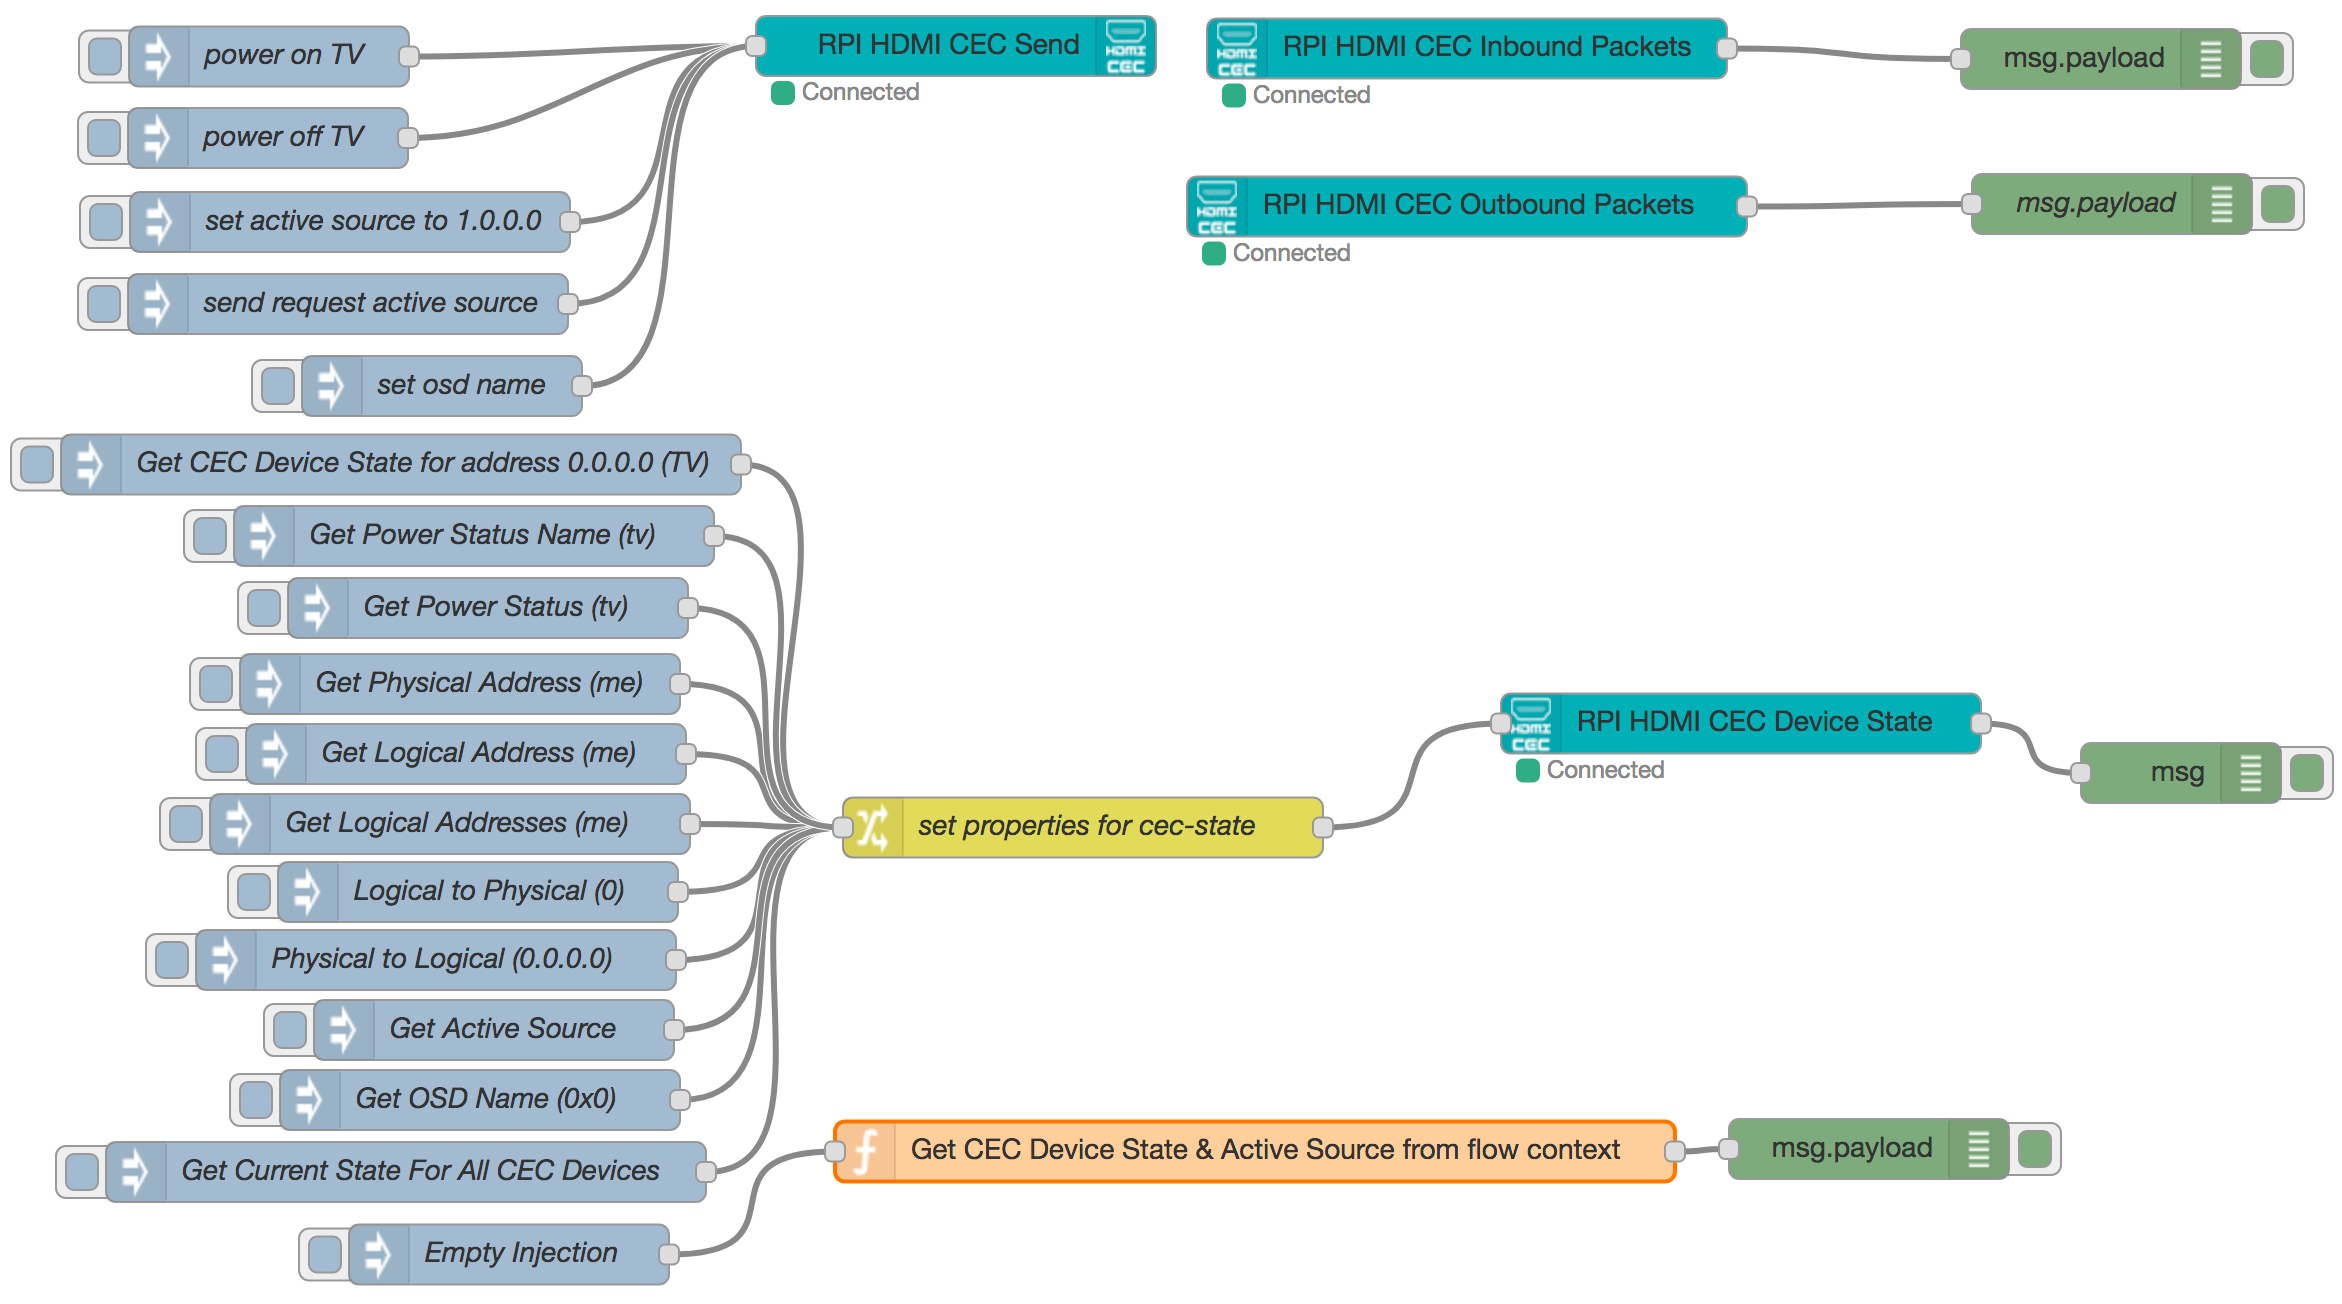
Or if you prefer, read the following explanation and screen shots.
This module supports multiple cec adapters. So cec-config nodes can be shared between the cec-in, cec-out and cec-state nodes.
CEC Adapter
When creating any of the above nodes, you must select or create a CEC Adapter configuration. This provides connection details for connecting to the cec serial port.
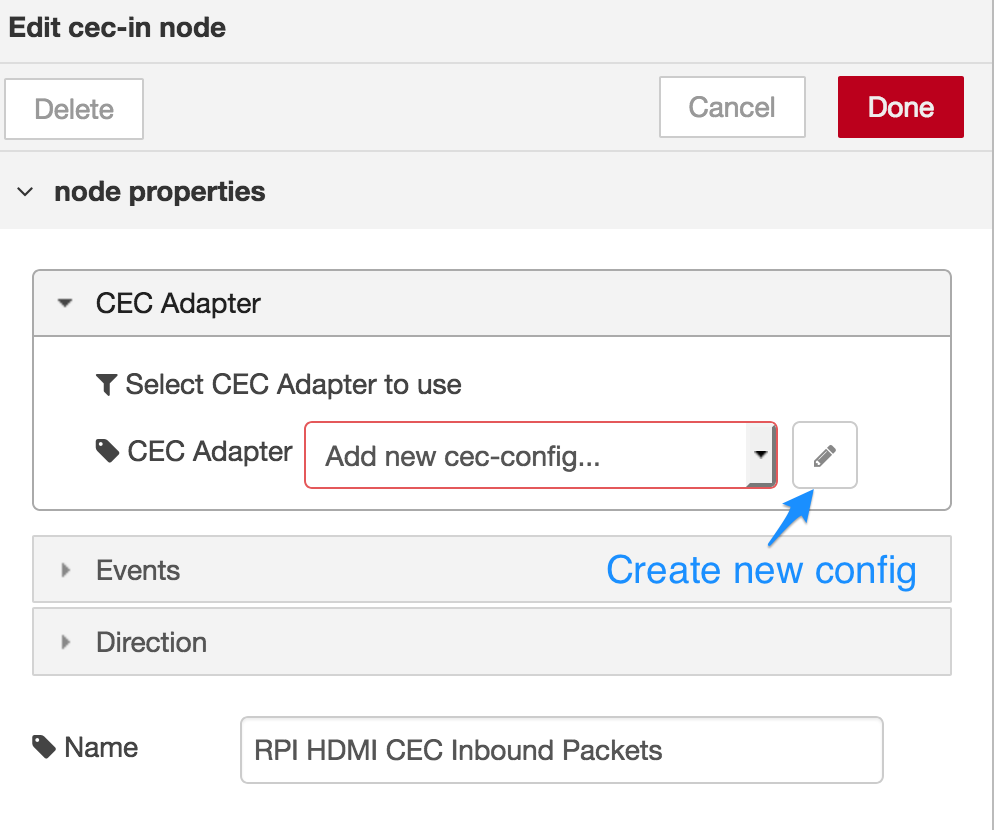
OSD Name is the name assigned to the hdmi device attached to the hdmi switch/bus. If a display such as a television sets this device as the active source, and if it supports it, this name will be displayed as a label for the device.
CEC Com Port specifies the name of the serial port to connect with to communicate on the HDMI CEC bus. If left blank, a search is performed and the first found port is used. The port name on a Raspberry Pi is "RPI"
HDMI Port refers to the physical HDMI socket on this device, and is relevant when there is more than one. Otherwise it can be left blank.
Player, Recorder, Tuner, Audio are different source classes that can provide images to display on the output device (.i.e television/projector). For this device, select all classes that apply, or simply choose "Player".
cec-in Node
The cec-in input node receives CEC messages from the HDMI CEC bus for the adapter. The payload property of the outbound msg contains an object with the following example generic structure and values according to the cec-o-matic.com documentation.
{
  "type": "TRAFFIC",
  "number": "82784",
  "flow": "IN",
  "source": 1,
  "target": 4,
  "opcode": 144,
  "args": [
    0
  ],
  "event": "REPORT_POWER_STATUS",
  "data": {
    "val": 0,
    "str": "ON"
  }
}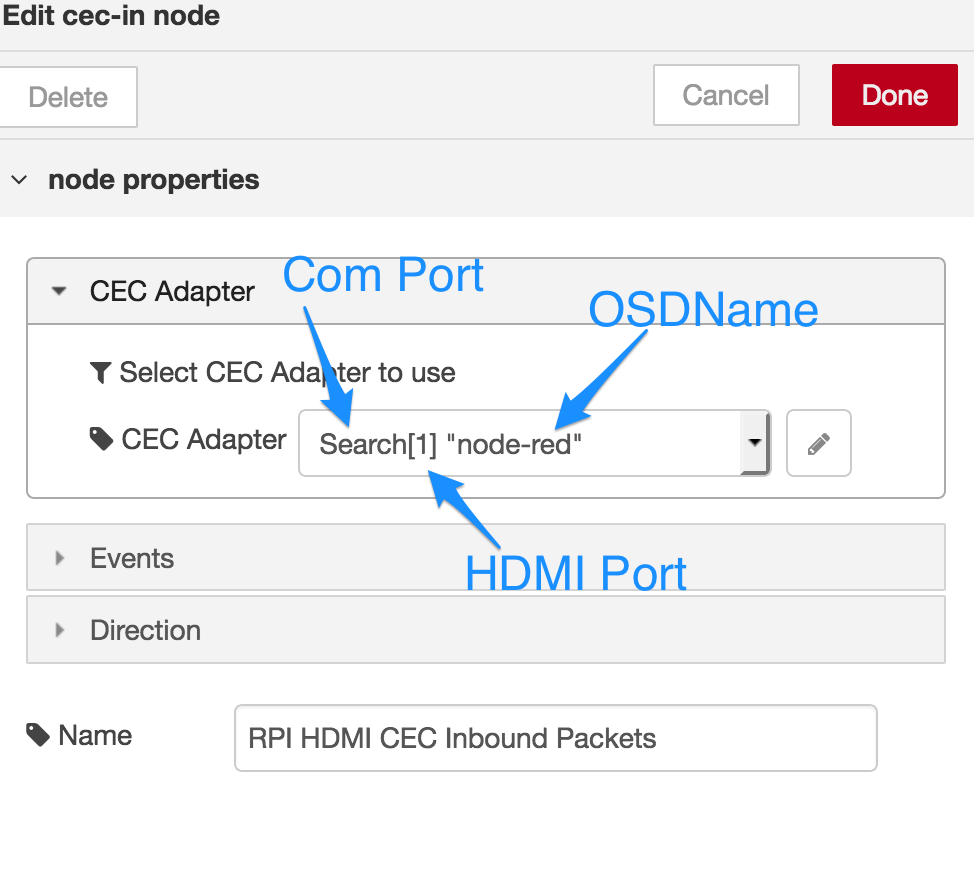
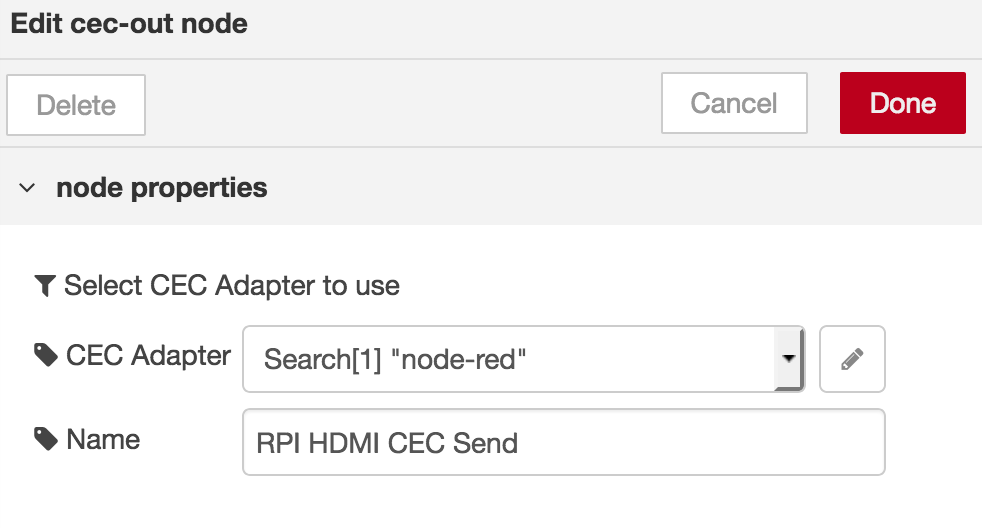
Select CEC Adapter - Select the Adapter to use, or create a new adapter configuration by clicking on the pencil icon.
Events - You may specify which events that are sent or received on the HDMI CEC bus to send from this node. You can select all events using the button at the bottom of the list.
Direction - An inbound CEC Code is one that has been sent by another device on the HDMI CEC bus, while an outbound CEC Code is one that has been sent by this CEC adapter onto the bus. You can send events from either direction, or both.
cec-out Node
This is an output node that receives CEC commands on its input to send on the HDMI CEC bus.
Input Node Format
Commands to send should be specified in the msg payload property as an array of objects or if only a single command, then no array, just an object. As an example, the object should have the following properties/values:
{
  "source": "RECORDINGDEVICE1",
  "target": "TV",
  "opcode": "IMAGE_VIEW_ON",
  "args": []
}
The above example is a message from recording device 1 (logical address 1) to the TV device (logical address 0), to request that it power on, using opcode IMAGE_VIEW_ON (hex code 0x04, decimal 4). No arguments are required for this opcode, hence an empty array.
This same message could also be expressed with the following same commands:
{
  "source": "recordingdevice1",
  "target": "tv",
  "OPCODE": "image_view_on"
}
	</pre>
	<pre>
{
  "source": "0x1",
  "target": "0x0",
  "opcode": "0x4"
}
	</pre>
	<pre>
{
  "source": 1,
  "target": 0,
  "opcode": 4
}
As you can see, case is unimportant and you can also use numeric values for the codes, and string represenations in hexadecimal (e.g. "0x"). If no args are necessary for the opcode, then that property can be omitted. If you wish to use the logical source address assigned to your cec adapter, then source can be set as null or simply omitted.
All Commands
See below for a full list of all the codes and an explanation of their function (reproduced from cec-monitor). My sincere thanks to Pablo Gonzalez for his work on cec-monitor, without which, node-red-contrib-cec would not be possible.
Also refer to cec-o-matic for further information on these commands and their usage.
ACTIVE_SOURCE - Used by a new source to indicate that it has started to transmit a stream OR used in response to a 'Request Active Source' (Brodcast). This message is used in several features : One Touch Play,Routing Control
IMAGE_VIEW_ON - Sent by a source device to the TV whenever it enters the active state (alternatively it may send 'Text View On') (Directly addressed)
TEXT_VIEW_ON - As 'Image View On', but should also remove any text, menus and PIP windows from the TV’s display (Directly addressed)
INACTIVE_SOURCE - Used by the currently active source to inform the TV that it has no video to be presented to the user, or is going into standby as the result of a local user command on the device (Directly addressed)
REQUEST_ACTIVE_SOURCE - Used by a new device to discover the status of the system (Broadcast)
ROUTING_CHANGE - Sent by a CEC Switch when it is manually switched to inform all other devices on the network that the active route below the switch has changed (Broadcast)
ROUTING_INFORMATION - Sent by a CEC Switch to indicate the active route below the switch (Broadcast)
SET_STREAM_PATH - Used by the TV to request a streaming path from the specified address (Broadcast)
STANDBY - Switches on or all devices into standby mode. Can be used a broadcast message or be addressed to a specific device (Broadcast or Directly addressed)
RECORD_OFF - Requests a device to stop a recording (Directly addressed)
RECORD_ON - Attempt to record the specified source (Directly addressed). This message is used in several features : One Touch Record,Tuner Control
RECORD_STATUS - Used by a Recording Device to inform the initiator of the message 'Record On' about its status (Directly addressed)
RECORD_TV_SCREEN - Request by the Recording Device to record the presently displayed source (Directly addressed)
CLEAR_ANALOGUE_TIMER - Used to clear an Analogue timer block of a device (Directly addressed)
CLEAR_DIGITAL_TIMER - Used to clear a Digital timer block of a device (Directly addressed)
CLEAR_EXTERNAL_TIMER - Used to clear an External timer block of a device (Directly addressed)
SET_ANALOGUE_TIMER - Used to set a single timer block on an Analogue Recording Device (Directly addressed)
SET_DIGITAL_TIMER - Used to set a single timer block on a Digital Recording Device (Directly addressed)
SET_EXTERNAL_TIMER - Used to set a single timer block to record from an external device (Directly addressed)
SET_TIMER_PROGRAM_TITLE - Used to set the name of a program associated with a timer block. Sent directly after sending a 'Set Analogue Timer' or 'Set Digital Timer' message. The name is then associated with that timer block (Directly addressed)
TIMER_CLEARED_STATUS - Used to give the status of a 'Clear Analogue Timer', 'Clear Digital Timer' or 'Clear External Timer' message (Directly addressed)
TIMER_STATUS - Used to send timer status to the initiator of a 'Status Timer' message (Directly addressed)
CEC_VERSION - Used to indicate the supported CEC version, in response to a 'Get CEC Version' (Directly addressed)
GET_CEC_VERSION - Used by a device to enquire which version of CEC the target supports (Directly addressed)
GIVE_PHYSICAL_ADDRESS - A request to a device to return its physical address. (Directly addressed)
GET_MENU_LANGUAGE - Sent by a device capable of character generation (for OSD and Menus) to a TV in order to discover the currently selected Menu language. Also used by a TV during installation to discover the currently set menu language from other devices (Directly addressed)
REPORT_PHYSICAL_ADDRESS - Used to inform all other devices of the mapping between physical and logical address of the initiator (Broadcast)
SET_MENU_LANGUAGE - Used by a TV or another device to indicate the menu language (Broadcast)
DECK_CONTROL - Used to control a device’s media functions (Directly addressed)
DECK_STATUS - Used to provide a deck’s status to the initiator of the 'Give Deck Status' message (Directly addressed)
GIVE_DECK_STATUS - Used to request the status of a device, regardless of whether or not it is the current active source (Directly addressed)
PLAY - Used to control the playback behaviour of a source device (Directly addressed)
GIVE_TUNER_DEVICE_STATUS - Used to request the status of a tuner device (Directly addressed)
SELECT_ANALOGUE_SERVICE - Directly selects an Analogue TV service (Directly addressed)
SELECT_DIGITAL_SERVICE - Directly selects a Digital TV, Radio or Data Broadcast Service (Directly addressed)
TUNER_DEVICE_STATUS - Used by a tuner device to provide its status to the initiator of the 'Give Tuner Device Status' message (Directly addressed)
TUNER_STEP_DECREMENT - Used to tune to next lowest service in a tuner’s service list. Can be used for PIP (Directly addressed)
TUNER_STEP_INCREMENT - Used to tune to next highest service in a tuner’s service list. Can be used for PIP (Directly addressed)
DEVICE_VENDOR_ID - Reports the Vendor ID of this device (Broadcast)
GIVE_DEVICE_VENDOR_ID - Requests the Vendor ID from a device (Directly addressed)
VENDOR_COMMAND - Allows vendor specific commands to be sent between two devices (Directly addressed)
VENDOR_COMMAND_WITH_ID - Allows vendor specific commands to be sent between two devices or broadcast (Directly addressed or Broadcast)
VENDOR_REMOTE_BUTTON_DOWN - Indicates that a remote control button has been depressed (Directly addressed or Broadcast)
VENDOR_REMOTE_BUTTON_UP - Indicates that a remote control button (the last button pressed indicated by the 'Vendor Remote Button Down' message) has been released (Directly addressed or Broadcast)
SET_OSD_STRING - Used to send a text message to output on a TV (Directly addressed)
GIVE_OSD_NAME - Used to request the preferred OSD name of a device for use in menus associated with that device (Directly addressed)
SET_OSD_NAME - Used to set the preferred OSD name of a device for use in menus associated with that device (Directly addressed)
MENU_REQUEST - A request from the TV for a device to show/remove a menu or to query if a device is currently showing a menu (Directly addressed)
MENU_STATUS - Used to indicate to the TV that the device is showing/has removed a menu and requests the remote control keys to be passed though (Directly addressed)
USER_CONTROL_PRESSED - Used to indicate that the user pressed a remote control button or switched from one remote control button to another (Directly addressed). This message is used in several features : Device Menu Control,System Audio Control,Remote Control Pass Through
USER_CONTROL_RELEASE - Indicates that user released a remote control button (the last one indicated by the 'User Control Pressed' message) (Directly addressed). This message is used in several features : Device Menu Control,System Audio Control,Remote Control Pass Through
GIVE_DEVICE_POWER_STATUS - Used to determine the current power status of a target device (Directly addressed)
REPORT_POWER_STATUS - Used to inform a requesting device of the current power status (Directly addressed)
FEATURE_ABORT - Used as a response to indicate that the device does not support the requested message type, or that it cannot execute it at the present time (Directly addressed)
ABORT - This message is reserved for testing purposes (Directly addressed)
GIVE_AUDIO_STATUS - Requests an amplifier to send its volume and mute status (Directly addressed)
GIVE_SYSTEM_AUDIO_MODE_STATUS - Requests the status of the System Audio Mode (Directly addressed)
REPORT_AUDIO_STATUS - Reports an amplifier’s volume and mute status (Directly addressed)
SET_SYSTEM_AUDIO_MODE - Turns the System Audio Mode On or Off (Directly addressed or Broadcast)
SYSTEM_AUDIO_MODE_REQUEST - A device implementing System Audio Control and which has volume control RC buttons (eg TV or STB) requests to use System Audio Mode to the amplifier (Directly addressed)
SYSTEM_AUDIO_MODE_STATUS - Reports the current status of the System Audio Mode (Directly addressed)
SET_AUDIO_RATE - Used to control audio rate from Source Device (Directly addressed)
cec-state Node
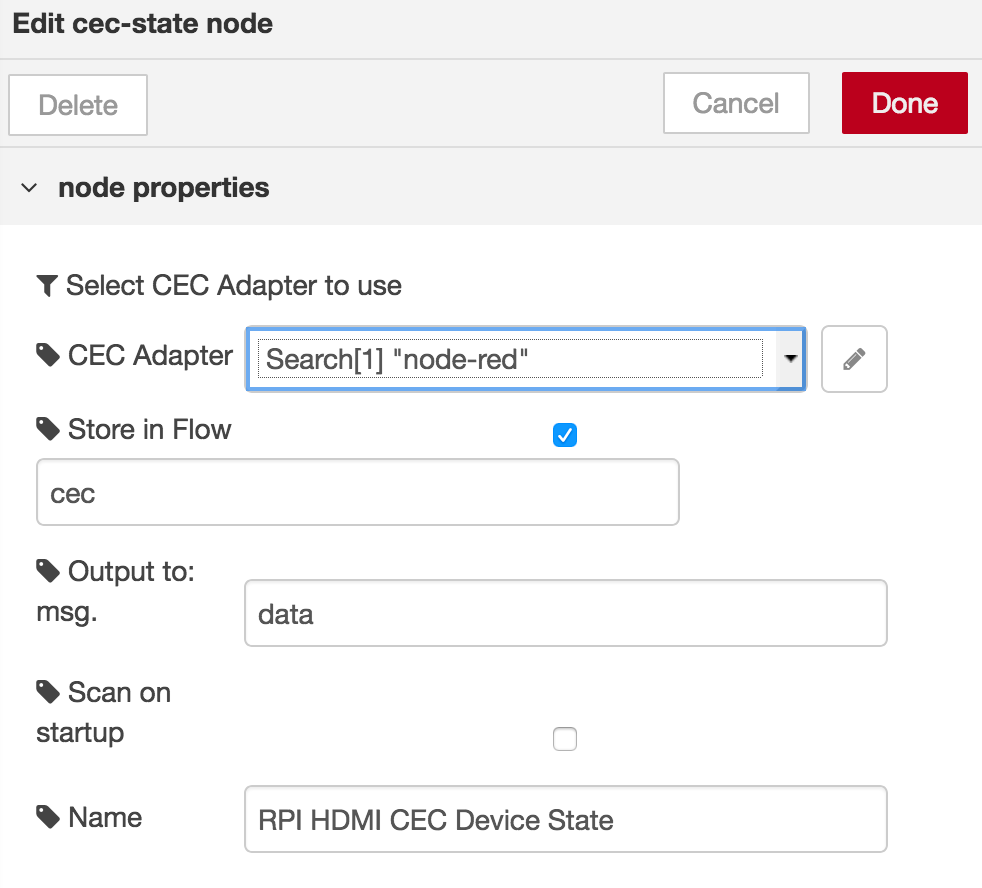
This node tracks and stores the status of all the devices connected to the HDMI CEC bus by listening to the cec messages.
By sending a message to its input, you can query a particular device by its logical or physical address or, without an address, query state information of all logical addresses.
Input Query Message Format
To query a particular device, specify in the input message, the logical (0 - 15) or physical address (of form 0.0.0.0) in msg.address as shown below:
msg = {
  "command": "getstate",
  "address": "1.0.0.0"
}
Or using logical address and noting, case-insensitivity:
msg = {
  "command": "GETSTATE",
  "address": "4"
}
Or using the equivalent logical address name - playbackdevice1 device:
msg = {
  "command": "GETSTATE",
  "address": "playbackdevice1"
}
Following is the complete list of device names and their corresponding logical address. Remember that a device can register more than one type of logical address.
- UNKNOWN: -1,
- TV: 0,
- RECORDINGDEVICE1: 1,
- RECORDINGDEVICE2: 2,
- TUNER1: 3,
- PLAYBACKDEVICE1: 4,
- AUDIOSYSTEM: 5,
- TUNER2: 6,
- TUNER3: 7,
- PLAYBACKDEVICE2: 8,
- RECORDINGDEVICE3: 9,
- TUNER4: 10,
- PLAYBACKDEVICE3: 11,
- RESERVED1: 12,
- RESERVED2: 13,
- FREEUSE: 14,
- UNREGISTERED: 15,
- BROADCAST: 15
If command is omitted, the default command is getstate. There are many other specific commands, such as:
{
    "command": "getpowerstatusname",
    "address": "tv"
}
which will return a string representation of the power status of the TV, like STANDBY.
Other commands include:
- getphysicaladdress - Get the physical address for this cec adapter
- getlogicaladdress - Get the primary logical address for this cec adapter
- getlogicaladdresses - Get all the logical addresses for this cec adapter
- logical2physical - Convert the logical address to its physical address (if known)
- physical2logical - Convert the physical address to its logical address (if known)
- getosdname - Get the on screen name (if known) for the given address e.g.
TV - getpowerstatus - Get the power status code for the given address (if known) e.g.
0 - getpowerstatusname - Give the power status name for the given address (if known) e.g.
STANDBY - getactivesource - Get the physical address of the active source (if known) e.g.
0.0.0.0
Note, if any of the queries above are unknown, then null is returned.
Output Format
If a specific address is requested for getstate, as follows:
msg = {
  "command": "getstate",
  "address": "0"
}
then following js data structure shall be returned:
{
  "physical": "0.0.0.0",
  "power": 1,
  "osdname": "TV"
}
If a value for a specific address is not known, then it will either be set to null, or an empty string:
{
  "physical": null,
  "power": null,
  "osdname": ""
}
For getsource, if msg.address is omitted, then all devices' state is returned as an object keyed by logical address for all devices, as per below:
{
  "0": {
    "physical": "0.0.0.0",
    "power": 1,
    "osdname": "TV"
  },
  "1": {
    "physical": "1.0.0.0",
    "power": 0,
    "osdname": "RasPlex"
  },
  "2": {
    "physical": null,
    "power": null,
    "osdname": ""
  },
  "3": {
    "physical": null,
    "power": null,
    "osdname": ""
  },
  "4": {
    "physical": "3.0.0.0",
    "power": null,
    "osdname": "node-red"
  },
  "5": {
    "physical": null,
    "power": null,
    "osdname": ""
  },
  ...
  "15": {
    "physical": null,
    "power": null,
    "osdname": ""
  }
}
Property to Store State in Outgoing Message
You can specify the property name to store the output in the outgoing msg object. By default, it will be stored in msg.payload but you can store it anywhere.
Storing State in Flow Context
If you wish, you can also have cec-state store the state information of all devices in the context of the flow in which the cec-state node resides. This makes this state information available to any other node in the flow, including function nodes. You can specify the property name to use to store the state information, which by default, is cec. To access the state data from a function node, use the following syntax:
var cec = flow.get('cec') ;
msg.payload = cec.devices[0].osdname ;
return msg ;
This will retrieve the on screen display name for the TV (logical address 0) and store it in the payload of the outgoing message from the function node.
var cec = flow.get('cec') ;
msg.payload = cec.active_source ;
return msg ;
This will retrieve the physical address of the currently known active source device.
CEC Bus San
Finally, you can ask the cec-state node to perform a bus scan on startup to try and identify all the devices attached to the display device (on the CEC bus). Keep in mind that if you have non-CEC enabled devices attached, the scan can cause confusion about which device is the active source. Your mileage may vary.
Contributions
Contributions are welcome.
Licence
Copyright (c) 2017 Damien Clark, Damo's World
Licenced under the terms of the
GPLv3

THIS SOFTWARE IS PROVIDED BY THE COPYRIGHT HOLDERS AND CONTRIBUTORS "AS IS" AND ANY EXPRESS OR IMPLIED WARRANTIES, INCLUDING, BUT NOT LIMITED TO, THE IMPLIED WARRANTIES OF MERCHANTABILITY AND FITNESS FOR A PARTICULAR PURPOSE ARE DISCLAIMED. IN NO EVENT SHALL DAMIEN CLARK BE LIABLE FOR ANY DIRECT, INDIRECT, INCIDENTAL, SPECIAL, EXEMPLARY, OR CONSEQUENTIAL DAMAGES (INCLUDING, BUT NOT LIMITED TO, PROCUREMENT OF SUBSTITUTE GOODS OR SERVICES; LOSS OF USE, DATA, OR PROFITS; OR BUSINESS INTERRUPTION) HOWEVER CAUSED AND ON ANY THEORY OF LIABILITY, WHETHER IN CONTRACT, STRICT LIABILITY, OR TORT (INCLUDING NEGLIGENCE OR OTHERWISE) ARISING IN ANY WAY OUT OF THE USE OF THIS SOFTWARE, EVEN IF ADVISED OF THE POSSIBILITY OF SUCH DAMAGE.
Acknowledgements
Like others who stand on the shoulders of giants, I'd like to acknowledge the contributions of the following people/groups without which, more directly, this modest Node-RED node would not be possible.
- cec-monitor by Pablo González of Senzil, and
- libcec by PulseEight.
