native-json-editor
v0.3.0
Published
Native JSON text editor with indentation and syntax highlighting on the fly.
Downloads
103
Maintainers
Readme
JSON Editor
A HTML text editor for json inputs, with auto indentation and syntax highlight, both on the fly while typing. If this doesn't sound good enough:
- NO libraries, frameworks or transpilers required.
- It works with vanilla HTML / JS and it doesn't have any dependency.
- Easy integration, as it's a single javascript file. Available as a node package as well.
- FULL styling control with CSS.
Just add in your document:
<json-editor></json-editor>to render this:
How to install
Setup for vanilla HTML / JS
Just take the file json-editor.js file. Then, add it to your application as usual.
<script src="json-editor.js" />Setup for Node
First, add the package to your project.
npm install native-json-editor --saveSecond and last, add the package to the files for which you will use it.
require('native-json-editor')How to use it
After the setup, you will have 1 new HTML tag available to use: json-editor.
<json-editor>
Defines a new editor, similar to a vanilla textarea.
Attributes
value: You can initialise the editor with some json, just add your json as a STRING using this value.indent: The number of "spaces" used in the indentation, default is 3.
For clarity, consider the following example:
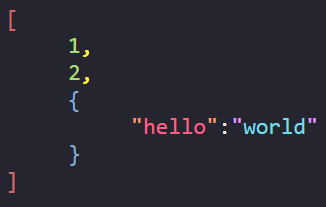
<json-editor value='[ 1, 2, {"hello":"world"} ]' indent="5"></json-editor>That will render:
API
To control the editor programmatically, you can use the following getters and setters:
raw_string: Gets/Sets the editor content as a string. Getter returns the current editor content even if it is invalid json. It includes new line characters (\n). Example:// get const value = editor.raw_string // returns '[\n1,\n2,\n{\n"hello":"world"\n}\n]' as a stringstring_value: Gets/Sets the editor content as a string. Getter returns the LAST VALID json string. Example:// get const value = editor.string_value // returns '[ 1, 2, {"hello":"world"} ]' as a string // set editor.string_value = '{ "other": "stuff" }' // sets the content of the editorjson_value: Gets/Sets the editor content as data. Getter returns the LAST VALID json value. Example:// get const value = editor.json_value // returns an array [ 1, 2, {"hello":"world"} ] // set editor.json_value = { "other": "stuff" } // sets the content of the editor from an objectvalue: Value is just an alias for string_value, with no difference but the name. I recommend to use the prefixed getters and setters for clarity, but it's on you.// get const value = editor.value // returns '[ 1, 2, {"hello":"world"} ]' as a string // set editor.value = '{ "other": "stuff" }' // sets the content of the editoris_valid(): A method which returns true or false, depending if the current editor content is valid json or not.// get editor.is_valid() // returns true
Styling
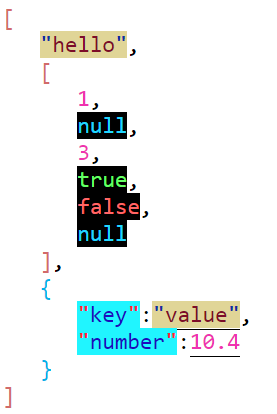
To customize the style, we just need some CSS. As example we can create a "light theme" version of the editor just with:
/* a class name for the editor */
.light {
    background: #FFF;
    border: 1px solid black;
}

/* to customise the different tokens of the json syntax, we just do... */
.light::part(braces)        { color: #00b2e8 } /* curly braces {} */
.light::part(brackets)      { color: #d26a6a } /* brackets [] */
.light::part(colon)         { color: #000000 } /* colon : */
.light::part(comma)         { color: #000000 } /* comma , */
.light::part(string)        { color: #7c0d29; background: rgb(224, 213, 151) } /* strings */
.light::part(string_quotes) { color: #112ba1 } /* quotes wrapping strings */
.light::part(key)           { color: #1d0bbe; background: #20f5ff; } /* object keys */
.light::part(key_quotes)    { color: #ff2032 } /* quotes wrapping object keys */
.light::part(value)         { border: 1px solid #000 } /* object value */
.light::part(number)        { color: #ef33b0 } /* number */
.light::part(null)          { color: #21d6ff; background: #000; } /* null keyword */
.light::part(true)          { color: #ffd6d6; background: #000; } /* true keyword */
.light::part(false)         { color: #d6ffd6; background: #000; } /* false keyword */
<json-editor class="light"></json-editor>the above will result in:


