mock-service-plugin
v1.2.2
Published
模拟后端接口服务
Downloads
317
Maintainers
Readme
mock 服务的作用
前后端分离并行开发,模拟后端接口服务
优势
- 兼容 webpack 4/5
- 兼容 常见框架 Vue/React
- 支持 restful api 规范
- 使用简单 易与项目集成
mock-service-plugin 介绍
示例项目
如果基于 Vue/React 搭建 mock 环境, 点击下方锚点跳转到对应安装教程
安装
npm i mock-service-plugin --save-dev参数
new MockServicePlugin(options);- options.path mock 数据的存放路径
- options.port 代理服务器端口,默认为 3000
Mock 文件夹位置
.
├── app         //工程目录
    ├── dist
    ├── config
    ├── src
    ├── mocks    //mock数据目录
    |   ├── data.js
    |   ├── data.json
        ...
Mock 数据
Mock 数据 并非严格的 json 格式数据文件,更像是 js 代码。
当我们只需要返回直接的数据结构,使用如下的 json 格式会显得非常直接,示例data.json如下:
/**
 * @url /login
 * @method POST
 * @title 登录接口
 * @content 说明
 * @param {string} userid
 * @param {string} password
 */
{
	"code": 404,
	"data|5-10": [
		{
			"name": "@cname",
			"id": "@guid",
			"email": "@email"
		}
	],
	"message": "success"
}
对应的文件内容可以这样理解
- @url:
访问路径(必填项) - @title:
接口名称(非必填) - @method:请求方法 (非必填)
- @param: 请求参数 (非必填)
- @content: 页面说明/接口说明/备注
以上 mock 数据的语法均来自 mockjs,想获取更多语法可以参阅 mockjs 官网文档和示例
mock 数据说明文档和功能来源于 52cik/express-mockjs
注意
增加 mock 数据时,在 mock 中新建文件即可,webpack 配置无需更新,但是需要刷新界面
构建 mock 服务
分为三部分讲解:
- webpack 通用配置
- Vue 搭建 mock 服务
- React 搭建 mock 服务
- vite 构建 mock 服务
webpack 通用配置
在工程目录中增加一个 mocks 文件夹
.
├── app         //工程目录
    ├── dist
    ├── config
    ├── src
    ├── mocks    //mock数据目录
    |   ├── data.js
    |   ├── data.json
        ...
在 webpack.config.js 中,配置 proxy 和 mock-service-plugin
// 引入插件
const MockServicePlugin = require("mock-service-plugin");

// webpack 配置
module.exports = {
  // 配置插件
  plugins: [
    // 插件的功能是根据配置文件,起一个指定端口的server,将接口请求指向json文件
    new MockServicePlugin({
      // mock数据的存放路径
      path: path.join(__dirname, "./mocks"),
      // 配置mock服务的端口,避免与应用端口冲突
      port: 3000,
    }),
  ],
  // 配置代理,这里的代理为webpack自带功能
  devServer: {
    // 应用端口,避免与mock服务端口冲突
    port: 5001,
    proxy: {
      // 配置匹配服务的url规则,以及其代理的服务地址,即mock服务的地址
      "/": "http://localhost:3000/",
    },
  },
};
如果想要给 mock 服务指定 URL 前缀,你可以在 webpack 的 proxy 设置进行如下配置:
...
module.exports = {
  ...
  // 配置代理,这里的代理为webpack自带功能
  devServer: {
    // 应用端口,避免与mock服务端口冲突
    port: 5001,
    proxy: {
      '/api': {
        target: 'http://localhost:3000/',
        pathRewrite: {
          // 设置url的重写, 实际过程如下:
          // http://localhost:5001/api/getData -> http://localhost:3000/getData
          '^/api': ''
        }
      }
    }
  }
};
Vue 构建 mock 服务
安装
mock-service-pluginnpm i mock-service-plugin --save-dev在
vue.config.js配置mock-service-plugin// 引入插件 const MockServicePlugin = require("mock-service-plugin"); module.exports = { configureWebpack: { // 在 plugins 初始化插件 plugins: [ // 初始化 new MockServicePlugin({ path: path.join(__dirname, "./mocks"), // mock数据存放在 mocks 文件夹中 port: 9090, // 服务端口号 }), ], }, };项目根目录下创建 mock 数据文件夹
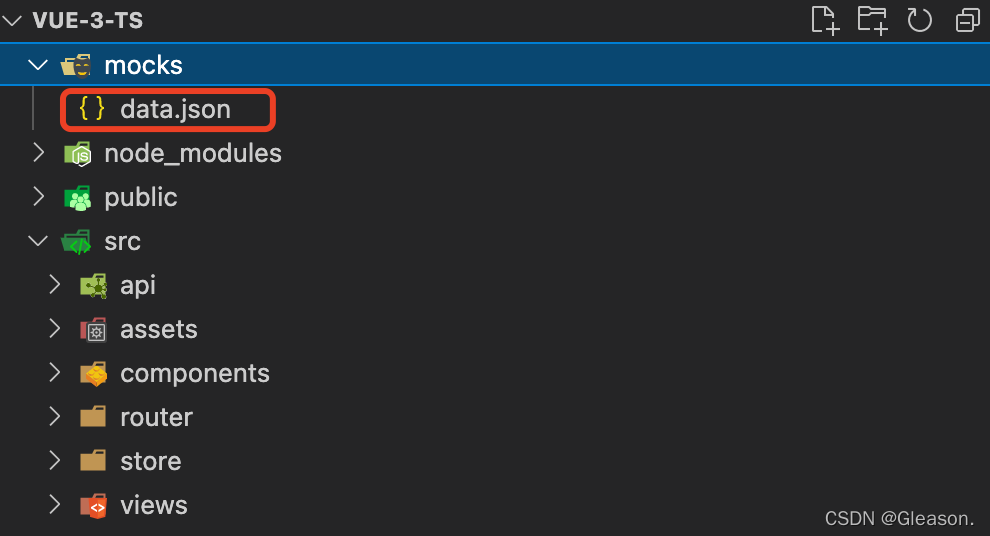
mocks如下图
在
mocks文件夹下创建一个data.json文件
添加如下数据(一个文件里仅仅放一个接口的 mock 数据,文件名随意)
/**
 * @url /login
 */
{
	"code": 404,
	"data|5-10": [
		{
			"name": "@cname",
			"id": "@guid",
			"email": "@email"
		}
	],
	"message": "success"
}
说明:
以获取用户信息接口为例(
www.example.com/user/info),我们通常会把www.example.com作为baseUrl,user/info作为接口 URL,在 data.json 文件文件中的/login就相当于user/info(图片懒得换了你们懂就行),头部注释中的
@url字段是必须的,当请求发送到 mock 服务器上时, mock 服务会遍历mocks文件夹下所有的.json文件, 将请求 url 与头部注释 @url 中的字段匹配, 匹配成功返回json中的数据
添加好以上信息后重启项目 (注意控制台输出)

在浏览器中打开
http://localhost:9090
点击左侧列表中
/login
如果看到上面的页面说明我们 mock 服务搭建成功了,接下来只要把请求发送到 mock 服务器上就可以了下面我们来实现下吧
将请求发送到
http://localhost:9090, 在vue.config.js中配下代理 就可以了// 配置代理 devServer: { // 应用端口,避免与mock服务端口冲突 port: 3000, proxy: { '/api': { target: 'http://localhost:9090/', pathRewrite: { // 设置url的重写, 实际过程如下: // http://localhost:5001/api/getData -> http://localhost:3000/getData '^/api': '' } } } }设置 axios 的
baseUrl为api就可以了 这一步很简单,把我的配置贴在下面,根据实际情况自行调整哈
在项目中使用

在页面上测试下

Vue 项目的 mock 服务就搭建完成了
React 构建 mock 服务
CRA 官方并没有开放 Webpack 的配置,有两种解决方式,第一种弹出 webpack 配置,第二种社区适配方案,社区适配方案主流有两种 craco 与 customize-cra 因为这两种方式都有人用,分别介绍下,建议将 Vue 配置教程详细阅读一遍,主要看配置流程,原理其实都一样
安装 mock-service-plugin
npm i mock-service-plugin --save-dev
craco 配置
// craco.config.js

import path from "path";

import { whenDev } from "@craco/craco";

// mock 插件
import MockServicePlugin from "mock-service-plugin";

const {
  REACT_APP_ENV, // 环境标识
} = process.env;

const pathResolve = (pathUrl) => path.join(__dirname, pathUrl);

module.exports = {
  webpack: {
    plugins: [
      ...whenDev(
        () => [
          // 配置mock服务
          new MockServicePlugin({
            path: path.join(__dirname, "./mocks"),
            port: 9090,
          }),
        ],
        []
      ),
    ],
  },
  devServer: {
    proxy: {
      "/mock": {
        secure: false,
        ws: false,
        target: `http://localhost:9090`,
        changeOrigin: true,
        pathRewrite: {
          "^/mock": "",
        },
      },
    },
  },
};
customize-cra 配置
// config.overrides.js

const path = require("path");

const {
  override, // 覆盖函数
  addWebpackAlias, // 别名配置
  addLessLoader, // less loader
  fixBabelImports, // babel 导入 引入antd-mobile
  addWebpackPlugin, // 增加插件
} = require("customize-cra");

// mock 插件
const MockServicePlugin = require("mock-service-plugin");

const {
  REACT_APP_ENV, // 环境标识
} = process.env;

/**
 * @description: 路径 处理
 * @param {String} pathUrl
 * @return {String} path
 */
const pathResolve = (pathUrl) => path.join(__dirname, pathUrl);

// override
module.exports = {
  webpack: override(
    addWebpackPlugin(
      // 配置mock服务
      new MockServicePlugin({
        path: path.join(__dirname, "./mocks"),
        port: 9090,
      })
    ),
    (config) => {
      return config;
    }
  ),
  devServer: (configFunction) => (proxy, allowedHost) => {
    proxy = {
      "/mock": {
        secure: false,
        ws: false,
        target: `http://localhost:9090`,
        changeOrigin: true,
        pathRewrite: {
          "^/mock": "",
        },
      },
    };
    return configFunction(proxy, allowedHost);
  },
};
Vite 构建 mock 服务
- 在项目根目录创建 vite-mock-plugin.ts 文件(文件名随意起)将下面代码粘贴进去
import MockServicePlugin from "mock-service-plugin";
import net from "net";
import path from "path";

function isPortTaken(port: number) {
  return new Promise((resolve) => {
    const server = net.createServer();

    server.once("error", (err: { code: string }) => {
      if (err.code === "EADDRINUSE") {
        resolve(true);
      } else {
        resolve(false);
      }
    });

    server.once("listening", () => {
      server.close();
      resolve(false);
    });

    server.listen(port);
  });
}

// eslint-disable-next-line import/no-default-export
export default function ViteMockServicePlugin(e: string) {
  return {
    name: "ViteMockServicePlugin",
    buildStart() {
      (async () => {
        const port = 3008;
        const portTaken = await isPortTaken(port);
        if (portTaken) {
          console.log(`Port ${port} is already in use`);
        } else {
          if (e === "mock") {
            const ints = new MockServicePlugin({
              // mock 数据的存放路径
              path: path.join(__dirname, "./mocks"),
              // 配置mock服务的端口,避免与应用端口冲突
              port: 3008,
            });
            ints.apply();
          }
        }
      })();
    },
  };
}- 配置
vite.config.ts文件
import react from "@vitejs/plugin-react";

import ViteMockServicePlugin from "./vite-mock-plugin";

export default defineConfig(({ mode }) => {
  return {
    plugins: [react(), ViteMockServicePlugin(mode)],
  };
});
更新支持
支持 RESTful API
/llm/:schema/:type/:id/txt/v2支持流式传输
LLM、 SSE、 EventStream 响应
以下是流模式及 RESTful api 使用示例
/**
 * @url /llm/:schema/:type/:id/txt/v2
 * RESTful API endpoint for streaming LLM responses
 * 下面是 流模式 响应固定格式,
 * 必须包含 "stream": true,
 * 必须包含 "interval": "100"
 * 其他字段不是必须的,根据 业务需求自定义
 */
{
  "stream": true, // 是否为流模式
  "interval": "@integer(100,500)", // 间隔响应时间
  "items|50": [
    {
      "id": "@increment(1)",
      "data": {
        "id": "@guid",
        "object": "chat.completion.chunk",
        "created": "@now('T')",
        "model": "@pick(['moonshot-v1-8k', 'moonshot-v1-16k', 'moonshot-v1-32k'])",
        "choices": [
          {
            "index": 0,
            "delta": {
              "role": "assistant",
              "content": "@csentence(3,10)"
            },
            "finish_reason": null
          }
        ],
        "system_fingerprint": "fpv0_@string('lower',8)"
      }
    }
  ]
}