
miniprogram-qrcode-clip
v0.0.4
Published
clip miniprogram qrcode center circle area at client side to your custom image!
Downloads
3

Readme
miniprogram-qrcode-clip
clip miniprogram qrcode center circle area at client side to your custom image!
#! https://zhuanlan.zhihu.com/p/414365336

icebreaker手把手教你定制小程序码
前言
小程序菊花码,相比与普通的二维码,辨识度高,一看就知道拿微信扫。
默认情况下,我们可以自定义生成码的 参数, 路径, 大小, 自动或手动配置线条颜色,底色是否为透明 这些配置项。
然而,这些配置项往往是无法满足我们的定制化需求的。
举个例子,我们需要在不破坏 小程序码 可识别性的情况下,把中间的 Logo 替换掉,怎么做呢? 接下来就由笔者手把手来教你。
梳理思路
我们先要理清楚这个问题的本质。这个其实就是个 图像处理 问题, 而这个工作服务端和客户端都能做。
于是就有 2 个方案:
服务端生码并且缝合出结果的 服务端处理方案。具体怎么做,有兴趣的同学,可以查看笔者的这篇文章 Web 函数自定义镜像实战:构建图象处理函数
服务端生码,客户端缝合方案。这就是本篇文章具体提及的。
注:小程序码一般由服务端调用微信api接口生成
云调用——生码最简便方案
总所周知,微信小程序环境的 wxacode.getUnlimited 有 2 种生成模式,一种为 HTTPS 调用 , 一种为 云调用。
其中 云调用 作为一种场景定制化的 serverless解决方案,往往能为我们的开发,带来效率上的提升。我们接下来快速部署一个getWxacodeUnlimit函数,来为我们提供测试素材。
getWxacodeUnlimit/index.js:
import cloud from 'wx-server-sdk'

cloud.init({
  env: cloud.DYNAMIC_CURRENT_ENV
})

export async function main (event, context) {
  const { scene = '', page, width = 430, autoColor, lineColor, isHyaline } = event
  const result = await cloud.openapi.wxacode.getUnlimited({
    scene,
    page,
    width,
    autoColor,
    lineColor,
    isHyaline
  })
  return result
}
// 笔者使用了打包工具, 大家想直接跑,把 esm 转化为 cjs 即可 getWxacodeUnlimit/config.json:
{
  "permissions": {
    "openapi": ["wxacode.getUnlimited"]
  }
}
通过上述 2 段代码块,我们的测试函数就部署完成了。
把返回的 buffer 转成本地临时图片
const suffixMap = {
  'image/jpeg': 'jpeg',
  ...
}

export function getPath(filename = 'tmp', contentType = 'image/jpeg') {
  return `${wx.env.USER_DATA_PATH}/${filename}.${suffixMap[contentType] || 'jpeg'}`
}

export function writeFile(buff, contentType = 'image/jpeg', filename = 'tmp') {
  return new Promise((resolve, reject) => {
    const fsm = wx.getFileSystemManager()
    const filePath = getPath(filename, contentType)
    fsm.writeFile({
      filePath,
      data: buff,
      encoding: 'binary',
      success() {
        resolve(filePath)
      },
      fail(error) {
        reject(error)
      }
    })
  })
}

....
// 在需要用到的地方直接
try {
  loading('生成中')
  const result = await getQrcode(scene, option) // 云调用封装function
  return await writeFile(result.buffer, result.contentType, scene) // : string
} catch (e) {
  console.error(e)
} finally {
  loaded()
}
客户端的图像处理
提到客户端图像处理就不得不提到 canvas 这个原生组件了,所以我们只需要通过它,把小程序码中间的 Logo 部分,进行 测量和裁剪替换 为我们想自定义的图像就可以了。
测量
这里以默认小程序码大小 430px * 430px 为例。(本case为了简单易懂,都使用的此分辨率的小程序码,如需求分辨率不同,可按比例进行计算裁剪。)
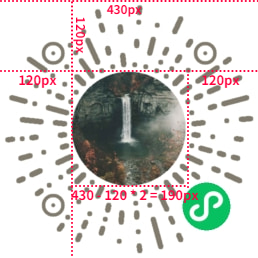
从图上的标注可知,在 430px * 430px 分辨率下,上下左右的边距为 120px ,可以算出中间 Logo圆形 的直径为 190px, 半径为 95px。
所以接下来就可以轻松愉快的写代码了。
利用canvas 2d实现
1代小程序 api 版本被淘汰了,现在直接使用 type="2d" 版本,Api文档在
MDN上
前置标签和样式
<!-- uni-app vue 格式,可自行转化为 wxml 简单的语法转化 `: => {{}}` -->
<canvas
  :class="visible ? '': 'canvas offscreen'"
  type="2d"
  id="canvas"
  :style="{
  width:width+'rpx',
  height:height+'rpx'
  }"
></canvas>
// scss
.canvas.offscreen{ // 2个 class 选择器,增加优先级
position: absolute;
bottom: 0;
left: -9999rpx;
// 这叫物理离屏渲染,笑~
}注: 不能在
canvas上 使用hiddenordisplay:none,它们会导致渲染空白。
核心 js 实现
初始化canvas实例和上下文
初始化 canvas 实例和 ctx 上下文:
let canvas
let ctx
{...codes...}
onReady(){
  uni
    .createSelectorQuery()
    .in(this)  // 如果canvas在组件中,则需要加这一行
    .select('#canvas')
    .fields({
      node: true,
      size: true
    })
    .exec((res) => {
      if (res[0]) {
        this.canvas = canvas = res[0].node
        this.ctx = ctx = canvas.getContext('2d')
        // 下面可根据设备的 pixelRatio 自行按比例调整,此处为了演示方便,就直接赋值了。
        canvas.width = 430
        canvas.height = 430
      }
    })
}
第一次渲染-画布背景
第一次渲染,把小程序码,作为图像传入画布。 drawBackgroud:
async drawBackgroud (orginQrcodeUrl) {
  const [err, res] = await uni.getImageInfo({
    // 这里可以是远程地址(需要配置downloadUrl)
    // 也可以是本地地址(直接返回参数自己)
    // 甚至 cloud:// 前缀的云存储url也可以哟
    src: orginQrcodeUrl
  })
  if (err) {
    throw err
  }
  const { path } = res
  const img = canvas.createImage()
  img.src = path
  await new Promise((resolve, reject) => {
    img.onload = () => {
      // 下面这一行,把小程序码,整个铺进画布中!
      ctx.drawImage(img, 0, 0, canvas.width, canvas.height)
      resolve()
    }
    img.onerror = (event) => {
      reject(event)
    }
  })
},
第二次渲染-裁剪加填充
第二次渲染,把背景裁剪一个圆,并把图片填充进去。 drawAvatar:
async drawAvatar (remoteAvatarUrl) {
  const [err, res] = await uni.getImageInfo({
    // 比如这里我用了云储存里的图像地址 prefix: cloud://
    src: remoteAvatarUrl
  })
  if (err) {
    throw err
  }
  const { path } = res
  const img = canvas.createImage()
  img.src = path
  // 测量数据在这里用上了
  const offsetX = 120 // x 轴偏移 120px
  const offsetY = 120 // y 轴偏移 120px
  const diam = 190 // 圆的直径 (430 - 120* 2) / 2
  const radius = diam / 2 // 圆的半径
  const borderWidth = 2 // 多加2px来把原先logo的纯色边抹除
  const circle = { // 裁剪部分圆的大小属性
    x: offsetX + radius,
    y: offsetY + radius,
    radius: radius + borderWidth
  }
  await new Promise((resolve, reject) => {
    img.onload = () => {
      ctx.save()
      // 开始! 把原先中间的Logo干掉!
      ctx.arc(circle.x, circle.y, circle.radius, 0, Math.PI 2, false)
      ctx.clip()
      // 结束
      // 开始! 把我们需要的自定义图像,平铺的插入进去!
      ctx.drawImage(
        img,
        offsetX - borderWidth,
        offsetY - borderWidth,
        circle.radius * 2,
        circle.radius * 2
      )
      // 结束
      ctx.restore()
      resolve()
    }
    img.onerror = (event) => {
      reject(event)
    }
  })
},
通过以上几步 ,我们就可以轻松的完成图像处理部分,把中间的默认Logo给替换成自定义的图像。
预览及下载到本地
// 获取 tempFilePath
async getImage () {
  const [err, res] = await uni.canvasToTempFilePath({
    canvas
  })
  if (err) {
    throw err
  }
  return res.tempFilePath
}
// 预览
async preview (src) {
  if (src) {
    uni.previewImage({
      urls: [src]
    })
  }
},
// 保存到相册里
async save (src) {
  try {
    // 先授权,后保存
    await authorize('scope.writePhotosAlbum')
    const [err, res] = await uni.saveImageToPhotosAlbum({
      filePath: src
    })
    if (err) {
      throw err
    }
    this.$success('保存成功!')
  } catch (e) {
    console.error(e)
  }
}
就这样,客户端生成自定义小程序码的整套解决方案就完成了
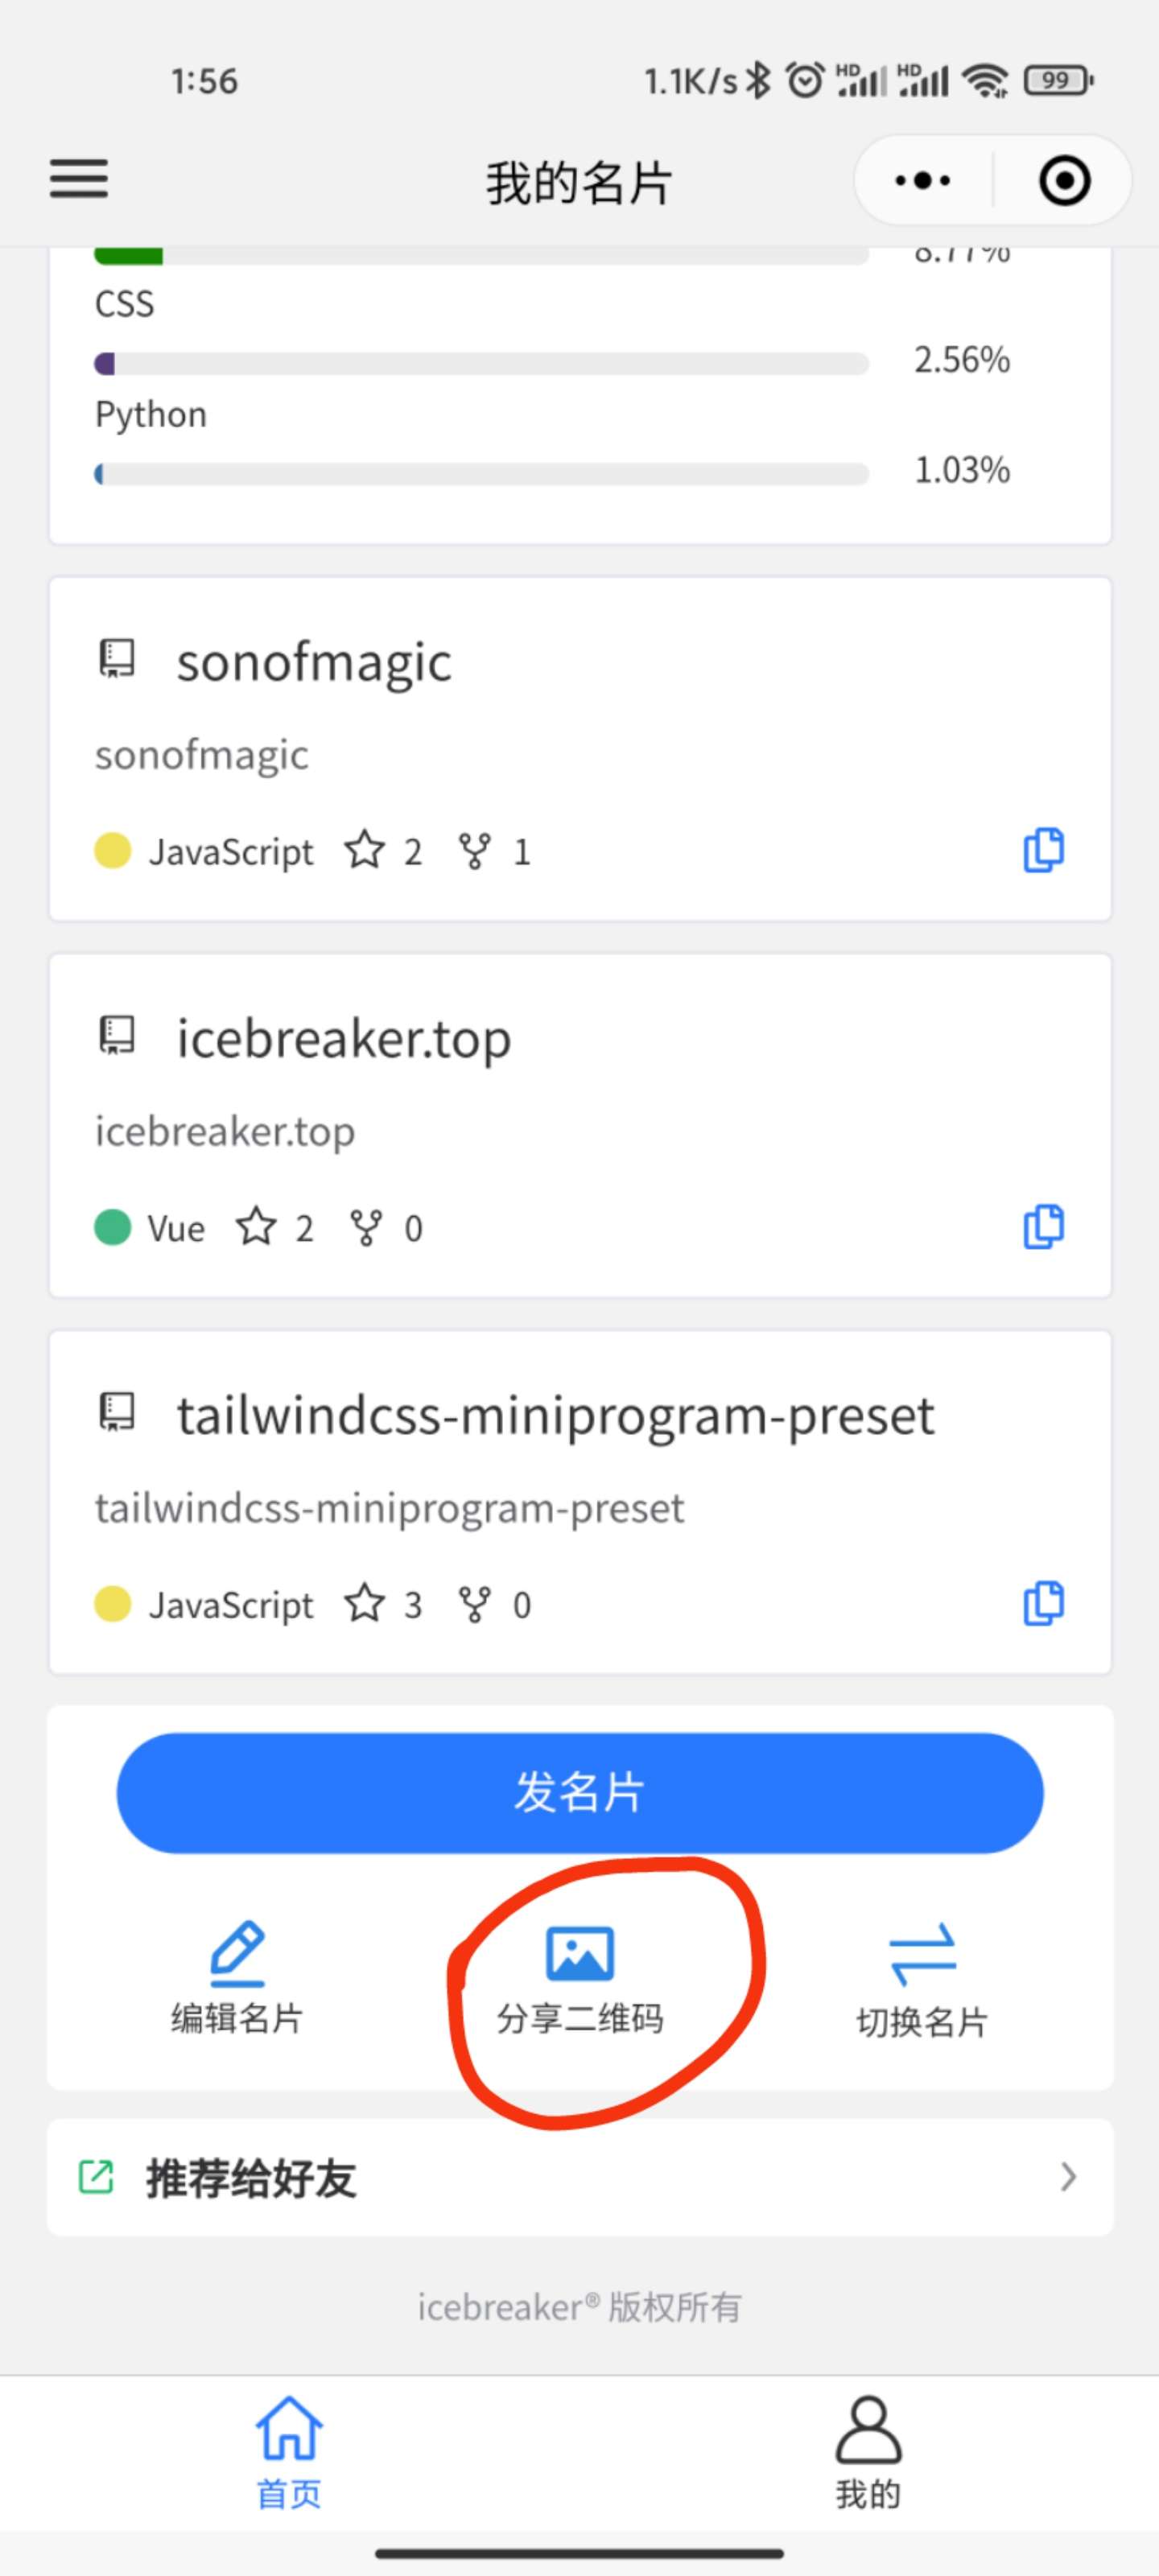
效果展示
或者微信搜索 程序员名片 后,维护名片,上传头像,再点击下方 分享二维码 按钮,即可预览。
自定义生成转发图片
这篇文章这个案例还算是非常简单的,笔者之前还写过一个 小程序Canvas 2D自定义生成转发图片, 还有自定义分享海报,这些原理上都是大同小异的,一通百通。