mantine-scheduler
v0.0.7
Published
[](https://choosealicense.com/licenses/mit/)
Downloads
11
Readme
Mantine-Scheduler
Introduction
Mantine-Scheduler is a powerful and flexible React package that allows you to easily integrate scheduling functionality into your Mantine-based applications. This package provides a customizable calendar component with various views and event handling capabilities.

Table of Contents
Installation
To install the mantine-scheduler package, run the following command:
npm install mantine-scheduleryarn add mantine-schedulerpnpm install mantine-schedulerBasic Usage
Here's a simple example of how to use the Mantine-Scheduler component in your React application:
This example creates a basic scheduler component with a single user and event.
// Define a list of users of whom have events
const users: User[] = [
  { id: 1, name: "John Doe", avatar: "https://i.pravatar.cc/150?img=1" },
];

// Define a list of events for the given users
const events: Event[] = [
  {
    id: 1,
    userId: 1,
    startTime: "9:00 AM",
    endTime: "10:00 AM",
    title: "Meeting",
    color: "blue",
  },
  {
    id: 2,
    userId: 1,
    startTime: "2:00 PM",
    endTime: "4:00 PM",
    title: "Project Work",
    color: "green",
  },
];

// Generate time slots for the scheduler
// NOTE: generateTimeSlots is a helper method we provide
const timeSlots = generateTimeSlots({
  start: "9:00 AM",
  end: "5:30 PM",
  interval: 30,
});

<Scheduler
  date={dayjs()}
  timeSlots={timeSlots}
  events={events}
  users={users}
/>;
Props
The MantineScheduler component accepts the following props:
| Prop Name | Required | Description | Default Value | | ---------------- | -------- | ------------------------------------------------------------------- | ------------- | | date | Yes | The date for which the schedule is displayed (Date or Dayjs object) | - | | events | Yes | An array of Event objects | - | | users | Yes | An array of User objects | - | | timeSlots | No | An array of strings representing time slots | - | | timeFormat | No | The format string for displaying time | "h:mm A" | | onEventClick | No | Callback function triggered when an event is clicked | - | | onCellClick | No | Callback function triggered when a cell is clicked | - | | cellRenderer | No | Custom renderer for individual cells | - | | userRenderer | No | Custom renderer for user information | - | | timeSlotRenderer | No | Custom renderer for time slot labels | - | | tableProps | No | Additional props for the Table component (excluding 'children') | - | | timeHeaderProps | No | Props for the time header cells | - | | userColumnProps | No | Props for the user column cells | - |
Note: This component also accepts all props from TableProps except for children.
Event Handling
You can handle events using the provided callback props. Here's an example of how to handle event clicks:
const App = () => {
  const handleEventClick = (event: Event) => {
    console.log("Event clicked:", event);
  };

  return <Scheduler events={events} onEventClick={handleEventClick} />;
};
Advanced Features
Custom User Cell Rendering
You can provide a custom user renderer to control how user cells are displayed:
userRenderer={(user) => (
    <Group>
        <Avatar src={user.avatar as string} radius="xl" />
        <Text size="sm" fw={500}>
        {user.name}
        </Text>
    </Group>
)}
Examples
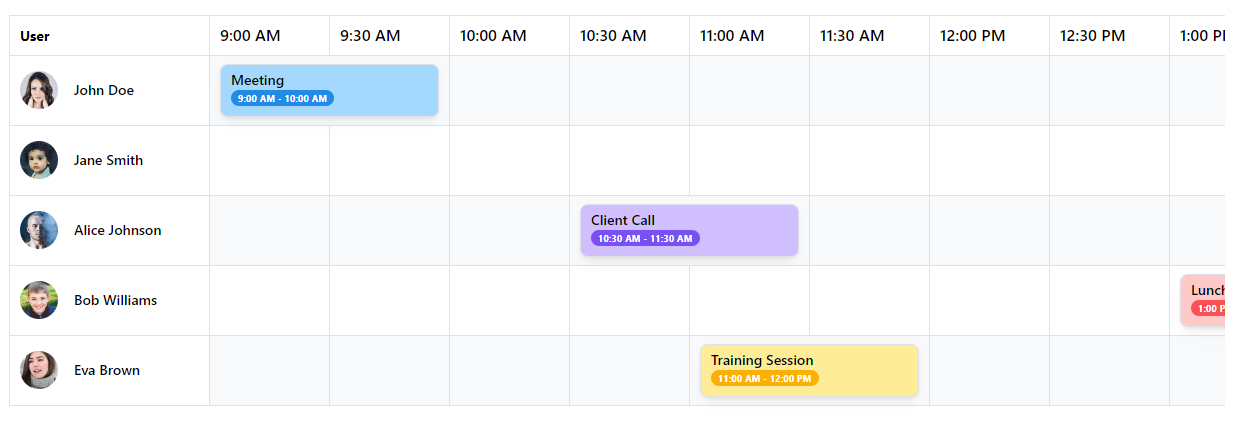
Advanced usage with custom user renderer and styles:
import { Scheduler, User, Event } from "../lib/Scheduler";
import dayjs from "dayjs";
import { generateTimeSlots } from "../lib/utils";
import { Avatar, Container, Group, Paper, Text } from "@mantine/core";

function App() {
  const users: User[] = [
    { id: 1, name: "John Doe", avatar: "https://i.pravatar.cc/150?img=1" },
    { id: 2, name: "Jane Smith", avatar: "https://i.pravatar.cc/150?img=2" },
    { id: 3, name: "Alice Johnson", avatar: "https://i.pravatar.cc/150?img=3" },
    { id: 4, name: "Bob Williams", avatar: "https://i.pravatar.cc/150?img=4" },
    { id: 5, name: "Eva Brown", avatar: "https://i.pravatar.cc/150?img=5" },
  ];

  const events: Event[] = [
    {
      id: 1,
      userId: 1,
      startTime: "9:00 AM",
      endTime: "10:00 AM",
      title: "Meeting",
      color: "blue",
    },
    {
      id: 2,
      userId: 2,
      startTime: "2:00 PM",
      endTime: "4:00 PM",
      title: "Project Work",
      color: "green",
    },
    {
      id: 3,
      userId: 3,
      startTime: "10:30 AM",
      endTime: "11:30 AM",
      title: "Client Call",
      color: "violet",
    },
    {
      id: 4,
      userId: 3,
      startTime: "3:00 PM",
      endTime: "5:00 PM",
      title: "Team Building",
      color: "orange",
    },
    {
      id: 5,
      userId: 4,
      startTime: "1:00 PM",
      endTime: "2:30 PM",
      title: "Lunch Meeting",
      color: "red",
    },
    {
      id: 6,
      userId: 4,
      startTime: "4:30 PM",
      endTime: "5:30 PM",
      title: "Code Review",
      color: "cyan",
    },
    {
      id: 7,
      userId: 5,
      startTime: "11:00 AM",
      endTime: "12:00 PM",
      title: "Training Session",
      color: "yellow",
    },
    {
      id: 8,
      userId: 5,
      startTime: "2:30 PM",
      endTime: "3:30 PM",
      title: "Design Review",
      color: "pink",
    },
  ];

  const handleEventClick = (event: Event) => {
    alert(`Event clicked: ${event.id}`);
  };

  const handleCellClick = (user: User, time: string) => {
    console.log("Cell clicked:", user, time);
  };

  const timeSlots = generateTimeSlots({
    start: "9:00 AM",
    end: "5:30 PM",
    interval: 30,
  });

  return (
    <>
      <Container mt={15}>
        <Paper withBorder radius="md" shadow="sm" p={15}>
          <Scheduler
            date={dayjs()}
            timeSlots={timeSlots}
            events={events}
            users={users}
            onEventClick={handleEventClick}
            onCellClick={handleCellClick}
            userRenderer={(user) => (
              <>
                <Group>
                  <Avatar src={user.avatar as string} radius="xl" />
                  <Text size="sm" fw={500}>
                    {user.name}
                  </Text>
                </Group>
              </>
            )}
            tableProps={{
              striped: true,
              highlightOnHover: true,
              withColumnBorders: true,
            }}
          />
        </Paper>
      </Container>
    </>
  );
}

export default App;
Contributing
We welcome contributions to the Mantine-Scheduler package! Please feel free to create any issues or prs you feel would improve the package

