madmin
v0.3.0
Published
madmin [](https://travis-ci.org/infrared5/madmin) =============
Downloads
6
Readme
madmin 
admin console for generating mock services with RESTful URIs.
Installing and using globally
$ npm install madmin
$ madmin [--port] [--json]
Options:
usage: madmin [port] [json]

Starts a server at http://localhost:<port> and provides a User Interface to document and dynamically curate a JSON based RESTful api.

Defaults to port 8124 unless --port option provided.
Defaults to load madmin lib local JSON resource file if --json option not provided.

options:
  --help              Display this help menu
  --port              Desired port to start server on localhost
  --json              Location to load the JSON file that describes the REST API
Getting and deploying madmin as standalone
Clone the madmin repo:
git clone [email protected]:infrared5/madmin.gitInstall the node module dependencies deifned in package.json
npm installRun madmin
node ./bin/madmin [--port] [--json]
Open your favorite modern web browser and go to http://localhost:8124/admin.
Usage
$> node index.js [port] [json]
When starting the madmin server, you can provide optional port and json source file. The following example shows it's usage and the default values:
node index.js --port 8124 --json ./public/resource/api.jsonWhen run, madmin will print out the specified port and json resource file defined:
2013-01-28 16:05:54 - info: JSON api read from /Users/toddanderson/madmin/public/resource/api.json.
2013-01-28 16:05:54 - info: madmin server running on port 8124 in development mode
The json source file provided will be read from and modified as you work with the madmin console interface.
Requirements
server-side
madmin server-side application has been tested against Node.js version >=0.8.4
client-side
madmin client-side application utilizes some ES5 objects and properties - ie, Object.create and Array.prototype.indexOf - and does not load in an additional polyfills to provide support for non-modern browsers.
The madmin client-side application should work properly in the following:
- Chrome 12+
- Safari 4+
- IE 9+
- Opera 12+
Introduction
madmin is a node application that provides a means to construct RESTful URIs that are immediately accessible on the server. While URIs can be defined using the command line - using such CLI tools such as cURL - madmin also provides an admin console as a GUI to aide in defining the URI and JSON response data structure.
Why?
madmin was born out of the intent to minimize time spent by front-end development teams building applications against a living spec for service requirements.
The Problem
We found that our front-end developers were curating two service layers implementing a common interface during development of an application:
[Fake] One that does not communicate with a remote resource and provides fake data.
Used during development without worry of remote endpoint being available (either from being undefined or no network) and can be modified to provide different responses in testing application response.
[Live] One that does communicate with a remote resource, sometimes utilizing libraries that abstract the communication.
Used for integration tests and QA on staging before pushing application to production.
This would allow the service layer dependency to easily be switched out during development and deployment while providing a common API for other components of the application to interact with.
Though these service layers are developed against the same interface providing a common API, the curation of both in tandem during development can be exhaustive timewise as specifications and requirements change. When we multiplied that curation time across the numerous applications being developed, it became clearer that the fake service layer needed to be eliminated from development - especially seeing as it is not part of the release or unit tests at all.
The Solution
Instead of defining the service layer as a dependency between these two implementations, if we could define the endpoints that the service layer communicates with then we could eliminate the need to have a fake service layer.
Just as the service references are changed from staging to production, why couldn't we provide a living service endpoint with URIs that are being discussed and hashed out between teams. As well, why can't we deploy that service locally and eliminate the need for a network resource to boot - we could continue our front-end development while relaxing on some remote un-connected island!
That is what madmin sets out to do.
The By-Product
Though the initial intent was to eliminate the curation of an unnecessary service layer from front-end development, by defining RESTful URIs using madmin we were actually providing useful documentation of the service layer and opened up comminication between the back-end and front-end teams with regards to requirements and data structure.
Opening channels for communication is always a plus, and the fact that it provided self-documentation just seemed like a winner!
What It is not
madmin is not meant to replace writing proper unit tests for client-side applications that communicate with a remote service nor is it mean to stand in for integration testing.
How?
The madmin application works by updating a target JSON source file that describes the RESTful URIs. This file is modified using a RESTful API of the madmin server application, itself. You can check out the schema for the source JSON file that defines the API at https://github.com/infrared5/madmin/blob/master/doc/madmin-api-schema.json
While it is possible to interact with the madmin server-side applicaiton using the command line - with such CLI tools such as cURL - a client-side applicaiton is available that provides ease of use and self-documentation.
Access
Once the server is started, you can access the GUI console for madmin at either: http://localhost:<port>/ or http://localhost:<port>/admin, with the <port> value wither being the default (8124) or the one specified using the --port command line option.
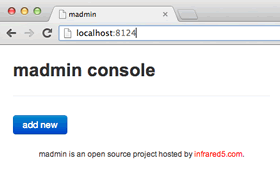
With an empty JSON API resource file, you will be presented with a console that provides an "add new" button only:
Upon adding a new route, you are presented with an empty editable console with various parameters:
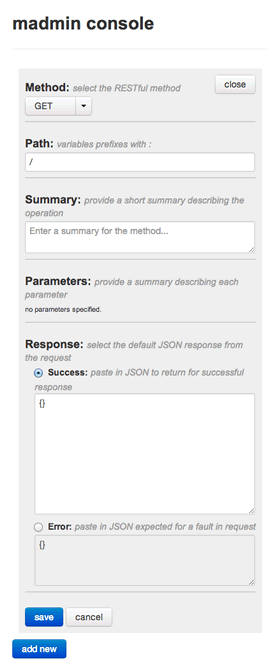
The following is a breakdown of each section from this route console UI:
Method
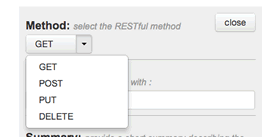
The Method dropdown allows you to select the desired REST method to associate with the URI defined in the Path field:
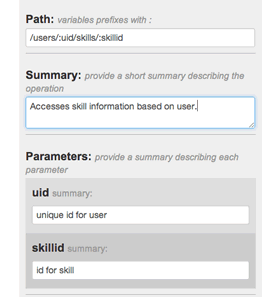
Path
The Path field defines the URI to add to the REST service:
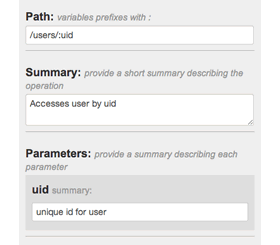
The Summary field allows for entering a description for the URI. When input focus is lost on the Path field, the listing of Parameters is updated and allows for providing descriptions for each variable:
Response
The Response field allows for defining the JSON returned from the URI. As well, you can choose which response to provide:
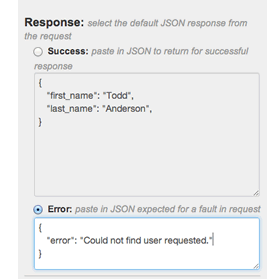
In reality it will return a 200 status with the selected JSON from either Success or Error. We often supply errors on a 200 and parse the response. This was an easy way for the team to coordinate the successful and error responses that come in JSON from the request.
Viewing Route URIs and Responses
When saved, the new route will be added to the supplies source JSON file and the client-side madmin console will change to the listing of URIs defined:
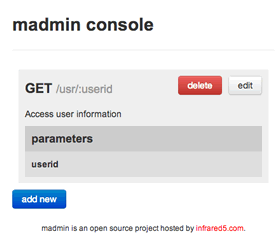
As well, the path and its proper response will be available immediately and available to develop against.
- With Error selected from the Response field:
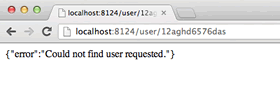
- With Success selected from the Response field:

note
The admin console can be found at the http://localhost:<port>/admin location. As such, /admin is a reserved route and can not be defined as a valid URI in madmin.
It is on the TODO list to define a custom URI for the admin portal of madmin in order to allow the currently reserved /admin.
Grunt Integration
The madmin repository has build files for grunt with support for <=0.3.x (grunt.js) and ~0.4.0 (Gruntfile.js) and tasks for linting and testing both the server-side and client-side code.
To run the grunt task simply run:
gruntDepending on your install version of grunt the proper build file should be run. To learn more about grunt and how to install, please visit the grunt project page.
Tools/Libraries
madmin could not have been possible without the following libraries:
NodeJS
- ExpressJS
- node-promise
- winston
- hbs - ExpressJS view engine wrapper for Handlebars
Client
Testing
Build
- Grunt - 0.3.x & ~0.4.0
- grunt-jasmine-node - 0.3.x & ~0.4.0
- grunt-jasmine-task - 0.3.x
- grunt-contrib-jasmine - ~0.4.0
- grunt-contrib-jshint - 0.3.x & ~0.4.0
- grunt-contrib-watch - 0.3.x & ~0.4.0
Acknowledgements
madmin could not have been created without the support from infrared5.com.
