
lolo-backend
v2.2.1
Published
Lolo Backend is a REST Framework and provides an automatic asynchronous CRUD backend server generator based on your models' definitions and validation rules for Node.js and MongoDB.
Downloads
1
Maintainers
 cpifano
Readme
Lolo Backend is a REST Framework and provides an automatic asynchronous CRUD (Non-Production) backend test server generator based on your models' definitions and validation rules for Node.js and MongoDB.
It is extremely easy to implement and provides a great variety of tools and possibilities for the implementation of a lightweight and strong RESTful backend server.
The purpose of this framework is to provide a quick and easy test server for frontend developers.
Installation
This is a Node.js module available through the npm registry.
Before installing, download and install Node.js.
If the installation is done using the npm install command:
npm install lolo-backendFeatures
- Rapid Backend Development.
- Security (
HTTPS,CORS,JWT). - Uses mongoose data modeling.
- Automatic integration of express-validator for validation rules.
- Automatic encryption of password type fields with bcrypt.
- Provides asynchronous responses.
- The find method provides a pager (Resolved pagination functions).
- Offers the possibility to set custom routes, out of automatic CRUD routing.
- Independent response translation module.
Dependencies [self-solved]
Lolo backend uses the following frameworks to provide an automatic CRUD Backend Server:
bcrypt: ^5.0.1 , cors: ^2.8.5 , express: ^4.17.1 , express-validator: ^6.10.0 , fs: ^0.0.1-security , http: ^0.0.1-security , https: ^1.0.0 , js-yaml: ^4.0.0 , jsonwebtoken: ^8.5.1 , moment: ^2.29.1 , mongoose: ^5.12.1 , path: ^0.12.7.
Quick Start
Lolo Backend in 3 single steps
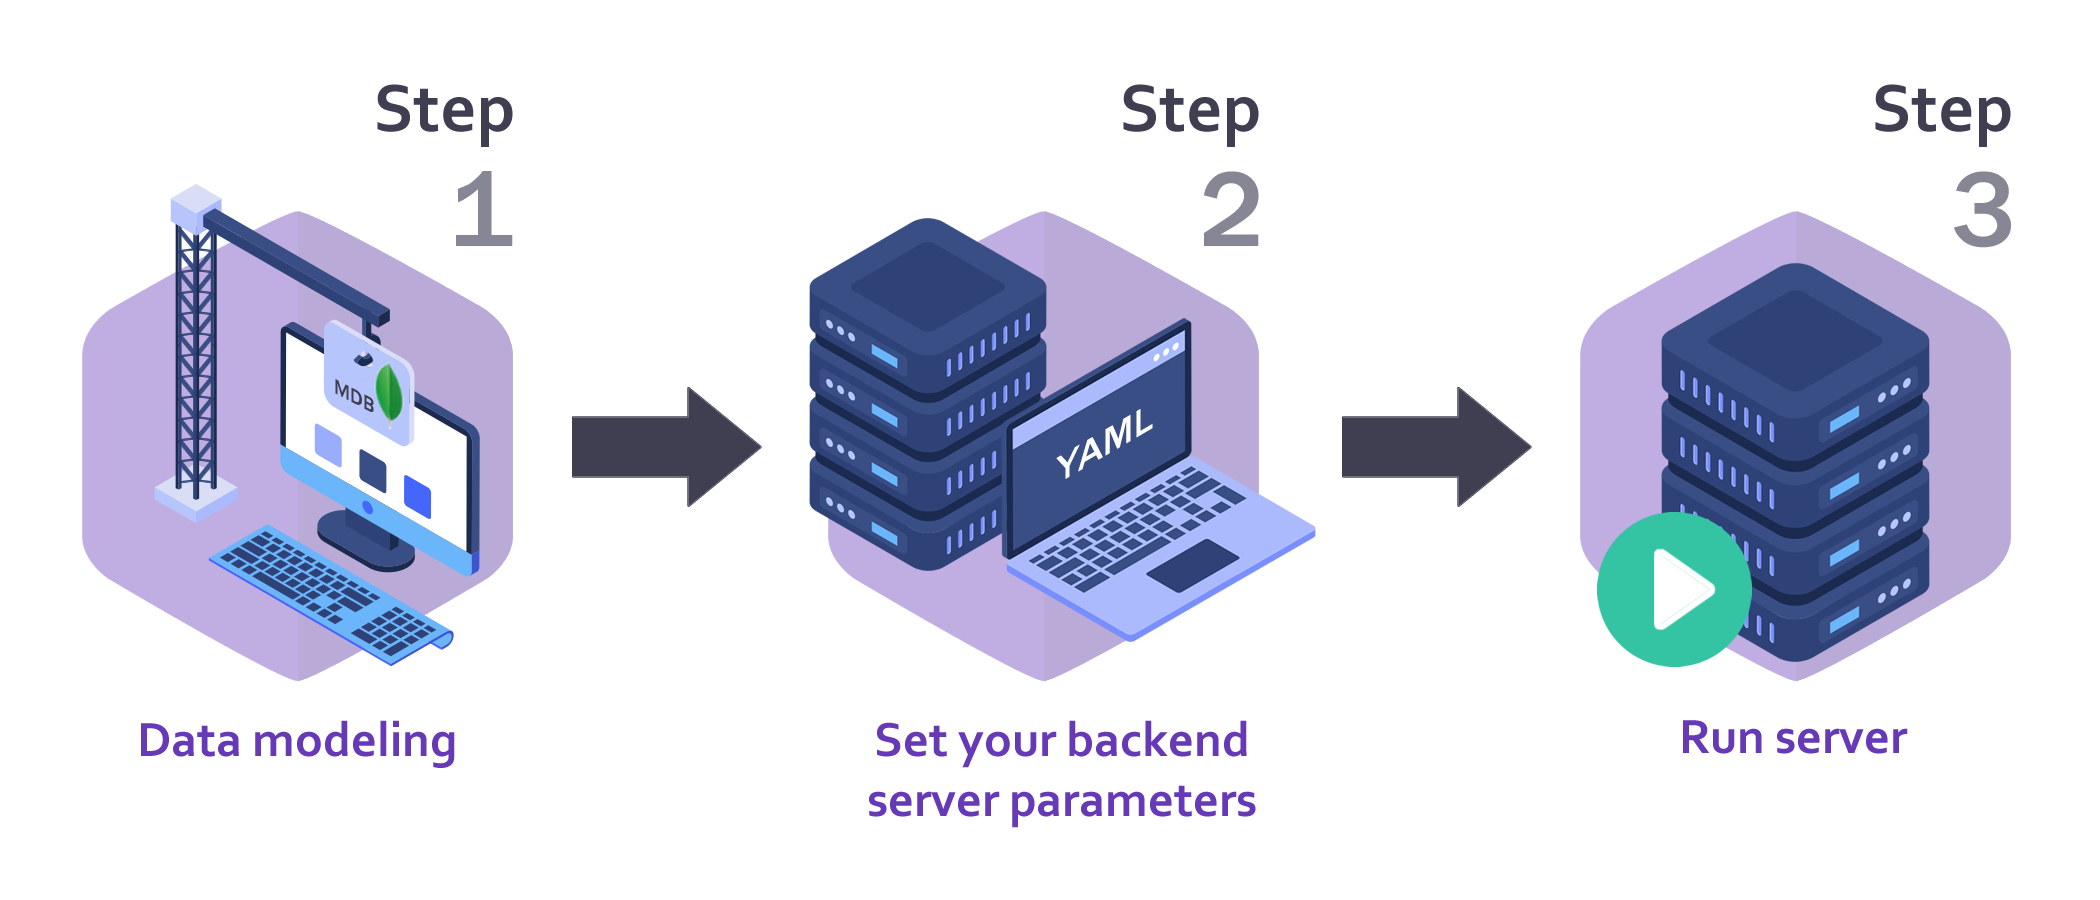
Step 1 - Data modeling
With Mongoose Schemas & Express-Validator
Lolo Backend allows automatic import of Mongoose Schemas & Models.
During the saving process in the database (MongoDB), these Schemas allow for a previous check against the corresponding Schema. Should the validation of the schema fail, mongoose will abort the save operation.
On the other hand, for validation rules and data normalization, Lolo Backend uses express-validator. express-validator is a set of express.js middlewares that wraps validator.js validator and sanitizer functions that ensure that only the correct data input reaches its destination (MongoDB).
Import mongoose and express-validator frameworks inside models' definitions files:
//Import modules:
const mongoose = require('mongoose');
const { body } = require('express-validator');
Modeling example (Simple user data modeling with mongoose):
//Define Schema:
const Schema = new mongoose.Schema({
    username:       { type: String, required: true },
    email:          { type: String, required: true, match: /.+\@.+\..+/ },
    status:         { type: Boolean, default: false }
},
{ timestamps: true },
{ versionKey: false });

//Define model:
const Model = mongoose.model('users', Schema);
Validation rules and data normalization example (express-validator):
//Define validation rules and data normalization for your models:
const Validator = [
    body('username')
        .trim()
        .isLength(8)
        .withMessage('The username is too short (minimum lenght: 8 characters).')
        .toLowerCase(),

    body('email')
        .trim()
        .isEmail()
        .withMessage('The value entered is not a valid email.')
        .normalizeEmail({ gmail_remove_dots: false })
        .toLowerCase(),

    body('status')
        .trim()
        .isBoolean()
        .withMessage('The status entered is not a boolean (true or false).')
        .toBoolean()
];
Clarification: The elements must be exported in the following way so that they are correctly interpreted by Lolo Backend.
//Export Shcema, Model and Validation Rules:
module.exports = { Schema, Model, Validator };
Step 2 - Set your backend server parameters
Lolo Backend imports the settings.yaml file from the root of the project (./).
In this file all the parameters to suit your backend server must be defined and adjusted.
Example of the contents of the settings.yaml file:
# MongoDB server settings:
db:
  host: 'localhost'
  port: 27017
  user: 'user_database'
  pass: 'pass_database'
  name: 'database_name'

# Web server settings:
webserver:
  host            : 'localhost'
  http_enabled    : true
  http_port       : 3001
  https_enabled   : false
  https_port      : 8443

# SSL settings (Only if https_enabled is true):
ssl_certificates:
  key  : './certificates/my_cert.key'
  cert : './certificates/my_cert.crt'
  ca   : false

# Set CORS and CORS whitelist:
cors_enabled: false
cors_whitelist : ['http://example.com:8080','https://another-example.com:443']

# Determine whether to use verbose mode:
verbose_log_enabled: true

# Set your secret token:
# For your safety change this value please.
secret_token: 'MY_SECRET_TOKEN'

# Establish JWT credentials for service consumers:
jwt_credentials:
  1:
    id: '54a8ce618e91b0b13665e2f9'
    username: 'angular-frontend'
    password: 'clave.segura.1'
    time_exp: '1d'
  2:
    id: '605a3f8282d6f81a5bbbc57a'
    username: 'mobile-app'
    password: 'clave.segura.2'
    time_exp: '2d'

# Set the language of the responses:
language: 'EN'

# Establish your models and their names:
models:
  users: './models/users'

# Determine whether to use custom routes:
custom_routes_enabled: true

# Set your custom routes file (Only if custom_routes_enabled is true):
custom_routes_file: './routes/custom_routes'
Important note
jwt_credentials:
- time_exp: Expressed in seconds or a string describing a time span zeit/ms.
Example:
60,"2 days","10h","7d". A numeric value is interpreted as a seconds count. If you use a string be sure you provide the time units (days, hours, etc), otherwise milliseconds unit is used by default ("120"is equal to"120ms").
Step 3 - Run your backend server
After making the models and configuring the parameters of your backend server, simply import lolo-backend and run it on your application.
//Import Lolo Backend:
const loloBackend = require('lolo-backend');

//Run Lolo Backend Server:
loloBackend.runserver();
How to use your backend server
Once the Lolo Backend is up and running, the following functions will be available for your application (API RESTful).
JSON Web Token (JWT)
Lolo Backend uses JWT to ensure secure access to data.
JWT is an open JSON-based standard for creating access tokens that allow identity and privilege propagation, in this case for your own backend server.

Request Methods
Lolo Backend provides the following list of request methods automatically for each of the defined models.
| METHOD | REQUIRES BEARER TOKEN | PATH / URL | DESCRIPTION |
| -------- | :-------------------: | ------------- | ------------------------------------------------------------ |
| POST | No | jwt-login | Generates a token (JWT) using authentication (settings.yaml > credentials). |
| GET | Yes | describe | Returns all the model's keys. |
| GET | Yes | count | Returns the number of documents that matches a specified filters. |
| GET | Yes | find | Finds all the records in the collection that match the filters, the projection and the requested sort. |
| GET | Yes | findById | Finds an element based on an ID (MongoDB _id). |
| GET | Yes | findOne | Finds a single item (first occurrence), in the collection that matches the filters, the projection and the requested sort. |
| POST | Yes | insert | Creates a new record in the database. |
| POST | Yes | update | Validates against the model and if positive, updates an existing record in the database according to the ID (MongoDB _id), and specified parameters. |
| POST | Yes | delete | Deletes an item from the database based on an ID (MongoDB _id). |
| POST | Yes | checkPassById | Checks password (password type field) according to the ID (MongoDB _id). |
Supported parameters & forms
jwt-login
admit: x-www-form-urlencodedusername = username defined in your settings.yaml file in the credentials section.
REQUIREDpassword = password defined in your settings.yaml file in the credentials section.
REQUIRED
describe
Does not admit parameters.
count
admit: URL Query Parametersfilter[
field_name] = string, number, boolean.
find
admit: URL Query Parametersfilter[
field_name] = string, number, boolean.proj[
field_name] = number (1 or 0 - Based on MongoDB Projections).sort[
field_name] = number (1 or -1 - Based on MongoDB Sort definitions).skip = number.
limit = number.
pager[page_number] = number.
pager[page_limit] = number.
Important note
pager: "If you use the pager parameters, keep in mind these overwrite the skip and limit parameters".
findById
admit: URL Query Parametersid = MongoDB _id.
REQUIREDproj[
field_name] = number (1 or 0 - Based on MongoDB Projections).
findOne
admit: URL Query Parametersinsert
admit: x-www-form-urlencodedYour models' fields: name_field = value.
REQUIRED
update
admit: x-www-form-urlencodedid = MongoDB _id.
REQUIREDFields to set: name_field = value.
REQUIRED
delete
admit: x-www-form-urlencodedid = MongoDB _id.
REQUIRED
checkPassById
admit: x-www-form-urlencoded- id = MongoDB _id.
REQUIRED password_field_name= password_to_check.REQUIRED
- id = MongoDB _id.
Set password case
If your model has a password type field, it must be specified with the isPassword() method of Lolo Backend's middleware crudMiddleware and this field will automatically be encrypted before being saved.
The request method checkPassById is available to validate the saved password field.
Modeling and validation rules definition example (Simple user data modeling with password field):
//Import modules:
const mongoose = require('mongoose');
const { body } = require('express-validator');
const loloBackend = require('lolo-backend');

//Define Pre-Schema (Only if a password field exists):
//For the rest of the cases use Schema directly.
const preSchema = new mongoose.Schema({
    username:       { type: String, required: true },
    password:       { type: String, required: true },
    email:          { type: String, required: true, match: /.+\@.+\..+/ },
    status:         { type: Boolean, default: false }
},
{ timestamps: true },
{ versionKey: false });

//Indicate that the schema has a password (to be encrypted):
Schema = loloBackend.crudMiddleware.isPassword(preSchema, 'password');

//Define model:
const Model = mongoose.model('users', Schema);

//Define validation rules and data normalization for your models:
const Validator = [
    body('username')
        .trim()
        .isLength(8)
        .withMessage('The username is too short (minimum lenght: 8 characters).')
        .toLowerCase(),

    body('password')
        .trim()
        .isLength(8)
        .withMessage('The password is too short (minimum lenght: 8 characters).'),

    body('email')
        .trim()
        .isEmail()
        .withMessage('The value entered is not a valid email.')
        .normalizeEmail({ gmail_remove_dots: false })
        .toLowerCase(),

    body('status')
        .trim()
        .isBoolean()
        .withMessage('The status entered is not a boolean (true or false).')
        .toBoolean()
];

//Export Shcema, Model and Validation Rules:
module.exports = { Schema, Model, Validator };
Supported languages
Currently, Lolo Backend supports the following languages for its response messages.
- English (
EN) - Spanish (
ES)
Example of a simple project
An example of a simple project is available for download here.
License
Lolo Backend is licensed by MIT License.