lexer-state
v1.0.7-alpha.1
Published
Lightweight state machine library to define and manage state transition declaratively
Downloads
11
Maintainers
Readme
Lexer state is a lightweight easy to use state management library, that’s allow you to handle and model your state transition declaratively using a state machine.
Installation
Install lexer state with npm
  cd my-project
  npm install lexer-state
Finite State Machine or Finite Automata
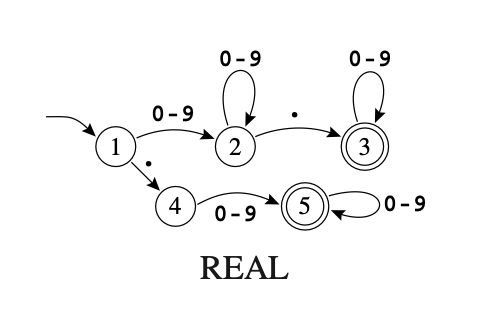
State machine or finite Automata has a finite set of states edges lead from one state to another, and each edge is labeled with a symbol. One state is the start state, and certain of the states are distinguished as final states.
Real Numbers Automata
We can describe a finite state machine that accept (identify) real numbers in the following diagram. Each circle represent a state in the machine, and the arrows are showing the type of input that’ll trigger a transition to the next state.

Example
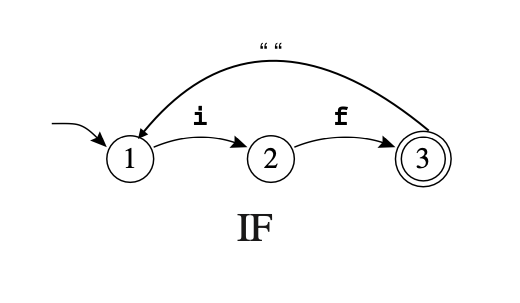
Let's create a simple state machine that accept or identify (if) in a string. such a state machine can be represent in this diagram.

We can implements that easily using Lexer-state by first defining our set of states and the transition events. Then create a transition table. After which we create an instance of machine from a transition table. to drive the state machine to goto next state we call next() with input value.
import {
  LexerState,
  Transition,
  isItMatch,
  Machine,
} from 'lexer-state/packages/machine';

const myStates = {
  firstState: 'firstState',
  secondState: 'secondState',
  ifState: 'if',
} as const;

const myEvents = {
  i_event: 'i',
  f_event: 'f',
  space_event: ' ',
} as const;

// creating transition events
const receiveI = LexerState(myEvents).create('i_event');
const receiveF = LexerState(myEvents).create('f_event');
const receiveSpace = LexerState(myEvents).create('space_event');

// creating set of states
const firstState = LexerState(myStates).create('firstState');
const secondState = LexerState(myStates).create('secondState');
const ifState = LexerState(myStates).create('ifState');

// defining transition table
const transition = new Transition('simple');
transition
  .at(firstState)
  .add(
    isItMatch(receiveI).moveTo(secondState),
    isItMatch(receiveSpace).moveTo(firstState),
  )
  .at(secondState)
  .add(
    isItMatch(receiveF).moveTo(ifState),
    isItMatch(receiveSpace).moveTo(firstState),
  )
  .at(ifState)
  .add(isItMatch(receiveSpace).moveTo(firstState));

const machine = new Machine(transition).at(
  // set the starting state of the machine
  myStates.firstState,
);

// call next() with input value to goto next state
console.log('current state ', machine.next('i'));
//output: current state  secondState

console.log('current state: ', machine.next('f'));
//output: current state:  if
Using Lexer State with React
- create state and event object
export const TrafficLightStates = {
  redState: 'redState',
  yellowState: 'yellowState',
  greenState: 'greenState',
} as const;

export const TrafficLightEvent = {
  next_event: 'next_event',
} as const;- Instantiate lexerState states and events
// src/service/index.ts

import {
  LexerState,
  Transition,
  isItMatch,
  Machine,
} from 'lexer-state/packages/machine';

// Instantiate States & events
const redState = LexerState(TrafficLightStates).create(
  'redState',
);
const yellowState = LexerState(TrafficLightStates).create(
  'yellowState',
);
const greenState = LexerState(TrafficLightStates).create(
  'greenState',
);

// Instantiate transition events
const nextEvent = LexerState(TrafficLightEvent).create(
  'next_event',
);- Define all possible transitions associated with each state.
- do() allows you to execute some actions on certain transition
// src/service/index.ts

// Define transitions
const transition = new Transition('trafficLights');
transition
  // defining red state
  .at(redState)
  // add red transition conditions
  .add(isItMatch(nextEvent).moveTo(yellowState))
  // defining yellow state
  .at(yellowState)
  .add(
    isItMatch(nextEvent)
    .moveTo(greenState)
      .do(async (arg) =>console.log('Traffic light switching to grean go now!'))
    )
  // defining green state
  .at(greenState)
.add(isItMatch(nextEvent).moveTo(redState));- Create traffic lights machine
// src/service/index.ts
export const trafficMachine = new Machine(transition).at(
  // set the starting state of the machine
  TrafficLightStates.redState,
);- Setup traffic light state machine with LexerState provider
// src/index.tsx
import { LexerStateProvider } from 'lexer-state/packages/machine';
import { trafficMachine } from './service';

function Index() {
  return (
    <LexerStateProvider machine={trafficMachine}>
      <App />
    </LexerStateProvider>
  );
}

const root = ReactDOM.createRoot(
  document.getElementById('app'),
);
root.render(<Index />);- useLexerState hook to get the current state or to transition to next state by dispatching a transition event to the state machine.
// src/App.tsx
import { useLexerState } from 'lexer-state/packages/machine';
import { TrafficLightEvent } from './service.ts';
import { trafficMachine } from './service';

function App() {
  const { currentState, dispatchEvent } = useLexerState<typeof TrafficLightEvent>(trafficMachine);

  const onNext = () => {
    dispatchEvent(TrafficLightEvent.next_event);
  };
  return (
    <div>
      <h1>Traffic light is in {currentState}</h1>
      <button onClick={onNext}>NEXT</button>
    </div>
  );
}
Setup with multiple state machine
// src/index.tsx
import { LexerStateProvider } from 'lexer-state/packages/machine';
import { trafficMachine, simpleMachine } from './service';

function Index() {
  return (
    <LexerStateProvider machines={[trafficMachine,simpleMachine]}>
      <App />
    </LexerStateProvider>
  );
}

const root = ReactDOM.createRoot(
  document.getElementById('app'),
);
root.render(<Index />);