
jupyter-instructortools
v0.8.0
Published
Tool to assist instructors in creating notebook templates for student Jupyter worksheets.
Downloads
14
Maintainers
 gutow
gutowReadme
jupyter-instructortools
Introduction | Usage | Current Menu Items | Typical workflow | Install | Issues or Comments | License
Introduction
This adds a menu to Jupyter that automates some useful tasks an instructor might want to do while building a notebook template for an assignment. This is part of the Jupyter Physical Science Lab project, but can be used independently of the rest of the project.
Usage:
The menu that provides access to most of the tools is activated using the "Activate menu" item in the "JPSL Instructor Tools" section of the Jupyter Lab command palette (figure 1). By default it is inactive at the beginning of a session.
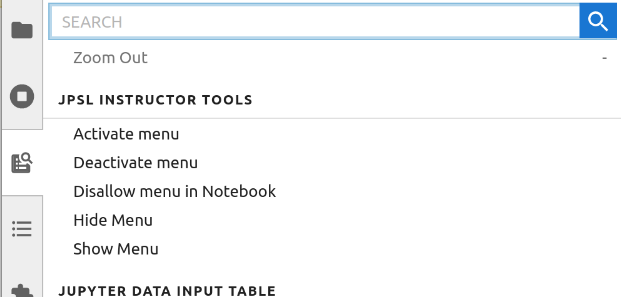
Figure 1: Instructor Tool commands available in the Jupyter lab command palette.
The "Disallow menu in Notebook" option prevents the use of the Instructor Tools menu with the currently focused notebook. This should only be done to the final form of the notebook that will be distributed to students, because it is very difficult to reverse.
Available menu items
- Create a data input table.
- Table column and row labels can be locked once set.
- Number of rows and columns must be chosen on initial creation.
- Table will survive deletion of all cell output data.
- The code cell that creates the table is protected.
- Table creation code will work in a plain vanilla Jupyter install, but the contents of the table cannot be edited.
- See the jupyter-datainputtable extension for more details.
- Add some highlight bars to a selected markdown cell. These can be removed by
deleting the associated
<div>:- A vertical cyan bracket at the left of the cell.
- A vertical red bracket at the left of the cell.
- A horizontal green start bar (fading down to beige). Useful for indicating the beginning of an instruction block.
- A horizontal brown stop bar (fading down from beige to brown). Useful for indicating the end of an instruction block.
- Protect/unprotect selected cells. Protected cells cannot be edited or deleted by the user. This is a good way to prevent instructions and example code from being damaged by students.
- Set/un-set selected cells as allowed to be hidden. This can be used to mark cells to hide before producing a pdf to turn in.
- Set/un-set selected cells to collapse code before printing.
- Set/un-set selected cells to collapse code in JPSL.
- Temporarily highlight each kind of cell marked for hiding or code collapse.
- Temporarily completely hide (not collapse) code (all or just selected cells).
- Insert boilerplate instructions on initializing a notebook into a selected markdown cell.
- Insert boilerplate instructions on preparing a pdf version of the notebook to turn in with instructor selected parts hidden.
Typical workflow
Work in a virtual environment that includes this tool plus all the tools the students will have access to (see Install).
- Start the jupyter notebook server (from the command line use
jupyter laborjupyter notebook). - Open a new notebook and activate the menu using the "Activate menu" item in the "JPSL Instructor Tools" section of the Jupyter Lab command palette (figure 1). By default it is inactive at the beginning of a session.
- Build the exercise including instructions, examples, tables (use the menu) and imports.
- Collect all the necessary imports into a code cell that will be the first code cell in the worksheet. You may want introductory material before this cell.
- Use the menu to protect any cells you do not want students to accidentally alter.
- Use the menu to tag cells so they can be hidden. This allows students to print a compressed version of the notebook for grading. Consider hiding most of the instructions.
- Restart the kernel and clear all cell outputs. Delete or emtpy any cells that have things you want the students to be filling in.
- Save the notebook and make a duplicate of it. Continue working with the duplicate.
- Work through the notebook as if you were a student, make adjustments as you go. Iterate restarting the kernel, clearing the cell outputs, saving, duplicating and working though until satisfied.
- Save the final version of the worksheet. Duplicate it.
- Open the duplicate worksheet. Make sure all the appropriate cell data is cleared. Then select "Disallow menu in Notebook" item in the "JPSL Instructor Tools" section of the Jupyter Lab command palette (figure 1). This will deactivate the menu and block students from easily reinstalling it. Save the notebook and distribute this copy to students.
Requirements
- JupyterLab >= 4.0.0
- notebook >= 7.0.0
- jupyter-datainputtable >=0.8.0
Install
Installation using pip into a virtual environment is recommended. My favorite way to manage virtual environments is using pipenv. You should also consider venv which is part of the standard Python library and hatch for development.
Option 1: Recommended, as this will install all of the Jupyter Physical Science Lab packages an Instructor might need. Use the JPSLInstructor pseudo package.
pip install JPSLInstructorOption 2: Install just this package and its minimal requirements. You may want to do this if you are just making worksheets, do not need live data acquisition or want to use a very specific set of packages.
pip install jupyter_instructortoolsContributing
Development install
Note: You will need NodeJS to build the extension package.
The jlpm command is JupyterLab's pinned version of
yarn that is installed with JupyterLab. You may use
yarn or npm in lieu of jlpm below.
# Clone the repo to your local environment
# Change directory to the jupyter_datainputtable directory
# Install package in development mode
pip install -e "."
# Link your development version of the extension with JupyterLab
jupyter labextension develop . --overwrite
# Rebuild extension Typescript source after making changes
jlpm build
You can watch the source directory and run JupyterLab at the same time in different terminals to watch for changes in the extension's source and automatically rebuild the extension.
# Watch the source directory in one terminal, automatically rebuilding when needed
jlpm watch
# Run JupyterLab in another terminal
jupyter lab
With the watch command running, every saved change will immediately be built locally and available in your running JupyterLab. Refresh JupyterLab to load the change in your browser (you may need to wait several seconds for the extension to be rebuilt).
By default, the jlpm build command generates the source maps for this extension to make it easier to debug using the browser dev tools. To also generate source maps for the JupyterLab core extensions, you can run the following command:
jupyter lab build --minimize=FalseDevelopment uninstall
pip uninstall jupyter_instructortoolsIn development mode, you will also need to remove the symlink created by jupyter labextension develop
command. To find its location, you can run jupyter labextension list to figure out where the labextensions
folder is located. Then you can remove the symlink named
jupyter-instructortools within that folder.
Testing the extension (currently incomplete)
Frontend tests
This extension is using Jest for JavaScript code testing.
To execute them, execute:
jlpm
jlpm test
Integration tests
This extension uses Playwright for the integration tests (aka user level tests). More precisely, the JupyterLab helper Galata is used to handle testing the extension in JupyterLab.
More information are provided within the ui-tests README.
Packaging the extension
See RELEASE
Issues or comments
Issues or bugs should be reported via the project's issues pages.
Copyright - Jonathan Gutow, 2020 - 2024.