
jmaple
v0.11.0
Published
its a library to show a conversation window on your website
Downloads
9
Maintainers
 ertrii
Readme
JMaple(Alpha)
A library to create conversation windows in the maplestory style using the classic or current design among others.
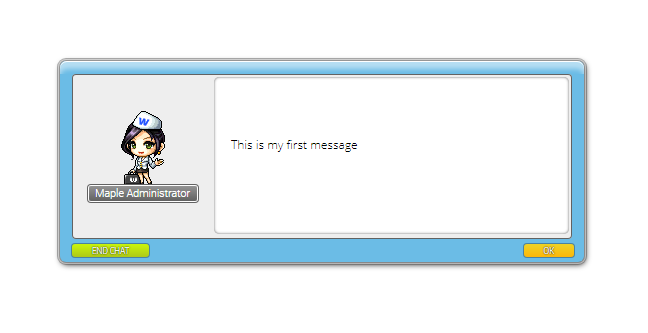
Table of contents
Starting
# npm
npm install jmaple
Style
<link rel="stylesheet" href="node_modules/jmaple/dist/css/flat.css">jmaple.js
<script src="node_modules/jmaple/dist/js/jmaple.js"></script>Config
- dev; bool, modo desarrollador. Default
false
const jmaple = new JMaple()
jmaple.config.dev = true
new jmaple.Task('element').start()//will show you a welcome window
Task será donde se estructurará y mostrará la ventana de conversación.
There are many styles of conversation window
- classic.css
- flat.css
- modern.css
Preference
Existen algunas propiedades que usted puede editar a su gusto, yo en mi caso lo dejaré por defecto:
- displace(bool=true), desplazamiento de la ventana.
- writing(bool=true), animación de escritura.
- transition(string), tipo de transición de una ventana a otra:
- ease, una transición suave.
- gross, una transición de golpe.
- step, no hay transición.
- key(string='m'), clase de la ventana de conversación, un identificador en los css styles. En caso de ser cambiado usted tendría que editar el css con ese nombre que le ha asignado.
- zIndex(int=100), posicionamiento
zdel contenedor principal.
const jmaple = new JMaple()
const task = new jmaple.Task('element')
task.Script = class{
    start(){
        this.cm.sendOk('This is my first conversation')
        this.cm.dispose()
    }
}
task.preference.displace = false
task.preference.transition = 'gross'
task.start()
NPC
Los npc representan un personaje:
- id(int), identificador.
- name(string).
- img(string), nombre de la imagen. Este puede ser omitido y tomará por defecto la ruta
NPC.pathy el id como nombre con formato png.
const jmaple = new JMaple()
console.log(jmaple.NPC.path)//'dist/src/img/'
jmaple.NPC.create(9010000,'Maple Administrator')
const task = new jmaple.Task(
    'element',
    9010000,//adding NPC id.
)
task.Script = class{
    start(){
        this.cm.sendOk('This is my first conversation')
        this.cm.dispose()
    }
}
task.start()
Conversation
Los script NPC están programado dentro de dos funciones principales:
- start, es el inicio del npc, la primera muestra.
start(){ //code } - action, es la siguiente acción que se mostrara, aquí será donde se programara todas las acciones del npc. Contiene tres parámetros:
- mode, devuelve un valor(int) del boton pulsado.
- type, devuelve un valor(int) del tipo de conversación.
- selection, devuelve un valor(int) de una lista de selección.
action(mode, type, selection){
    //code
}
Example:
const jmaple = new JMaple()
jmaple.NPC.create(9010000, 'Maple Administrator')
const task = new jmaple.Task('element', 9010000)
task.Script = class{
    start(){
        this.cm.sendOk('This is the first conversation')
    }
    action(mode, type, selection){
        this.cm.sendOk('This is the second conversation')
        this.cm.dispose()
    }
}
task.start()
Recomiendo usar class para mas comodidad.
Commands
Los commands(cm) son funciones que se ejecutarán dentro de las funciones principales, start() y action(). Hablaremos primero de los comandos para tipos de ventana de conversación:
Commands: Conversation Window:
| cm | Description | | -- | ----------- | | sendOk(string) | Shows a conversation window with an 'Ok' button | | sendNext(string) | Shows a conversation window with a 'Next' button | | sendPrev(string) | Shows a conversation window with a 'Prev' (previous) button | | sendNextPrev(string) | Shows a conversation window with a 'Next' and 'Prev' button (see above) | | sendYesNo(string) | Shows a conversation window with a 'Yes' and 'No' button | | sendAcceptDecline(string) | Shows a conversation window with an 'Accept' and 'Decline' button | | sendSimple(string) | Shows a conversation window with no buttons | | sendGetNumber(string, valueDefault, min, max) | Shows a conversation window with ok button and a input text. | | sendTest(string) | Shows a conversation window with a input and all buttons. This is cm does not exist in MapleStory, it was created for the development in the design |
Credits: Description by Shawn in Ragezone Forum, here
const jmaple = new JMaple()
jmaple.NPC.create(9010000, 'Maple Administrator')
const task = new jmaple.Task('element', 9010000)
task.Script = class{
    start(){
        this.cm.sendNext('This is a conversation window with an Next button')
    }
    action(){
        this.cm.sendYesNo('This is a conversation window with an Yes and No button')
        this.cm.dispose()
    }
}
task.start()
Dependiendo del tipo Ventana de Conversación, los parametros type y mode de action() devolveran un valor.
sendOk or sendNext
type = 0| Button | mode | | --------- | ---- | | end chat | -1 | | next / ok | 1 |
sendNextPrev
type = 0| Button | mode | | -------- | ---- | | end chat | -1 | | next | 1 | | back | 0 |
sendYesNo
type = 1| Button | mode | | -------- | ---- | | end chat | -1 | | yes | 1 | | no | 0 |
sendSimple
type = 4| Button | mode | | -------- | ---- | | end chat | 0 | | select | 1 |
sendAcceptDecline
type = 12| Button | mode | | -------- | ---- | | end chat | -1 | | accept | 1 | | decline | 0 |
sendGetNumber
type = 3| Button | mode | | -------- | ---- | | end chat | -1 | | ok | 1 |
sendTest
type = -1| Button | mode | | ------------------------ | ---- | | end chat | -1 | | ok / accept / yes / next | 1 | | no / back | 0 |
El parametro selection devolverá un valor 0 por defecto. Solo puede devolver otro valor cuando exista en el cuadro de dialogo una lista de selección, el valor dependerá de que item de la lista hayas selecionado. El valor tambien dependerá del valor que le hayas asignado al item.
Commands: Actions
| cm | description | | -- | ----------- | | dispose() | Ends the conversation window. | | warp(idMap, portal = 0) | Moves to a section page or other page, on MapleStory moves the player to a map. |
Con la función dispose() es recomendable ser ejecutada al final de cualquier comando al finalizar una conversación.
La función warp() requiere de dos valores:
- idMap, es un valor numerico(int) que identifica un map.
- portal, es un valor numerico(int) que identifica un portal, una posición de la ventana de conversación, esto es opcional.
Antes de usar warp debemos crear el mapa(map) en la lista. Si deseamos podemos crear portales. Los portales requerirán de dos parametros, id , identificador y coord , coordenadas. Las cordenadas X y Y serán string separados por un punto y coma. Los valores se los tomará como porcentajes.
const jmaple = new JMaple()
//creating portal
jmaple.Portal.create(12, '21.5;26')//id, coord
//creating map
jmaple.Maps.create({
    id : 123456,
    name : 'my map',
    link : 'index.html#' //can be any link
})
jmaple.Maps.create({
    id : 456789,
    name : 'Github',
    link : 'https://github.com/ertrii/JMaple'
})
jmaple.NPC.create( 9010000, 'Maple Administrator', 'src/img/npc/9010000.png')
const task = new jmaple.Task('element', 9010000)
task.Script = class{
    start(){
        this.cm.sendOk('This is a test.')
    }
    action(){
        this.cm.warp(456789, 12)//id map, id portal. Remember portal is optional
        this.cm.sendOk('warp...')
        this.cm.dispose()
    }
}
task.start()
Son dos propiedades requeridos y dos propiedades opcionales:
- id(int), identificador del map.
- link(string), link!.
- warp(bool = true), evita mover al usuario. Opcional, por defecto es true.
- action(function), ejecuta cualquier función. Opcional.
{
    id : 123456,
    link : 'index.html#',
    warp : false,
    action : myFunction
}
Text Color
Para dar color a los textos existen estas etiquetas:
| code | Description | | ---- | ------------ | | #b | Blue text. | | #d | Purple text. | | #e | Bold text. | | #g | Green text. | | #k | Black text. | | #r | Red text. | | #n | Normal text (removes bold) |
const jmaple = new JMaple()
jmaple.NPC.create(9010000, 'Maple Administrator')
const task = new jmaple.Task('element', 9010000)
task.Script = class{
    start(){
        this.cm.sendOk('This is #rRed Text# and this is #ePurple#')
        this.cm.dispose()
    }
}
task.start()
Existen algunos codes que requieren de un valor entero(id):
| code | Description | | ---- | ------------ | | #m[mapid]# | Shows the name of the map. | | #p[npcid]# | Shows the name of the NPC. | | #t[npcid]# / #z[npcid]# | Shows the name of the Item. | | #h # | Shows the name of the Character. Don't forget that space. | | #v[itemid]# / #i[itemid]# | Shows the image of the Item. | | #c[itemid]# | Shows how many [itemid] the player has in their inventory. |
Recuerde, esto mostrará siempre y cuando existan en la lista de su respectiva clase.
List
Para crear una lista se requieren ciertas etiquetas.
| code | Description | | -------- | ----------- | | #L[int]# | Open Item. You can close with this for the next item. | | #l | Close Item. |
Todos forman parte de un párrafo, si desea crear uno nuevo use la etiqueta #w. In Maplestory is \n.
const jmaple = new JMaple()
jmaple.NPC.create( 9010000, 'Maple Administrator')
const task = new jmaple.Task('element', 9010000)
task.Script = class{
    start(){
        this.cm.sendOk('This is a List: #L1#item 1#l#L2#item2#l#L3#item3#l')
        this.cm.dispose()
    }
}
task.start()
El número asignado podrá ser el valor para el parámetro selection, eso dependerá a que item selecciones en el cuadro de diálogo.
Character
Character es una extensión que amplia la lista de comandos(cm). Character solo se penso para el desarrollo de NPC para dicho juego.
Example:
const jmaple = new JMaple()
jmaple.NPC.create( 9010000, 'Maple Administrator')
const character = new jmaple.character('Erick')//nick
new jmaple.Task(
    'element',
    9010000,//npc
    character//adding

).start()
Estos son los comandos que le pertenece y se usarán en el script.
Commands: Character
| cm | Description | | -- | ----------- | | openShop(shopid) | Show a message by console. In the game, opens a shop window. | | haveItem(itemid) | Returns a boolean if the user/player has the item. | | gainItem(itemid, ammount) | Gives the player an item/takes an item from a player. | | changeJob(jobid) | Changes the job of the player. | | getJob() | Returns the jobid of the user/player. | | startQuest(questid) | Starts a quest (Developing). | | completeQuest(questid) | Finishes a quest (Developing). | | forfeitQuest(questid) | Forfeits a quest (Developing). | | getMeso() | returns the number of mesos(money) it has. | | gainMeso(int) | Gives a player mesos/takes mesos from a player. | | gainExp(int) | Gives the user/player exp/takes exp of user/player. | | getLevel() | level User/Player. | | teachSkill(skillid, skilllevel, maxskilllevel) | not enabled. | | get(stat) | Returns the number of spicified stat(STR, DEX, INT, LUK, HP, MP). | | modifyNX(int) | Gives/Takes the player nx/cash. |
Properties:
- nick(string), name User.
- gender(int), male(0), female(1).
- job(int), id job.
- gm(bool), if gm.
- meso(int), money.
- nx(int), cash.
- sp(int), stat point.
- ap(int), skill point.
- stat(Stat), stat.
- item(int), item identifier(iditem)
- items(Array(int)), Array item identifier.
- id(int), identifier.
- quantity(int).
//...
character.job = 110,//fighter
character.lv = 20,
character.exp = 500,
character.mesos = 95065012354//^^
//...
Stat
Character se le asigna por defecto un Stat. Podemos asignarle unos valores de manera personalizada.
//...
character.stat = new jmaple.Stat({
    str : 30,
    dex : 24,
    hp  : 1235
})
//...
Properties:
- str(int).
- dex(int).
- int(int).
- luk(int).
- hp(int), life.
- mp(int), manna.
- lv(int), level.
- exp(int), experiencie.
- def(int), defense.
- att(int), attack.
- attM(int), attack magic.
- fame(int), fame.
Item
Para crear un Item debemos conocer los tipos que existen. Antes de eso verficaremos el directorio donde se ubicará la imagen de tu item.
console.log(jmaple.Item.path)//'src/img/item/'//creating and adding..
jmaple.Item.equip.create(123, 'un arma', 'un_arma.png')
jmaple.Item.use.create(540, 'potion blue')Type Items:
Existen varias clases de item dependiendo de lo que deseas crear:
- equip, armas, accesorios, capas, etc.
- use, elementos que su uso altera o mejora al Character.
- setup, chair, elementos que no quepan en las demas clases.
- etc, son elementos simples.
Estas clases necesitan como parametros:
- id(int), identificador del item.
- name(string), nombre del item.
- icon(string), nombre de la imagen del item. Este puede ser omitida si tu imagen lleva como nombre igual al id con formato .png.
Ahora asignaremos un Item a un Character por medio de una Conversation Window:
//adding items
jmaple.Item.equip.create(961, 'Eclipse')
jmaple.Item.use.create(4556, 'Potion Blue', 'My_image_with_other_name.png')
jmaple.Item.etc.create(156, 'leaf')
const jmaple = new JMaple()
//creating npc
jmaple.NPC.create( 9010000, 'Maple Administrator')
//creating char
const character = new jmaple.Character('Erick')
//Convesation Window
const task = new jmaple.Task('element',9010000, character)
task.Script = class{
start(){
this.cm.gainItem(4556, 2)//idItem, quantity
this.cm.sendOk('Take two items...')
}
action(){
this.cm.sendOk('Ready! ^_^')
this.cm.dispose()
}
}
task.start()
En caso de que el item no exista en la lista le retornará por consola un error.
Si desea agregar un item al character que no sea por el medio ya visto, use la funcion setItem() o setItems().
//we will add the item of the List already created in the previous example.
character.setItem(961, 5)//idItem, quantity
character.setItems([
    {id : 4556, quantity: 5},
    {id : 156, quantity: 2}
])
En caso de que el character ya tenga agregado aquel item entonces simplemente se le sumara la cantidad.
Si deseamos eliminar el item del Character usaremos la function removeItem().
character.removeItem(961)//idItem. O si solo queremos reducir la cantidad pues le asignaremos otro parametro que sería la cantidad.
character.removeItem(4556, 2)//idItem. Atento, si la cantidad es mayor o igual a la cantidad que contiene el Character de dicho item entonces se le removera definitivamente.
Quest
Antes de iniciar un quest es necesario crear para que esto se registre. Todo nuevo quest requieren como parametro, id, name, min(minutos). Los minutos pueden ser nulos pues su función es simplemente dar una fecha de vencimiento desde que se inicie la Quest.
const jmaple = new JMaple()
jmaple.Quest.create(1234, 'My firts Quest', 10)
//Convesation Window
new jmaple.Task(
'element',
null, //if you do not need a NPC
new jmaple.Character('Erick'),//requerid
)
task.Script = class{
start(){
this.cm.startQuest(1234)//starting quest
this.cm.sendOk('Start Quest...')
//look at the top the cm for quest
}
}
task.start()Quest tiene una función llamada timer() en la cual le devolvera el tiempo concurrido en cada segundos; en caso de que un quest creado no tenga un tiempo de caducidad entonces la función le devolverá 0.
jmaple.Quest.timer(1234, function(sec){
    console.log(sec)//...,56, 55, 54, 53,...
})
Recuerde, una quest con vencimiento debe ser cumplida antes de que el tiempo termine sino tendrá que volver a inicar la quest.