hexo-seo-integrated-submit
v1.1.6
Published
SEO project,integrated submit latest urls to Baidu and Google and Bing ect... search engine
Downloads
134
Maintainers
Readme
说明
集成式主动推送站点信息到各个谷歌、必应、百度等搜索引擎,提高搜索引擎收录网站的几率和效率
使用
- 安装(hexo项目中)
npm install hexo-seo-integrated-submit --save- 配置文件 在 hexo 的 _config.yml 配置文件中添加以下内容
# 集成推送到各个搜索引擎平台(谷歌、必应、百度)
# generate_workflow_file: 是否生成github actions workflow文件
# enable: 开启/关闭 推送
# cron: 执行时间周期
# count: 每次提交最新的10篇文章,输入0或者不填写则默认为所有文章(建议是最新的10篇文章)
# date: 更新时间(updated)|创建日期(created)
# https://github.com/junpengzhou/hexo-seo-integrated-submit
hexo_seo_integrated_submit:
  generate_workflow_file: true # 如果仅使用纯命令行工具进行,可无需生成,如需自动化可按命令行工具自行配置,也可使用本工具所生成的workflow文件
  date: created
  count: 10
  cron: 0 4 * * *
  baidu:
    enable: true # 开启百度搜索引擎主动推送
  bing:
    enable: true # 开启必应搜索引擎主动推送
  google:
    enable: true # 开启谷歌搜索引擎主动推送
再次检查config.yml中是否配置有发布网站的url(互联网地址)
# URL
## Set your site url here. For example, if you use GitHub Page, set url as 'https://username.github.io/project'
url: 'https://www.junpengzhou.top'
方式一、纯命令行工具的使用
- 全局安装命令行工具
npm install --global hexo-seo-integrated-submit- 获取命令行帮助
- 获取全局帮助
hexo-sis --help- 获取特定命令帮助
hexo-sis google --help # 获取谷歌推送相关命令帮助
hexo-sis bing --help # 获取必应推送相关命令帮助
hexo-sis baidu --help # 获取百度推送相关命令帮助- 命令行工具使用(在hexo的根目录或其public目录下,均可使用)
Useage: hexo-sis <command> [options]

Commands:
  hexo-sis google  Submit crawler data to Google Search Engine
  hexo-sis bing    Submit crawler data to Bing Search Engine
  hexo-sis baidu   Submit crawler data to Google Search Engine

Options:
      --version  Show version number                                   [boolean]
  -p, --proxy    Config proxy will be worked when requesting outside interface
                                                                        [string]
      --help     Show help                                             [boolean]

Examples:
  hexo-sis google --email "xxx" --key "xxx"  Submit to Google
  hexo-sis google -e "xxx" -k "xxx"          Simplely Submit to Google
  hexo-sis bing -key "xxx"                 Submit to Bing
  hexo-sis bing -k "xxx"                   Simplely Submit to Bing
  hexo-sis baidu -key "xxx"                Submit to Baidu
  hexo-sis baidu -k "xxx"                  Simplely Submit to Baidu

You need at least one command before moving on

Specify --help for available options
or you can check the docs: https://github.com/junpengzhou/hexo-seo-integrated-submit#readme
方式二、使用github action + 命令行工具
由于生成的 actions 是在.github/workflows/hexo-seo-integrated-submit.yml,点开头的文件或文件夹都会被视为隐藏文件,所以 hexo 不会将隐藏文件部署到 pages,需要新增配置ignore_hidden
deploy:
  type: git
  repo: https://github.com/<username>/<project>
  # example, https://github.com/hexojs/hexojs.github.io
  branch: gh-pages
ignore_hidden: false # 忽略隐藏文件及文件夹(目录)- 安全设置
打开你博客仓库地址如下图

| Name | Value | 说明 |
| ------------------- | ----------------- | :---------------------------------------------------------------------------------------------------- |
| baidu_token | UlxxxxxxxxxxxxxB9 | 【必填】Value 输入百度的 token |
| bing_apikey | 47xxxxxxxxxxxxx91 | 【必填】Value 输入必应的 apikey |
| google_private_key | xxxxxxxxxxxxxxxxx | 【必填】Value 输入谷歌的 private_key (注意:填写的时候需要使用双引号包起来,如: "private_key") |
| google_client_email | xxxxxxxxxxxxxxxxx | 【必填】Value 输入谷歌的 client_email |
Baidu key
打开百度站长平台,点击左侧的普通收录https://ziyuan.baidu.com

Bing key
- 打开 Bing 站长平台 https://www.bing.com/webmasters/home
- 点击右上角头像 旁边的齿轮,跟着下图操作

Google key
(1) 开启Indexing API

如果账号中没有项目, 点击创建项目, 创建完项目后继续下面的操作.
点击下一步, 开启即可.

开启完成就是这样, 感觉像是卡住了.

(2) 打开凭证页面
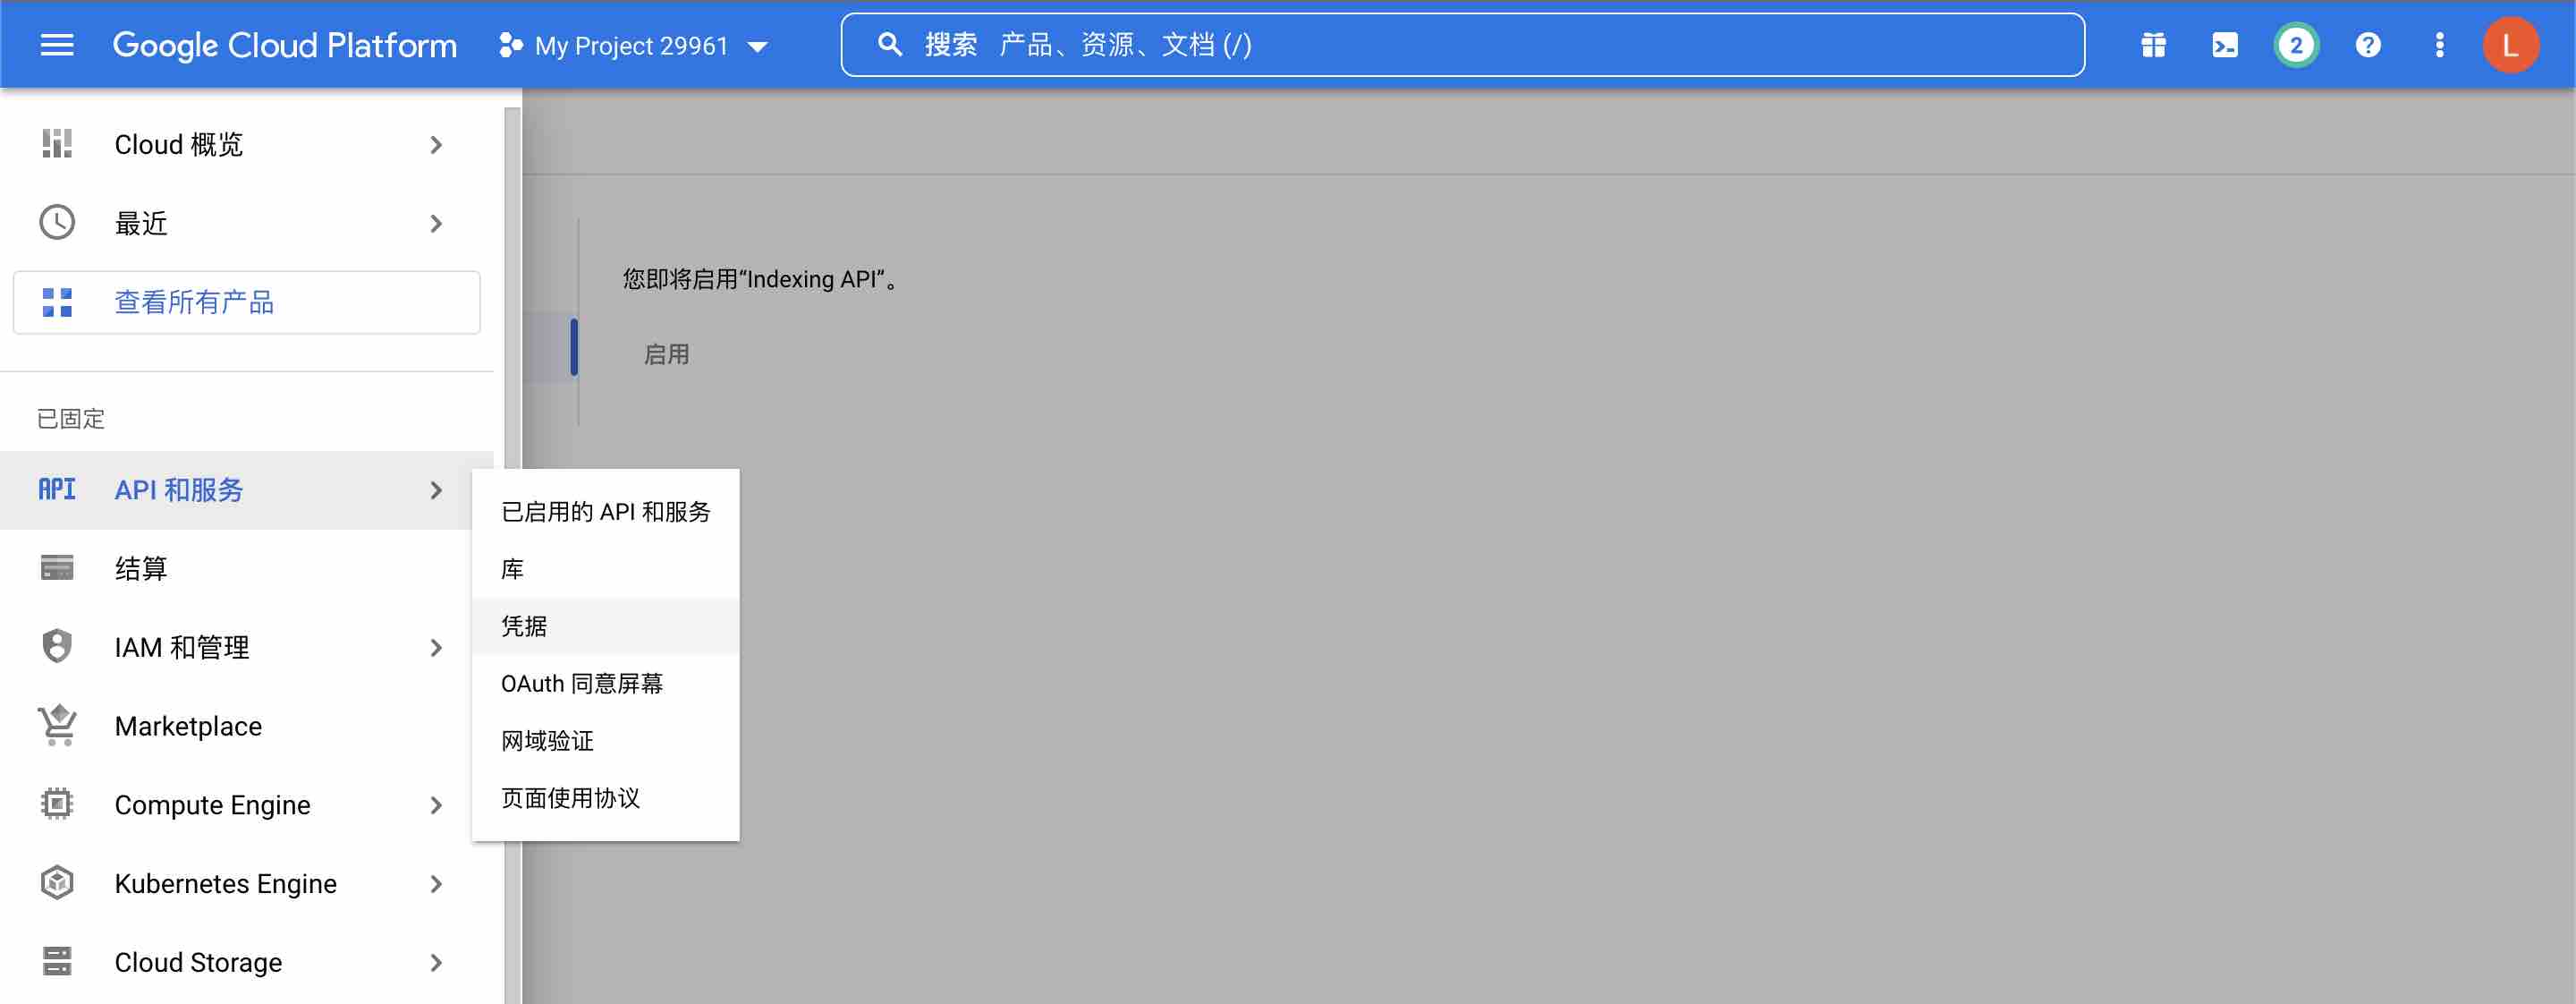
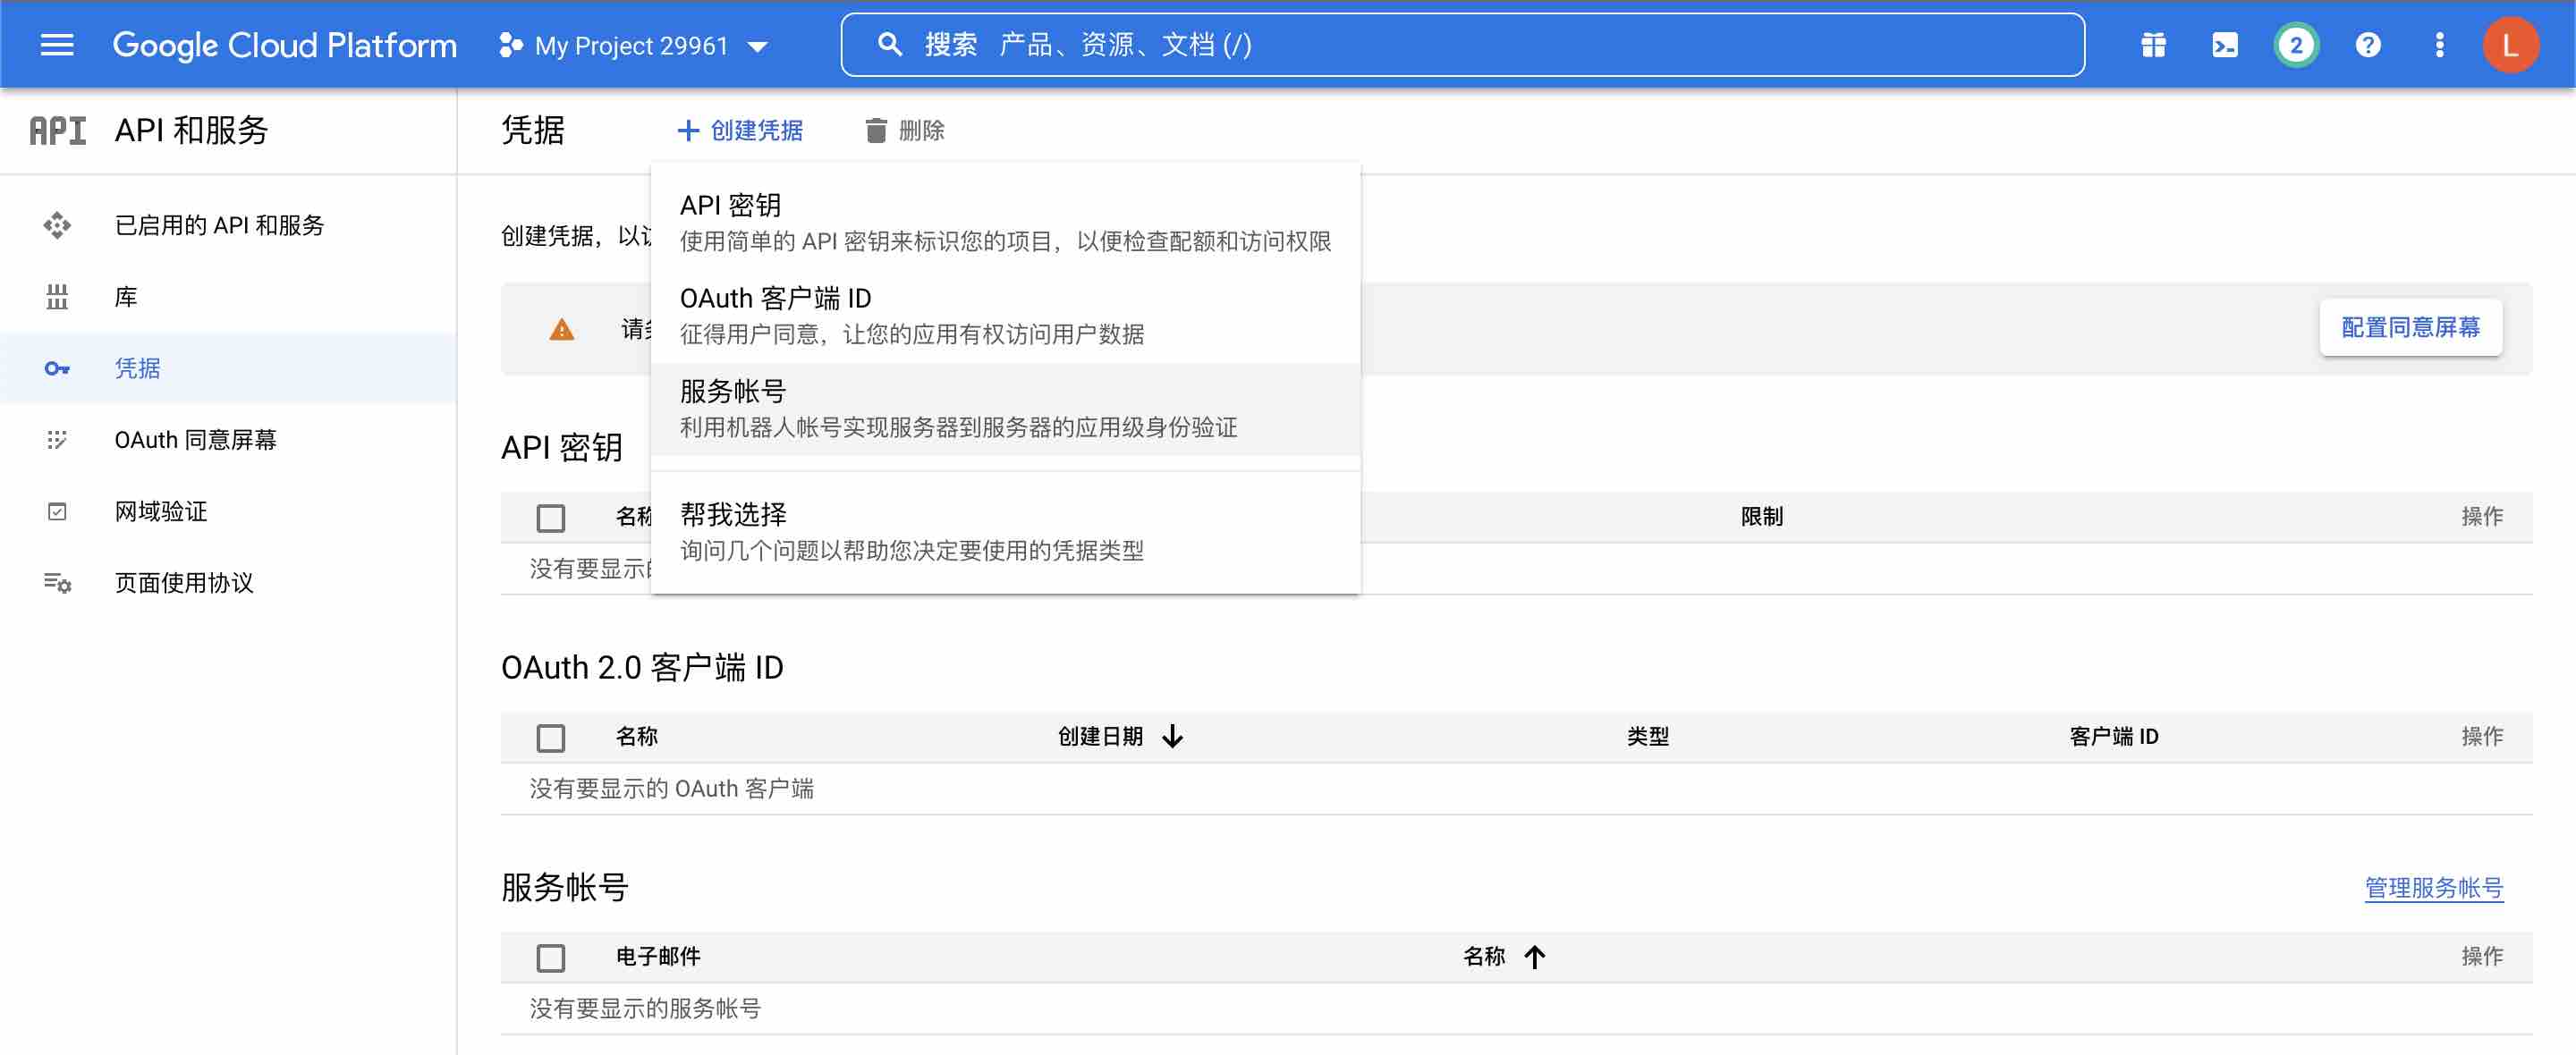
(3) 创建服务账号
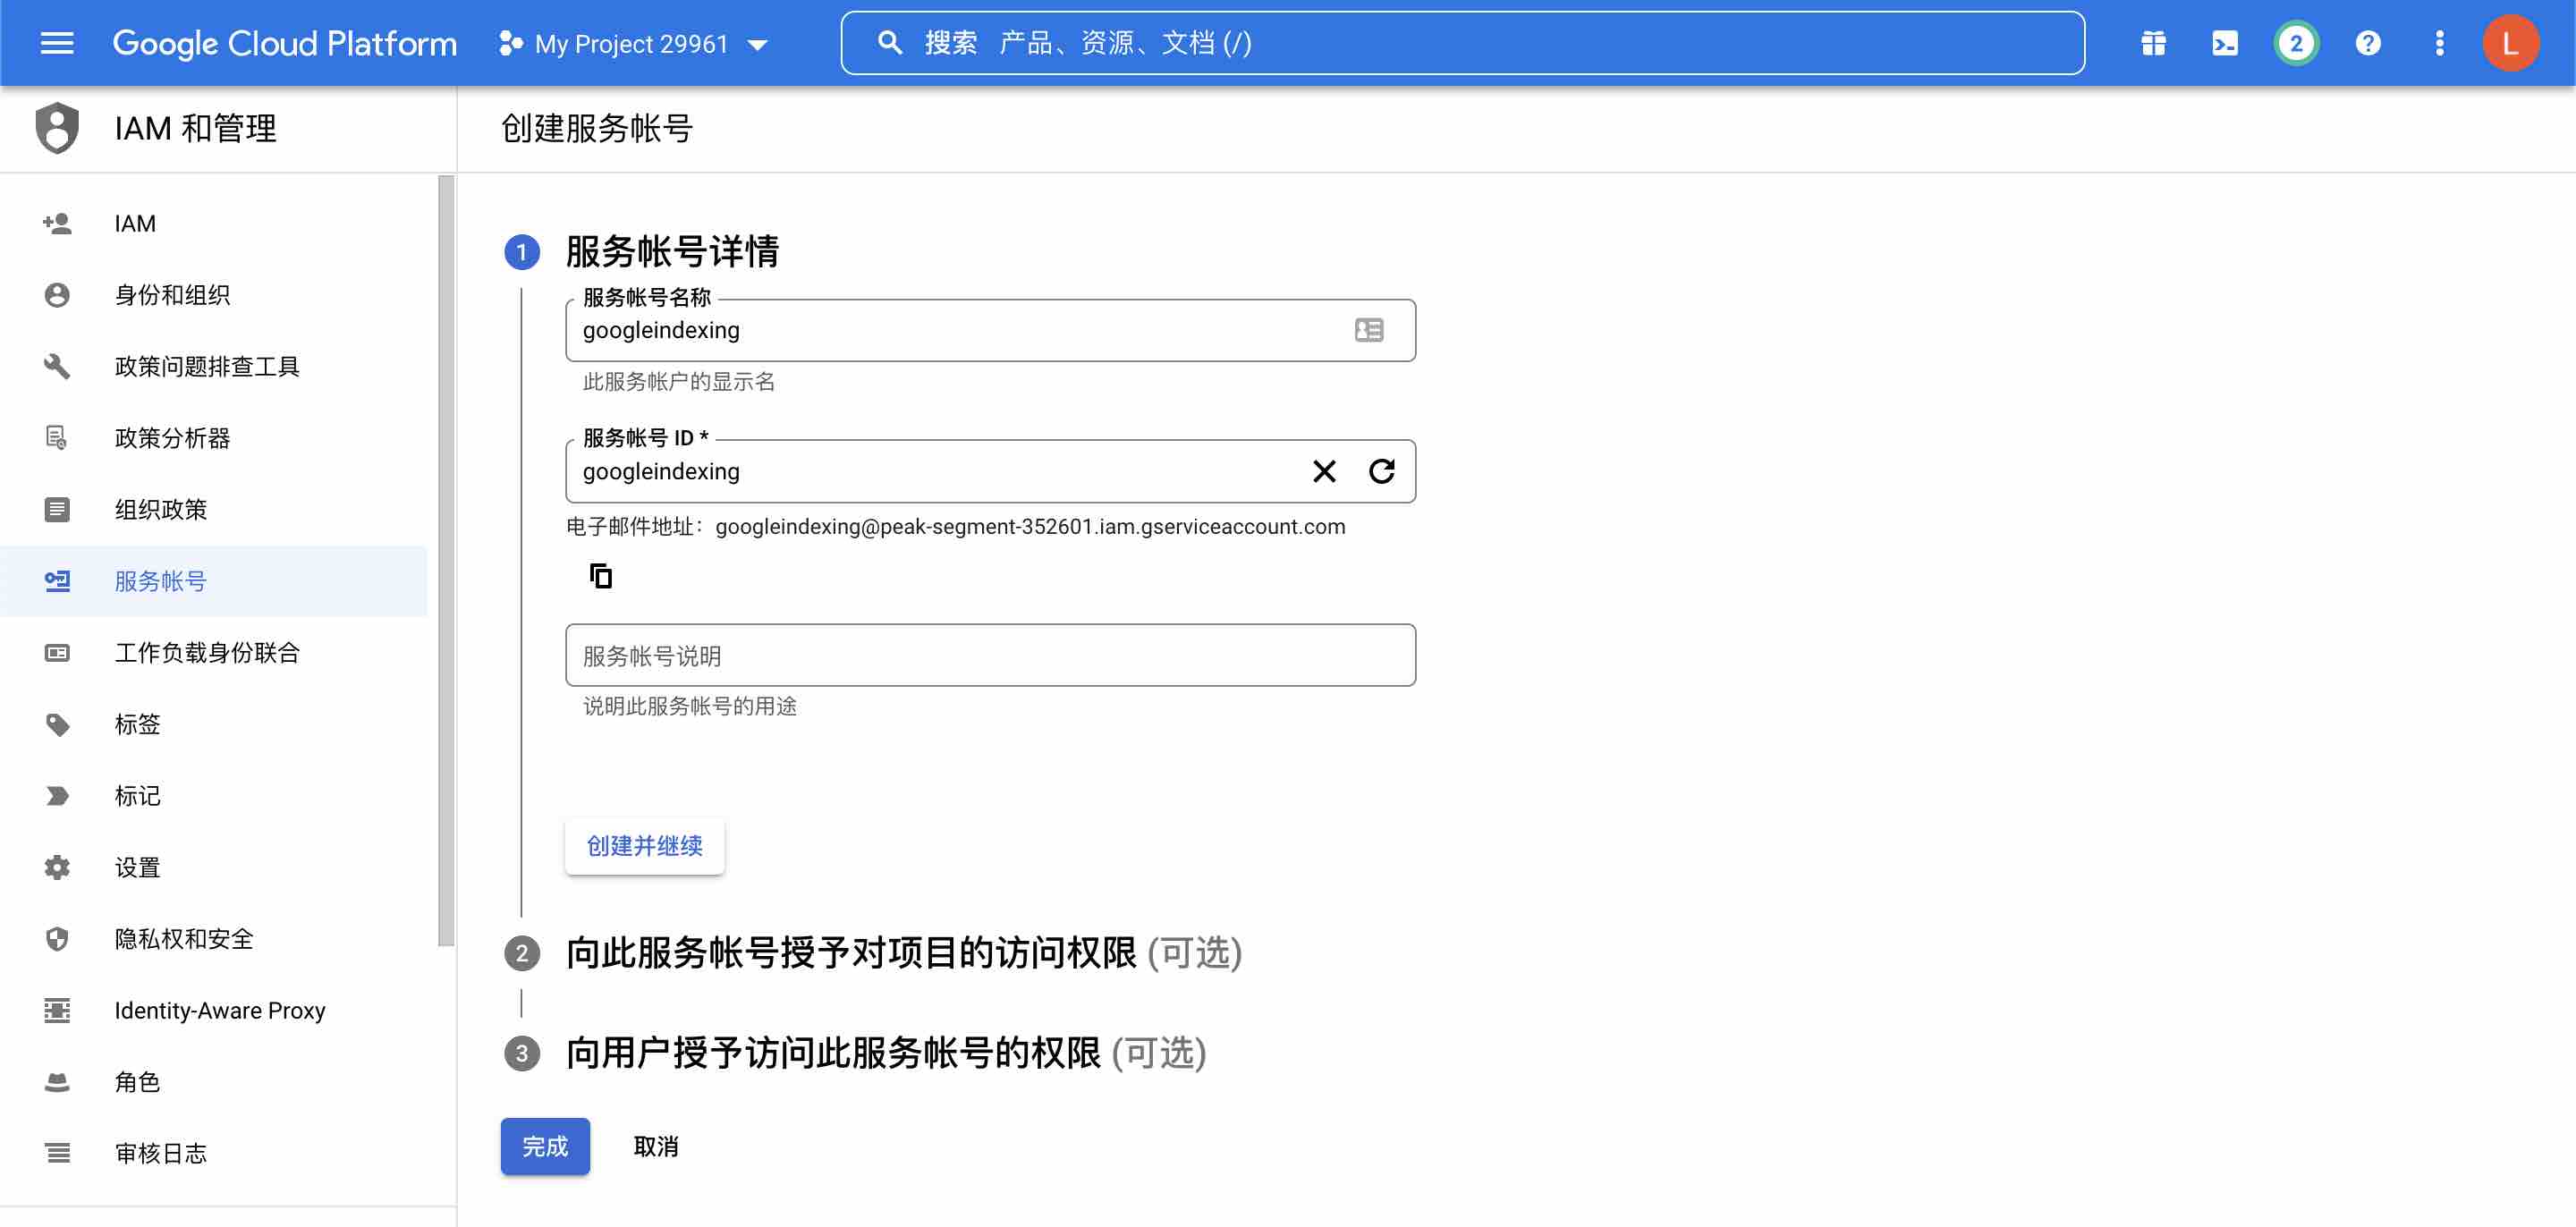
点击创建凭证, 点击服务账号.
输入服务账号名称, 然后直接点击完成,
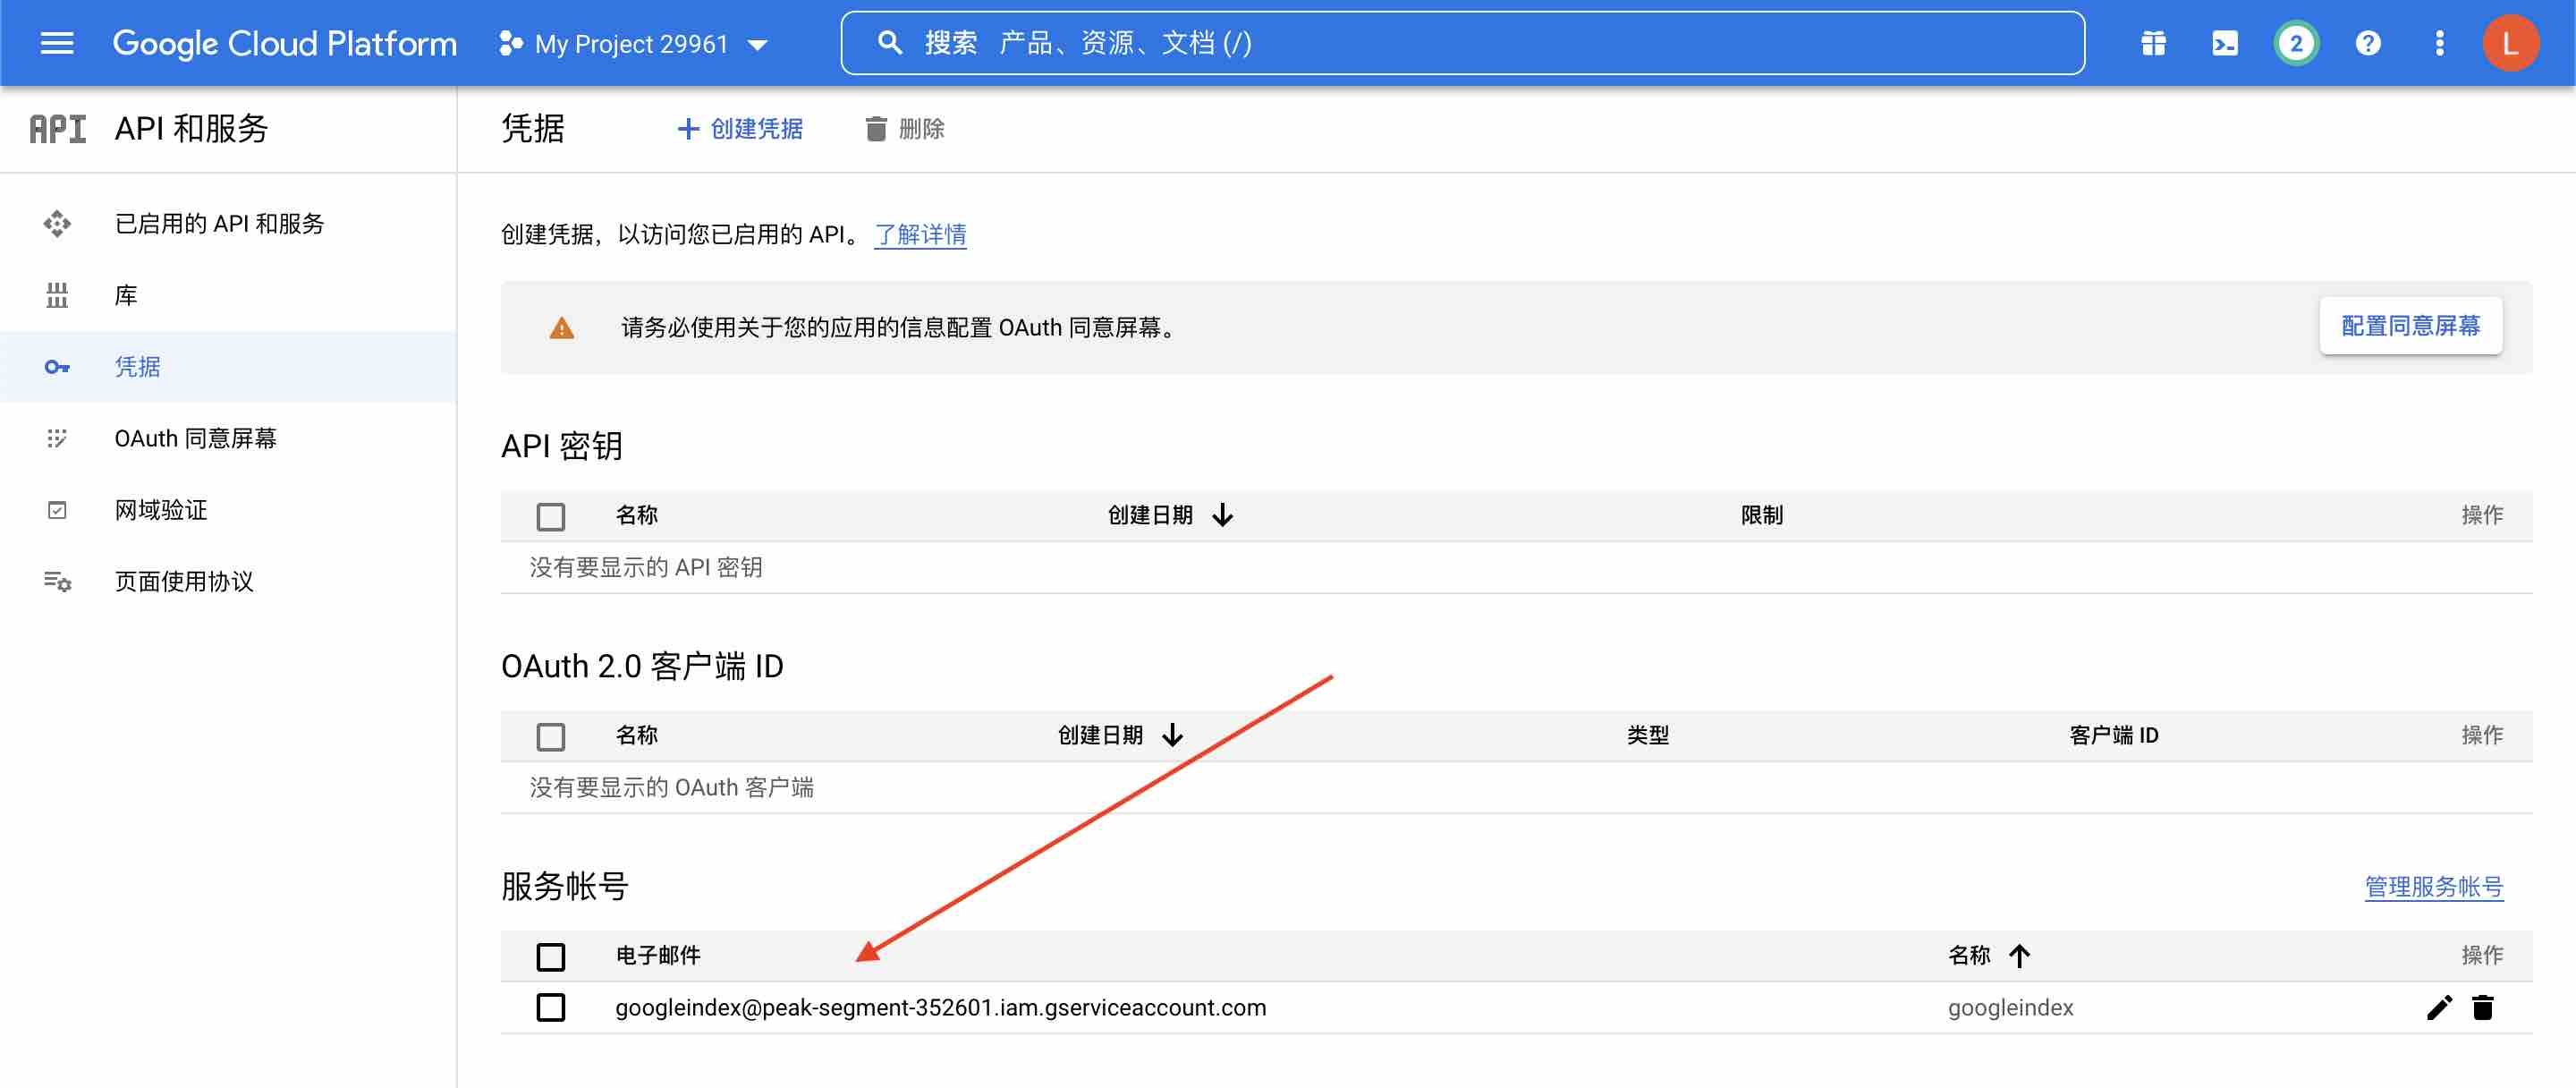
(4) 创建凭证
点击刚刚创建的服务账号
点击密钥标签, 点击添加密钥, 点击创建新密钥.
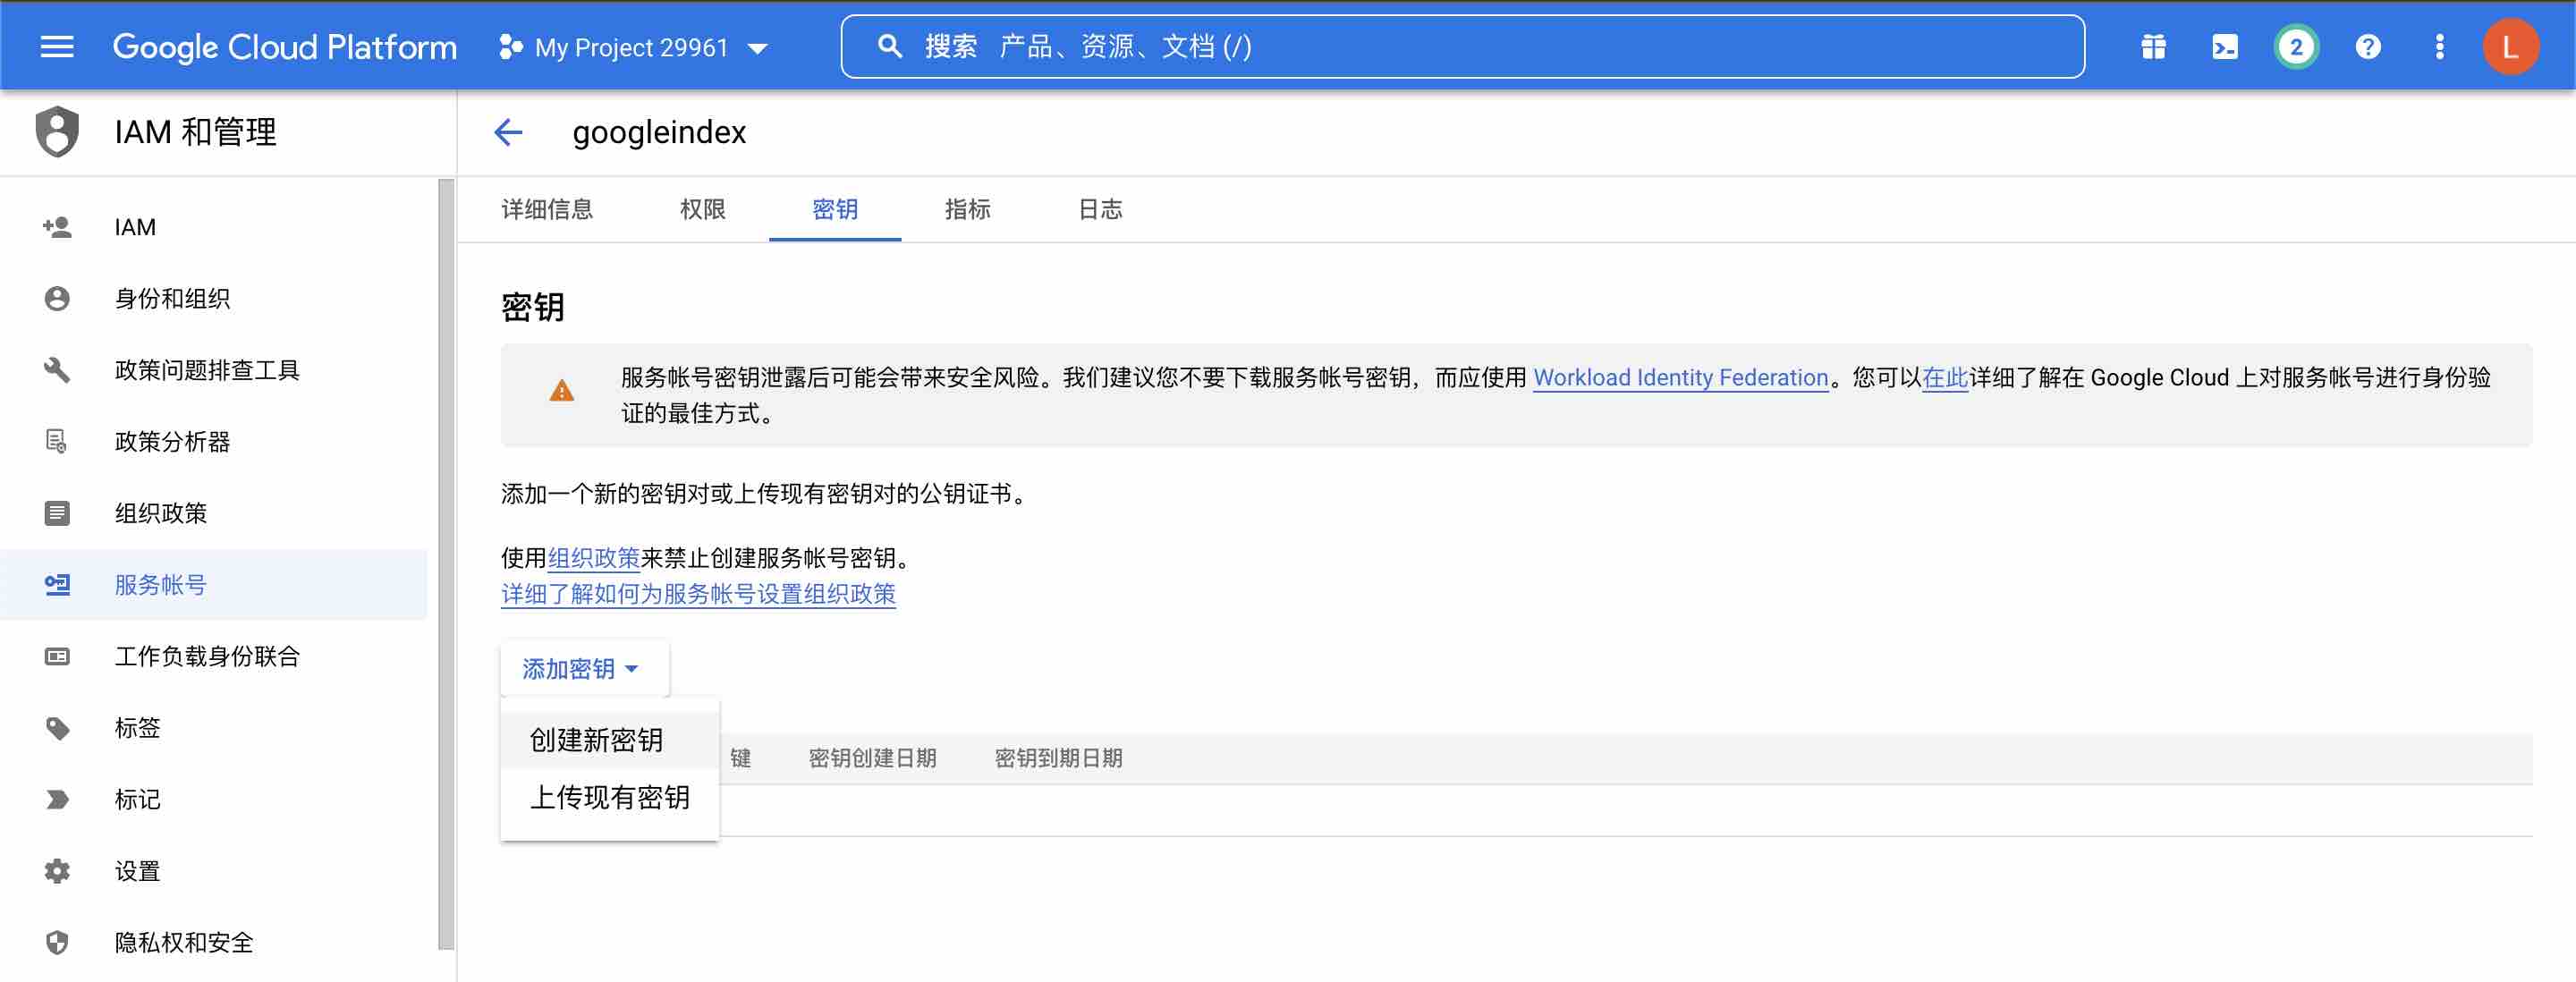
选择JSON格式, 点击创建, 然后JSON格式的密钥就会自动下载到电脑中.
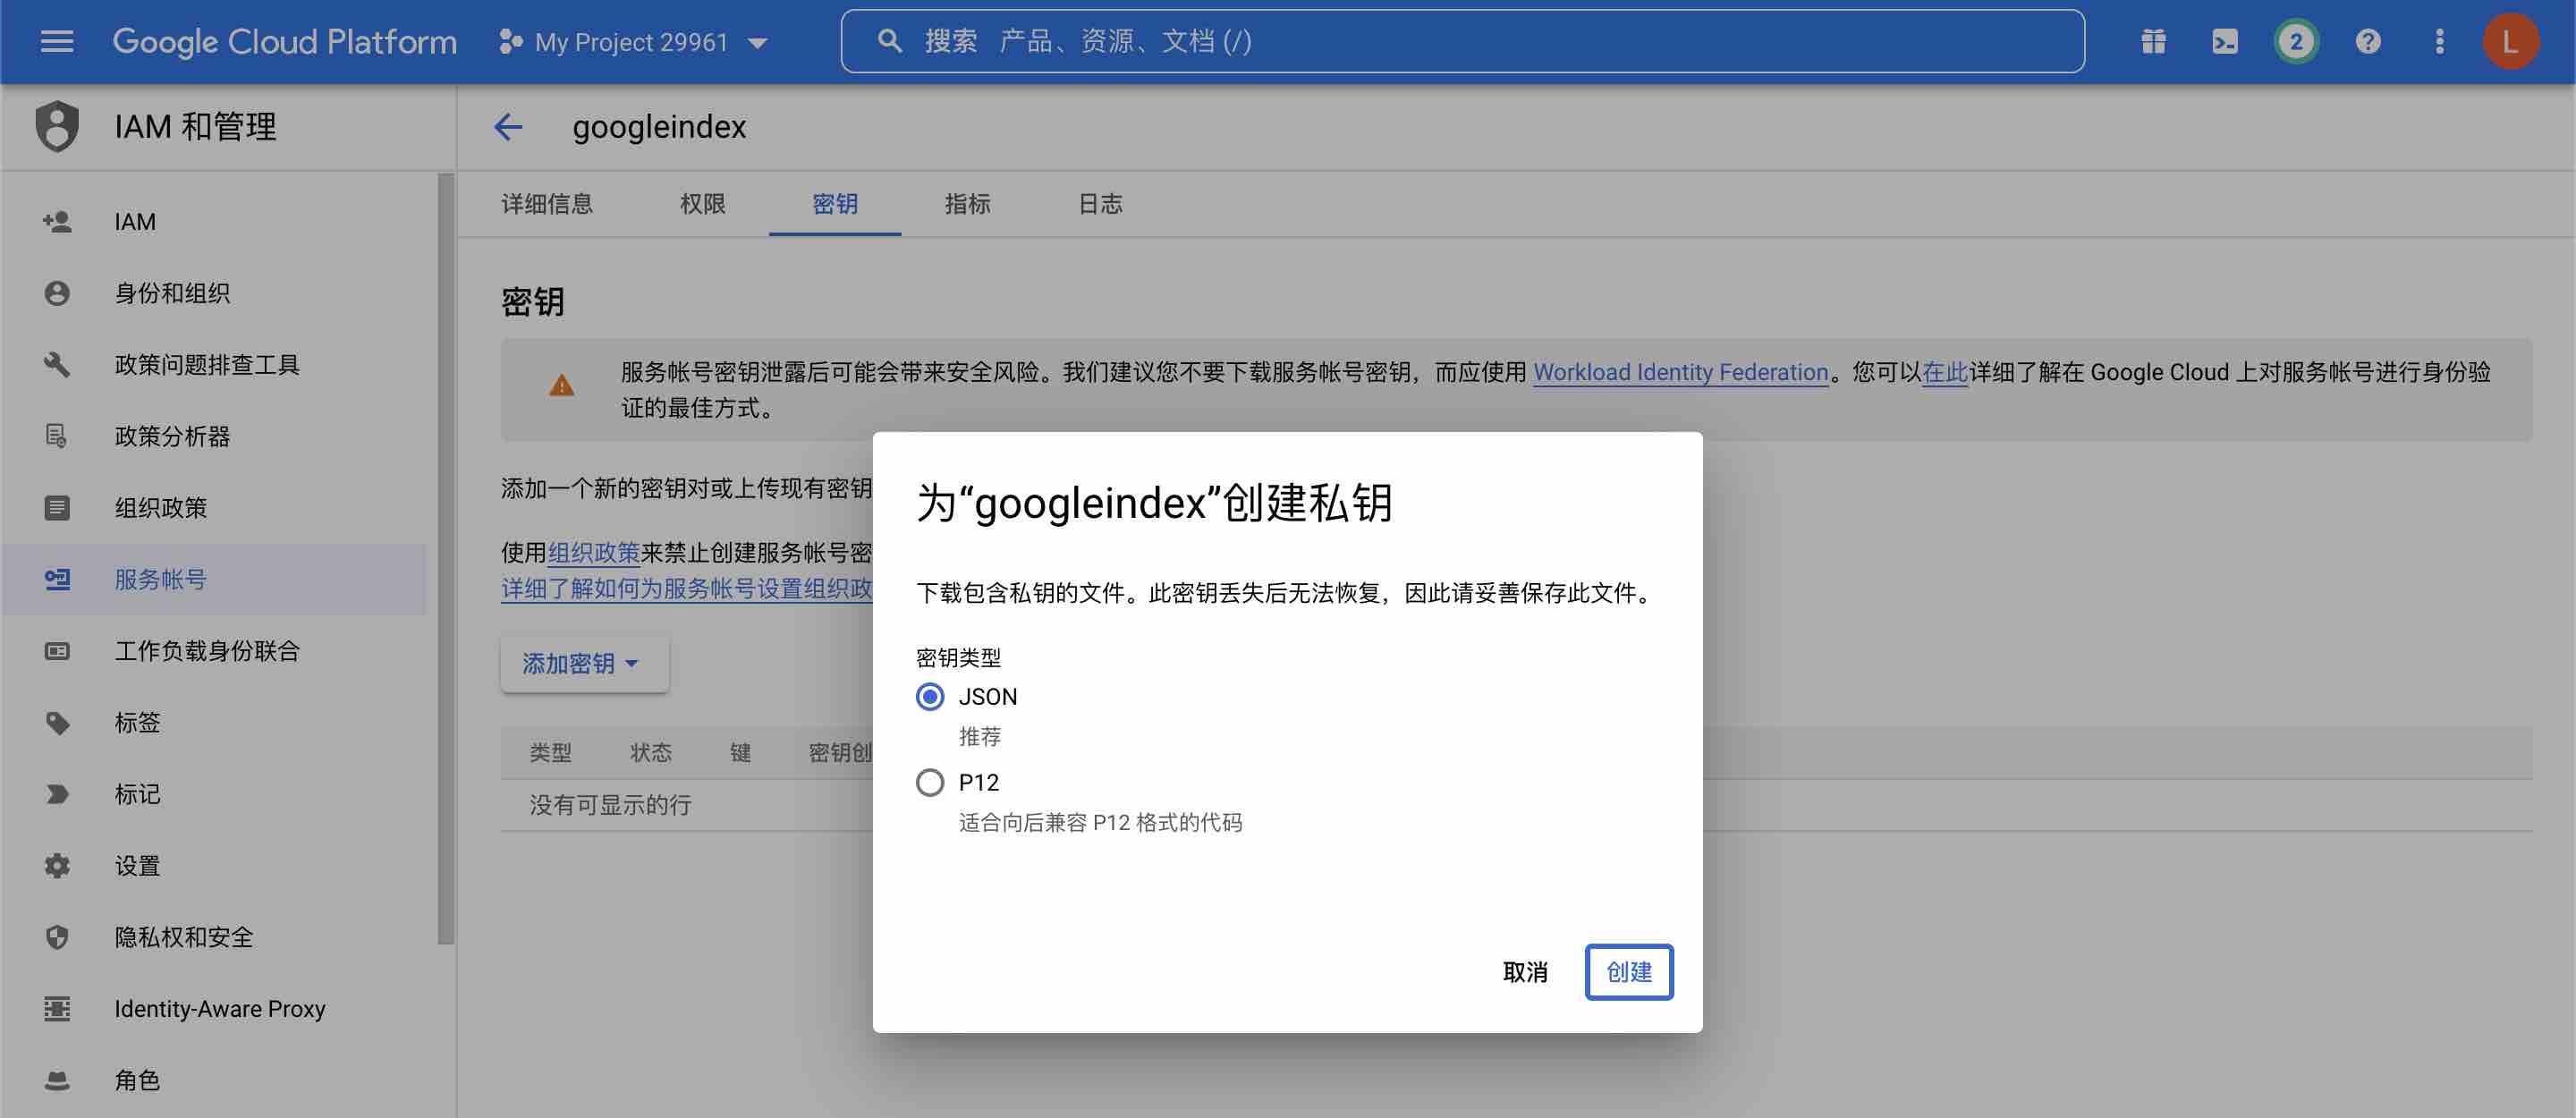
json文件内的内容,
以下信息已经过修改,并且已删除相关的申请,仅用于参考
其中
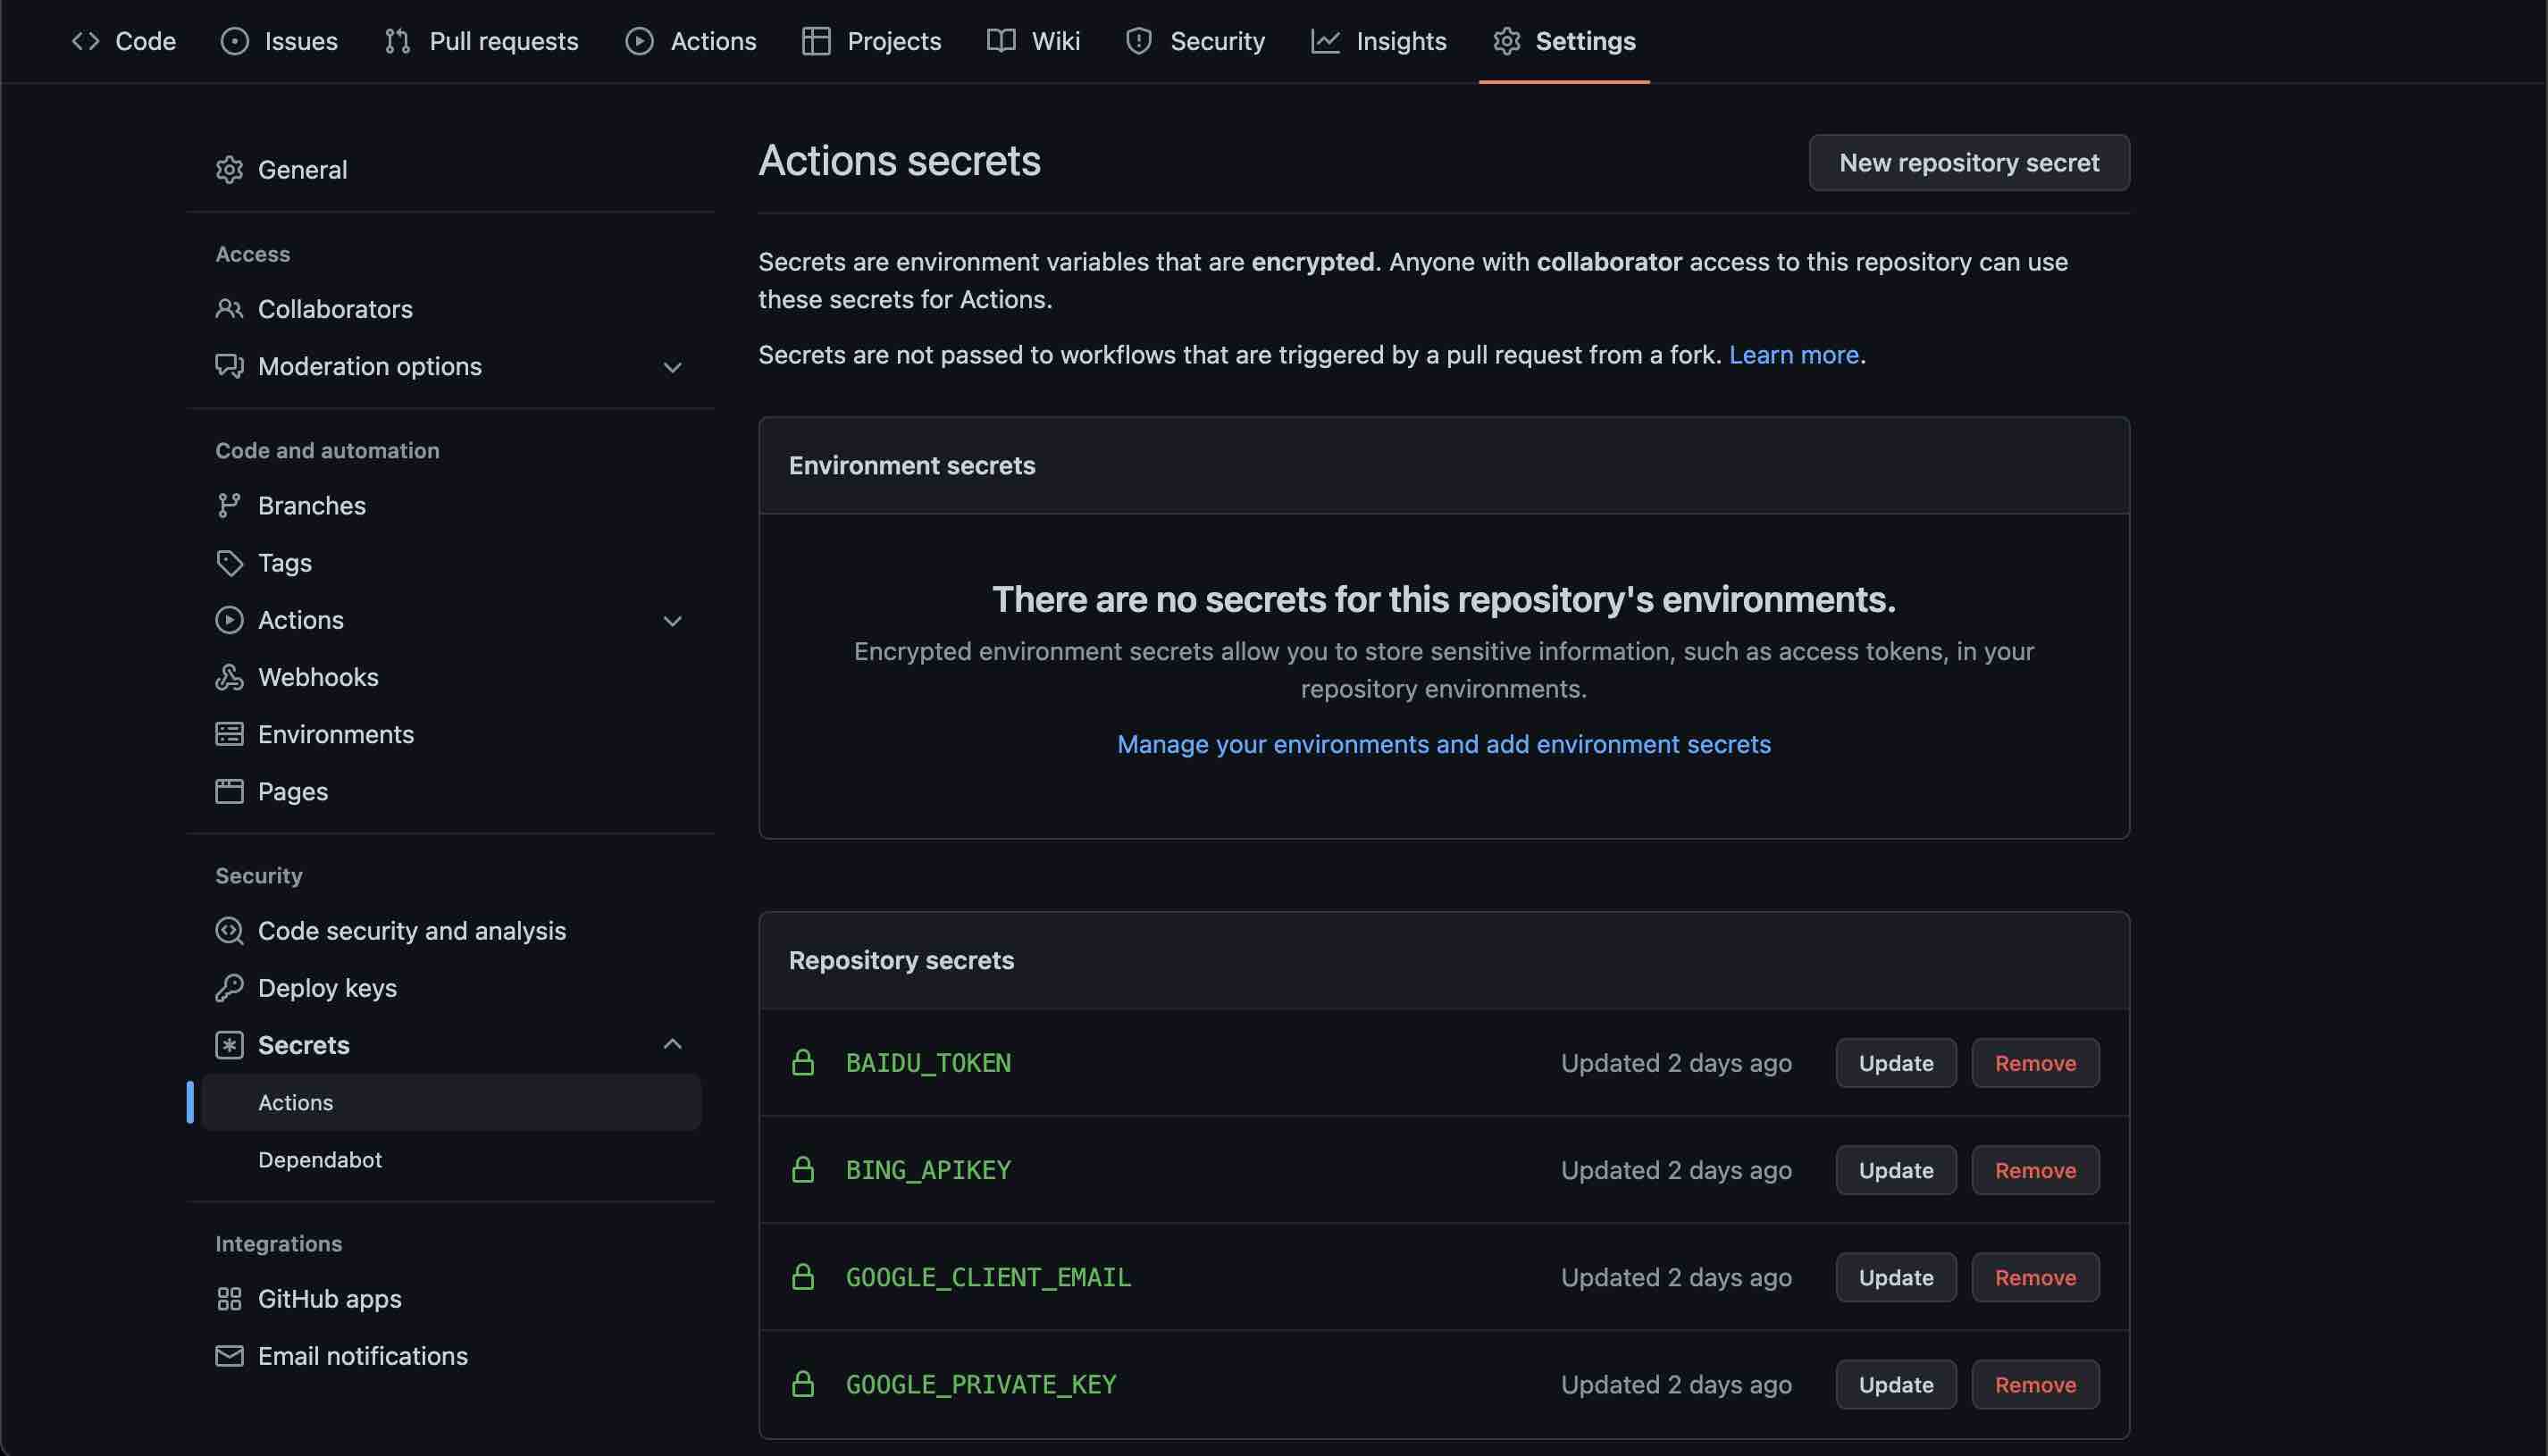
private_key和client_email是该项目需要的,注意在GitHub中的Secrets名为,
google_private_key和google_client_email
{
  "type": "service_account",
  "project_id": "elated-guild-298003",
  "private_key_id": "cf58d669c0e8c8e082b2c403ade5e2548078e384",
  "private_key": "-----BEGIN PRIVATE KEY-----\nMIIEvgIBADANBgkqhkiG9w0BAQEFAASCBKgwggSkAgEAAoIBAQDEAJw89yeylRrA\nB+bzOAfQQNgOCABIwEKCy5mMxWSaiXy2RktyCJWjMR2Pgz770NJgClQHPJjsFn0c\nukHufpnuiX3VPlimLANPCRFdU/qp+yiaw4quIhYF1UZJkhmhL30anghUcvi+r9hQ\nw+RwcKrgA4EUzqUJaPdvjtzSoo315PPGfR91ASD5S8gE02yVI8igtYMX7v2x1JYR\n7PwHJwOVemiM9lot8ilvoUbV4BU0vSlwFoxKMJAbEXTmJjEKQi9992rcMW0GzXO8\ncHldUUtURXkt3VFjYTH27KhHiTkTXw+uZRBu1rkubDJkS8lGIWN7Fc/r4HMMCVTu\nXPS6HbJ/AgMBAAECggEANSS7OBaFd3jRL3cVCiZLjA5A5pEJzq/+eKtOn2oYDISx\nwVRO+YTVWdGj47kg1zM4D11NikbGaeDxHFxuKwW9o/04lpyYebneTcw2Hpl6EiOs\nz0WssOlCEmPQ8nrAI0GWiKSHuqoPwtg37TIoGsqZsjKRCby759DDokZYnm3/0sc+\niEllT0ZyBZhGDzyguVLEdCIR2P02q/hQzLyd6ejWGGwZebImbGoILhmuOjVrco0p\nV0JbrrNskjM5Epe7w+CpGftEASJ7Dxa8oj0qIT6cyAipra2AZAGnG9jrLcWpJuhu\nvNeDIFnTfpNEac+khXZZE2++MIQfTX9wGJc8tox2vQKBgQD6yiNvAL7sxExiy6ER\ntLtFQ3bvmMpKRFGvFOyPOtMbmjZ3D1GEtNNKGH4v1TI+tncEy7Q5Dm7nWwpi8yvL\nbh8xKghelAc/CU1nw0xDEDCkMbAwpFg5A5ZDImy3LZsQh0kNXniIMy1vMSt5yLKS\n80gXQKGCxG8t3rP8Qd/2a55g1QKBgQDIExP1nG9sHJaigmitEUwr0Ow6Shqr56Me\nd7995gaV1oLWWCQzrXt/viWkb1W5ZGIxzcWNWz99m4CbvqfewRr598Eenald0csN\nVcIEk+0C+6KqA+jU9Tfs2zow/C7JuKULP2N++o0EoSz/ngokP7f1yLOYbr507v/R\n0cLElQBQAwKBgAbxDWYHKUG4dTzO0hiBXiWepm4fVooTtgcYlyunvywmapeFDwaT\nUr3cS7HbPtbJiiXR1Z02rw8sT+9JN88brzVXKoAjrMer5D6ZA0Vf71i8H1pZUi/R\nz5jwHP48/uvIMtdx4/gxInLPc5qdWYQDw90Q5ueNtF4aqfSzhhV2CR45AoGBAJN9\nPOF6iMjx6jmyWOf8MGK8iOgPaMoA4Ea9j/SHdaNPlvPb1hQid0AcNDObv14Dmj+M\nqW0jLxKxZ4VobufPAsvyz/J51zjKRx11cqldQwNH7QnYB/O1MZzxn1wtC3C5JTG9\ncONSYFJhXoKxRliigEI3ye089jnNVdifAS1ZiflxAoGBANTX1fEMEeNuYU0v3rtd\n5CkPZg4TNZ+y2MGl5xR1LdIgrJ8c9xKoW4rpp7SsOIvHpWX494f90D7o9uFEGSQ4\nyQK53jVzJ0ekGV5BdPF3n3/2j2VEqFLHi7LL4CJSxr6ci7OfBoHOGE8odhevQCCK\njnFzEin0QsBEgIC73fBh6XcH\n-----END PRIVATE KEY-----\n",
  "client_email": "[email protected]",
  "client_id": "103034240916368863393",
  "auth_uri": "https://accounts.google.com/o/oauth2/auth",
  "token_uri": "https://oauth2.googleapis.com/token",
  "auth_provider_x509_cert_url": "https://www.googleapis.com/oauth2/v1/certs",
  "client_x509_cert_url": "https://www.googleapis.com/robot/v1/metadata/x509/googleindexing%40elated-guild-298003.iam.gserviceaccount.com"
}
(5) 为服务账号授权
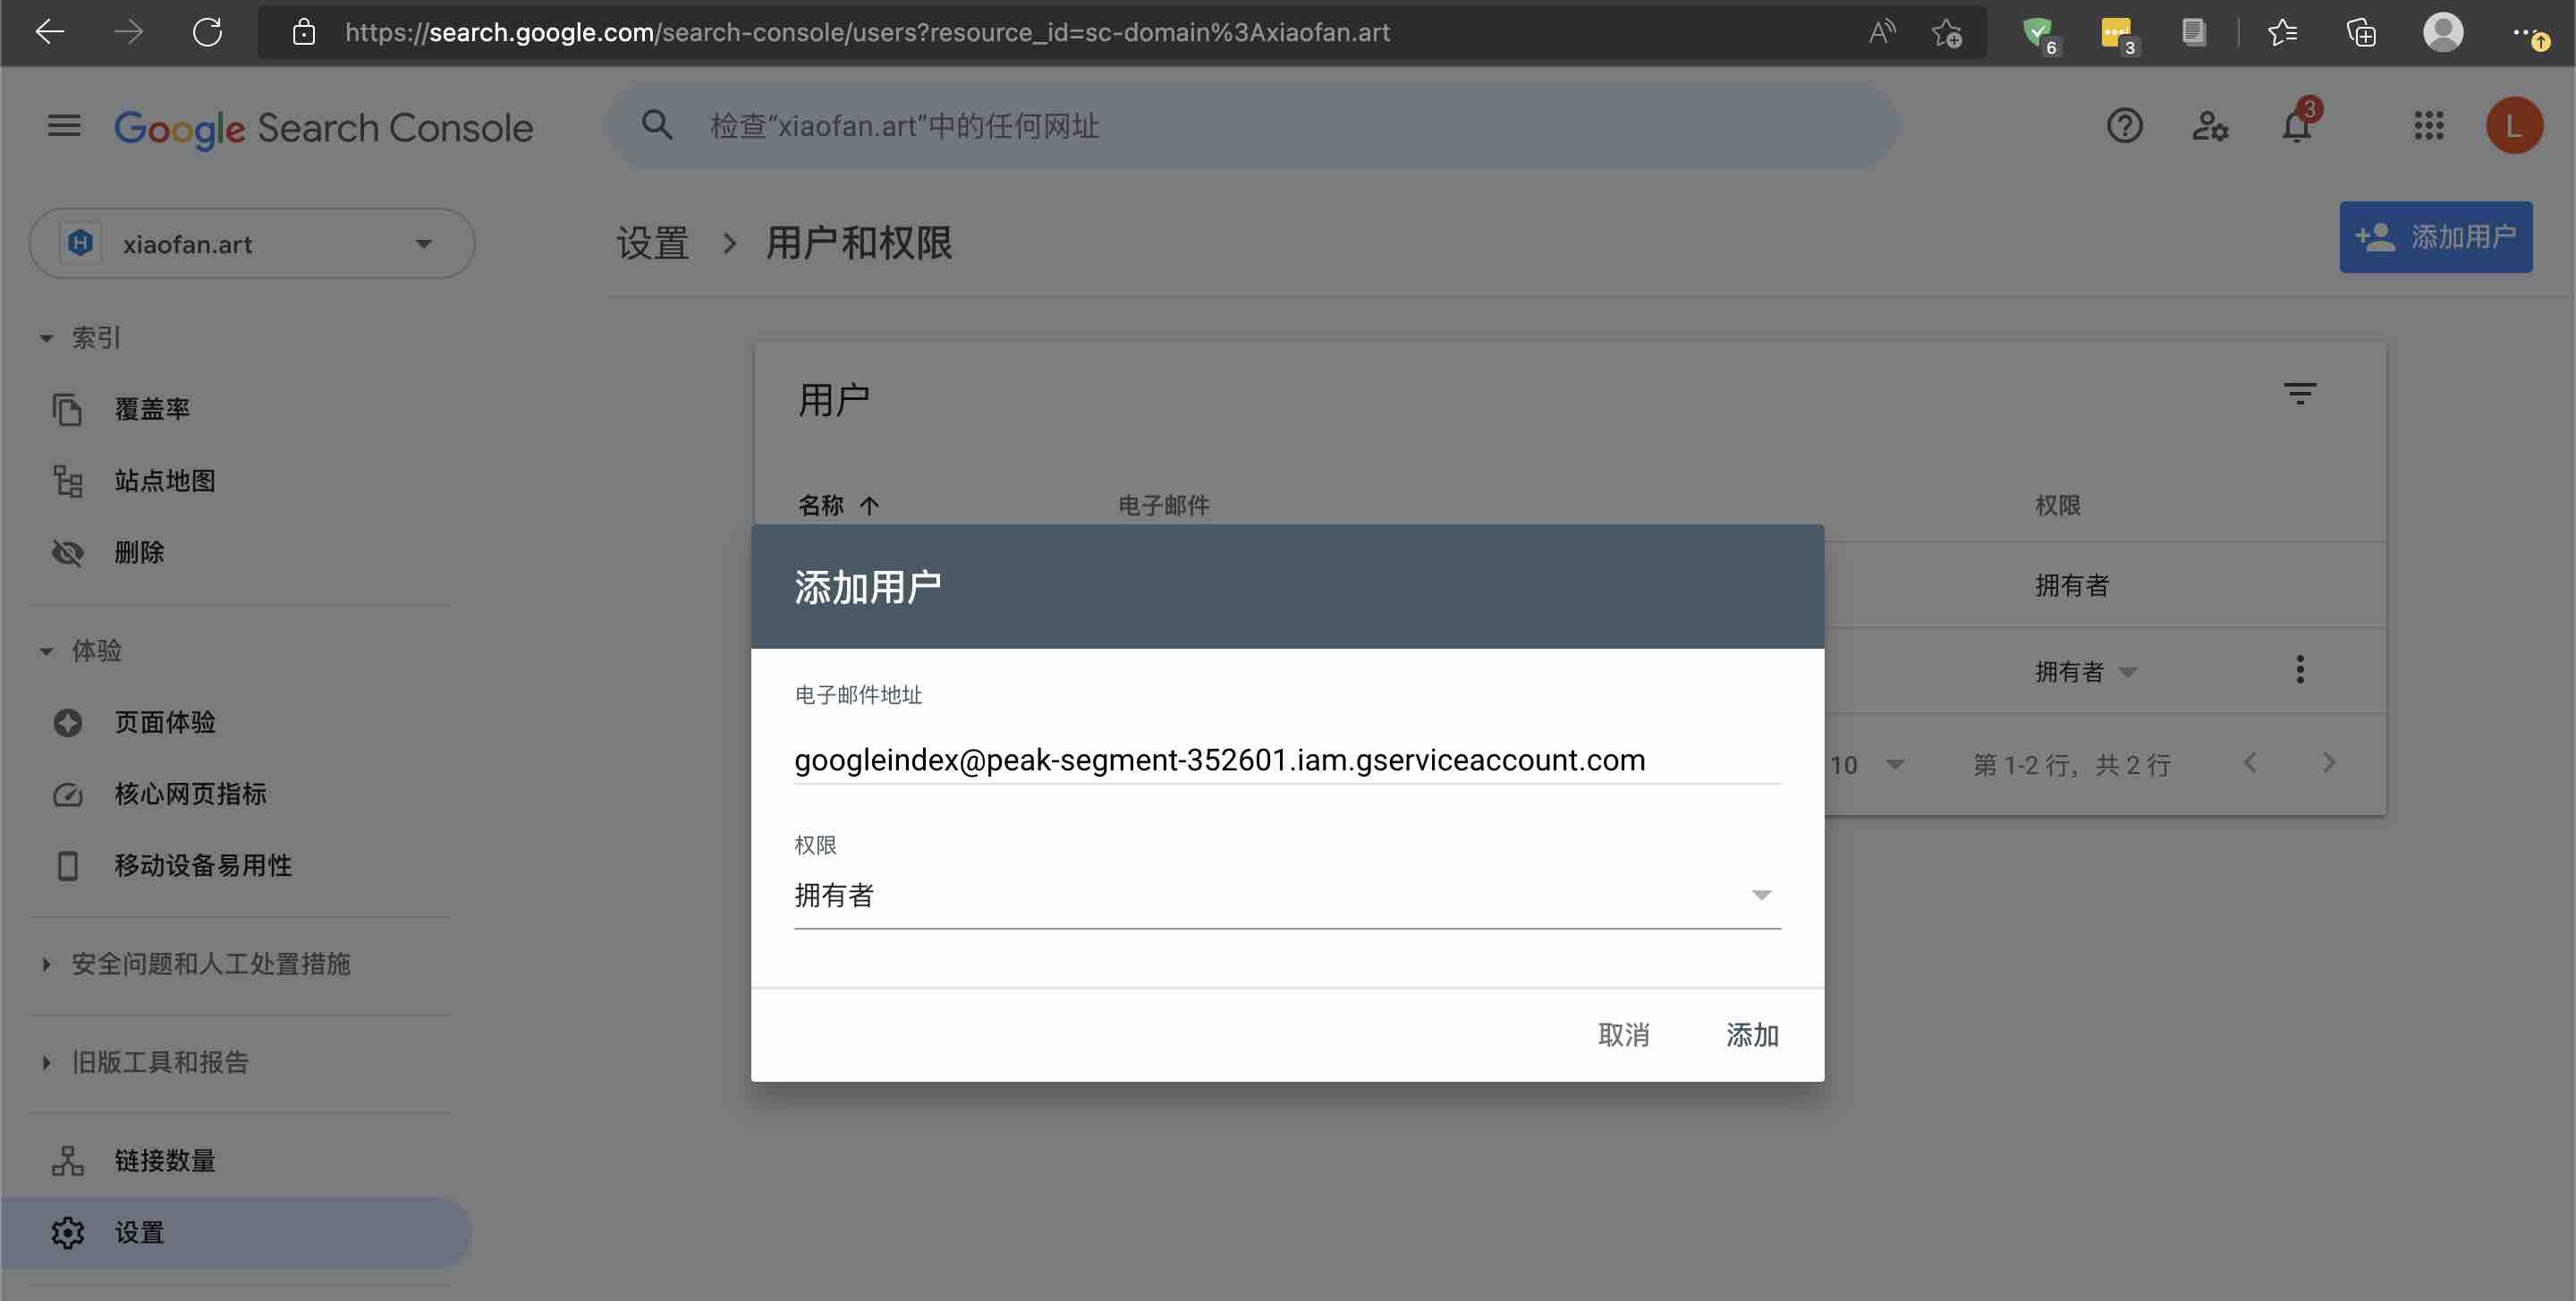
打开谷歌站长, 选择需要设置的网站, 点击设置, 点击用户和权限, 点击添加用户.
电子邮箱地址: json文件中的client_email字段
权限: 选择拥有者, 选择完整GitHub执行时会报权限错误.
(6) GitHub填入secrets
google_private_key: json文件中的private_key字段, 填入时要带双引号 google_client_email: json文件中的client_email字段, 填入时不带双引号
(7) 官网说明
由于谷歌常更新页面, 所以如果以上操作出现问题, 可参考官方教程, 不过官方教程也不是完成100%跟页面同步的.
使用 Indexing API 的前提条件 | Google Developers
验证

- 在Github中点击目标项目的Actions按钮
- 选中右侧的run workflow按钮
- 选择目标分支
- 点击
Run workflow
GitHub Action结果
点击Actions, 查看执行情况.
如果返回更新内容, 就说明成功了.
# 百度的
status: 200, statusTxt: OK, response:{ remain: 90, success: 10 }
# 必应的
status: 200, statusTxt: OK, response:{ d: null }
# 谷歌的
status: 200, statusTxt: OK, response:{ urlNotificationMetadata: [Object] }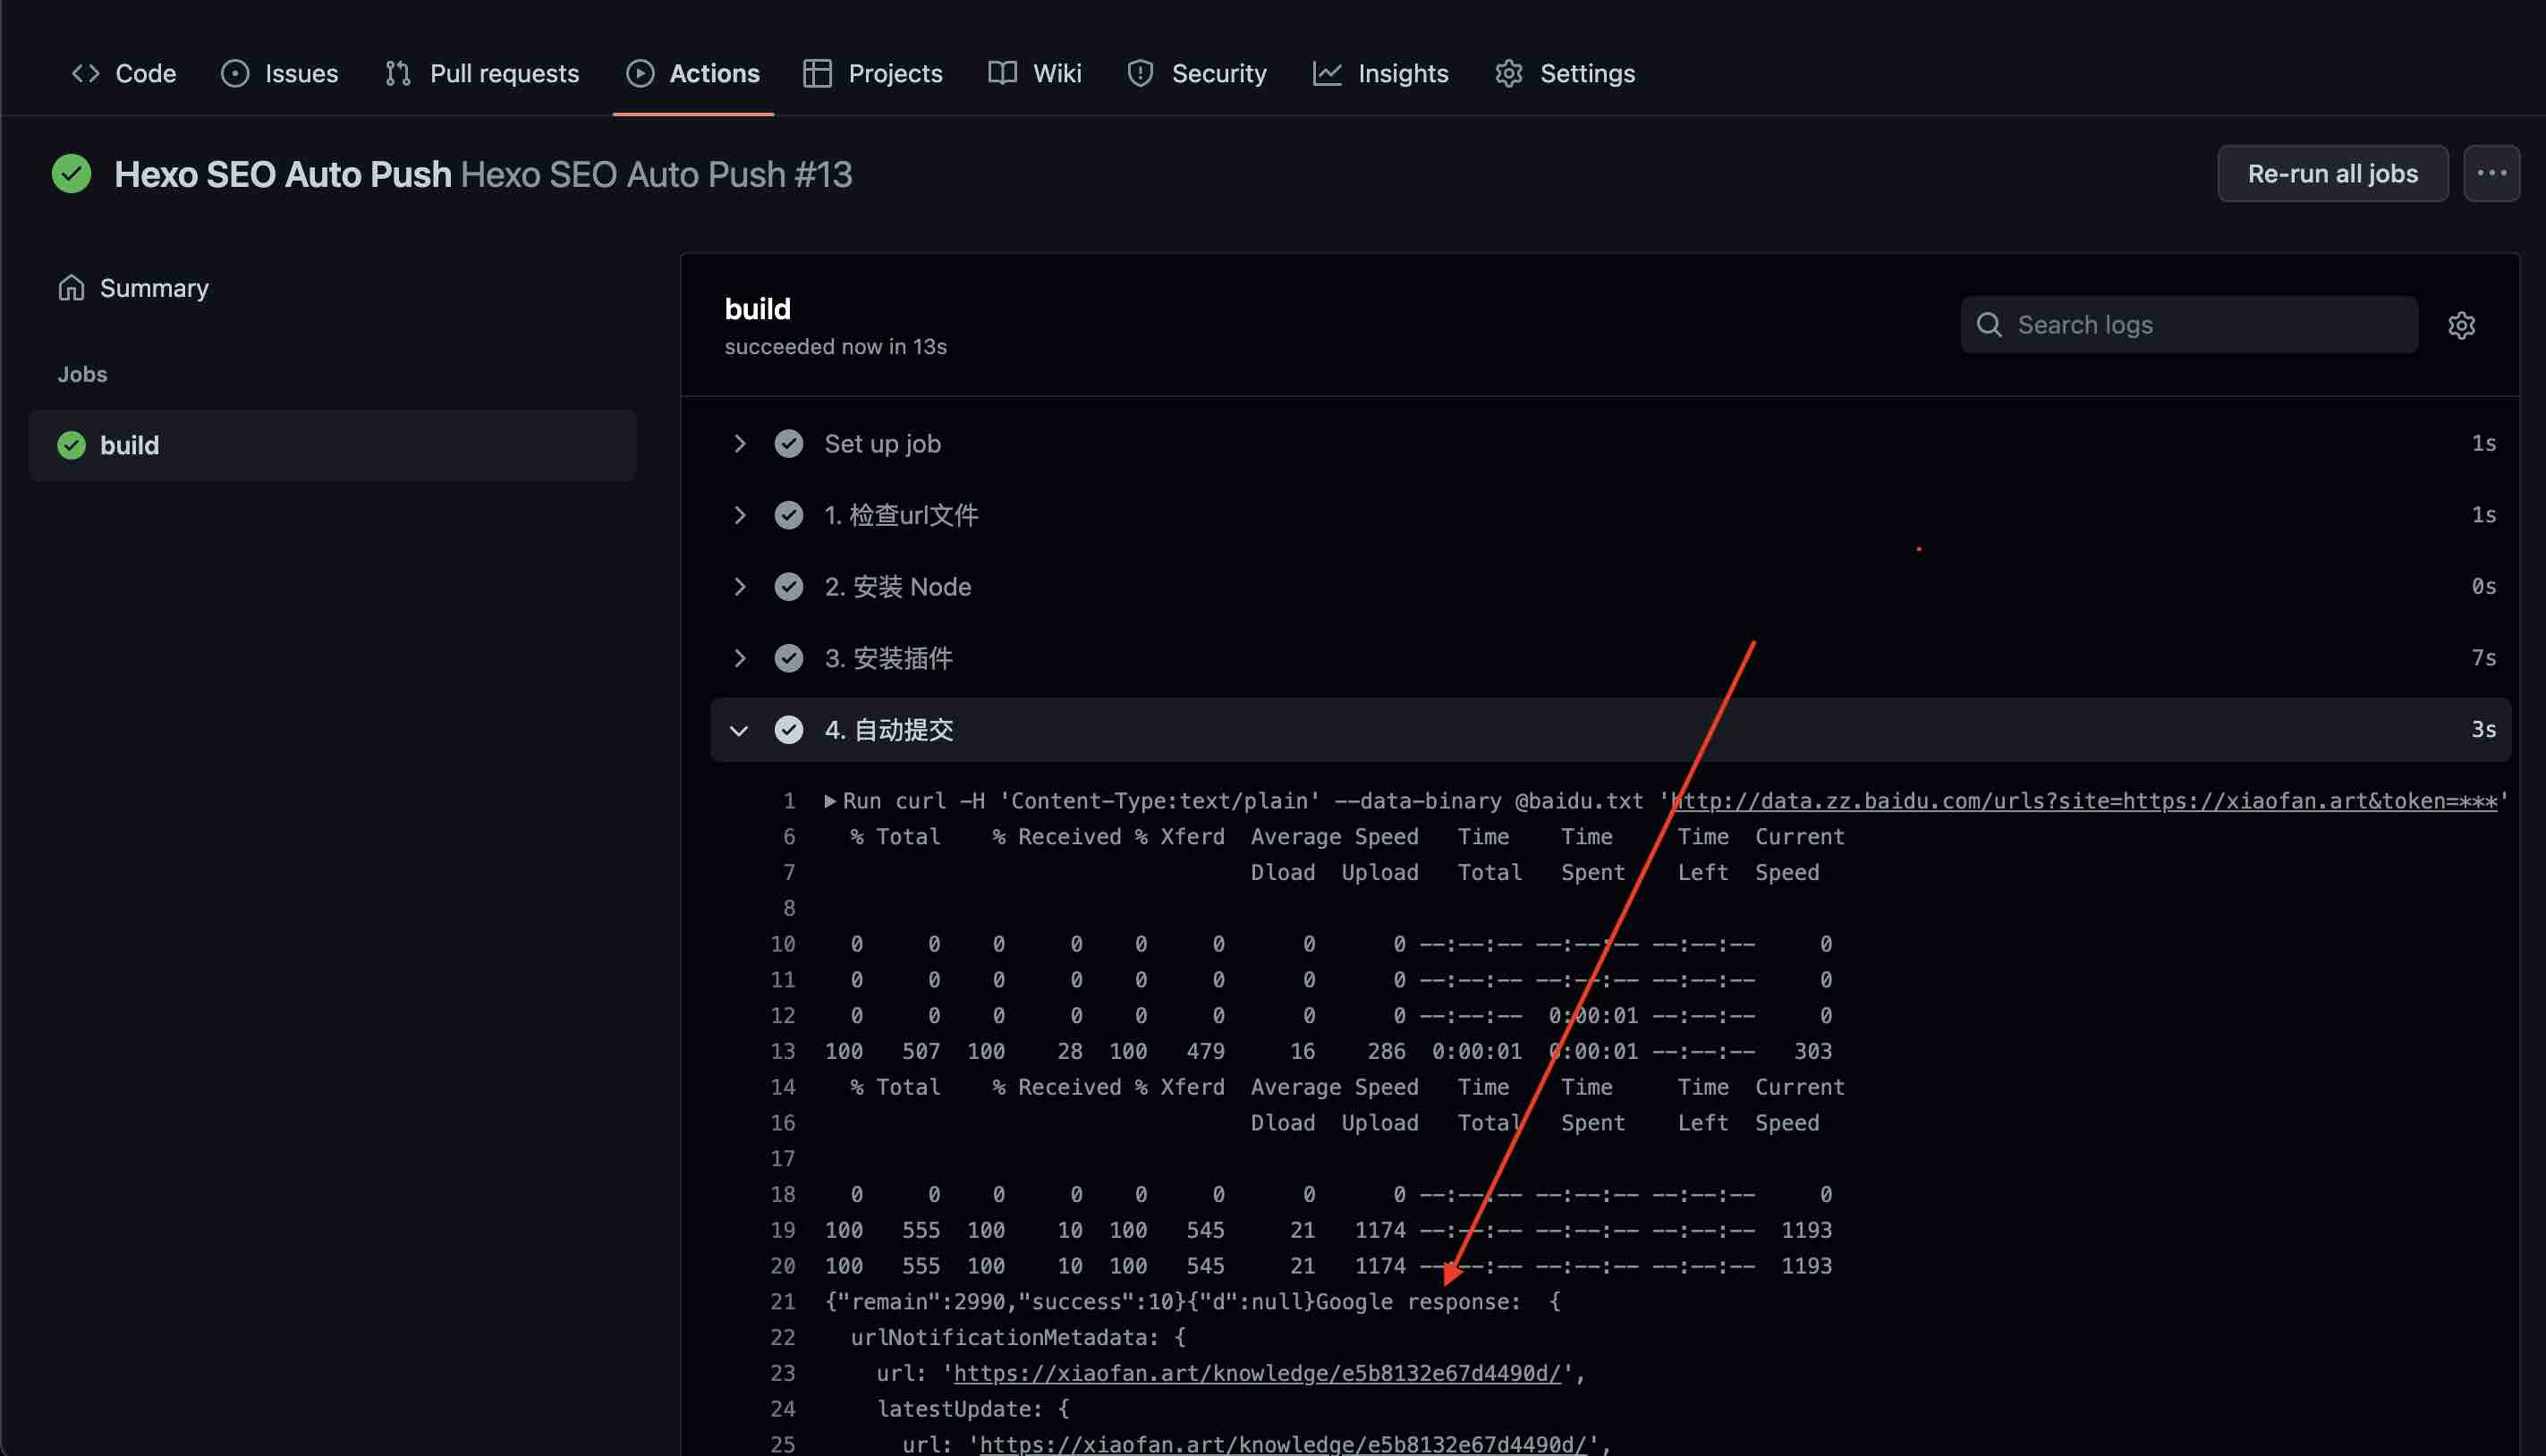
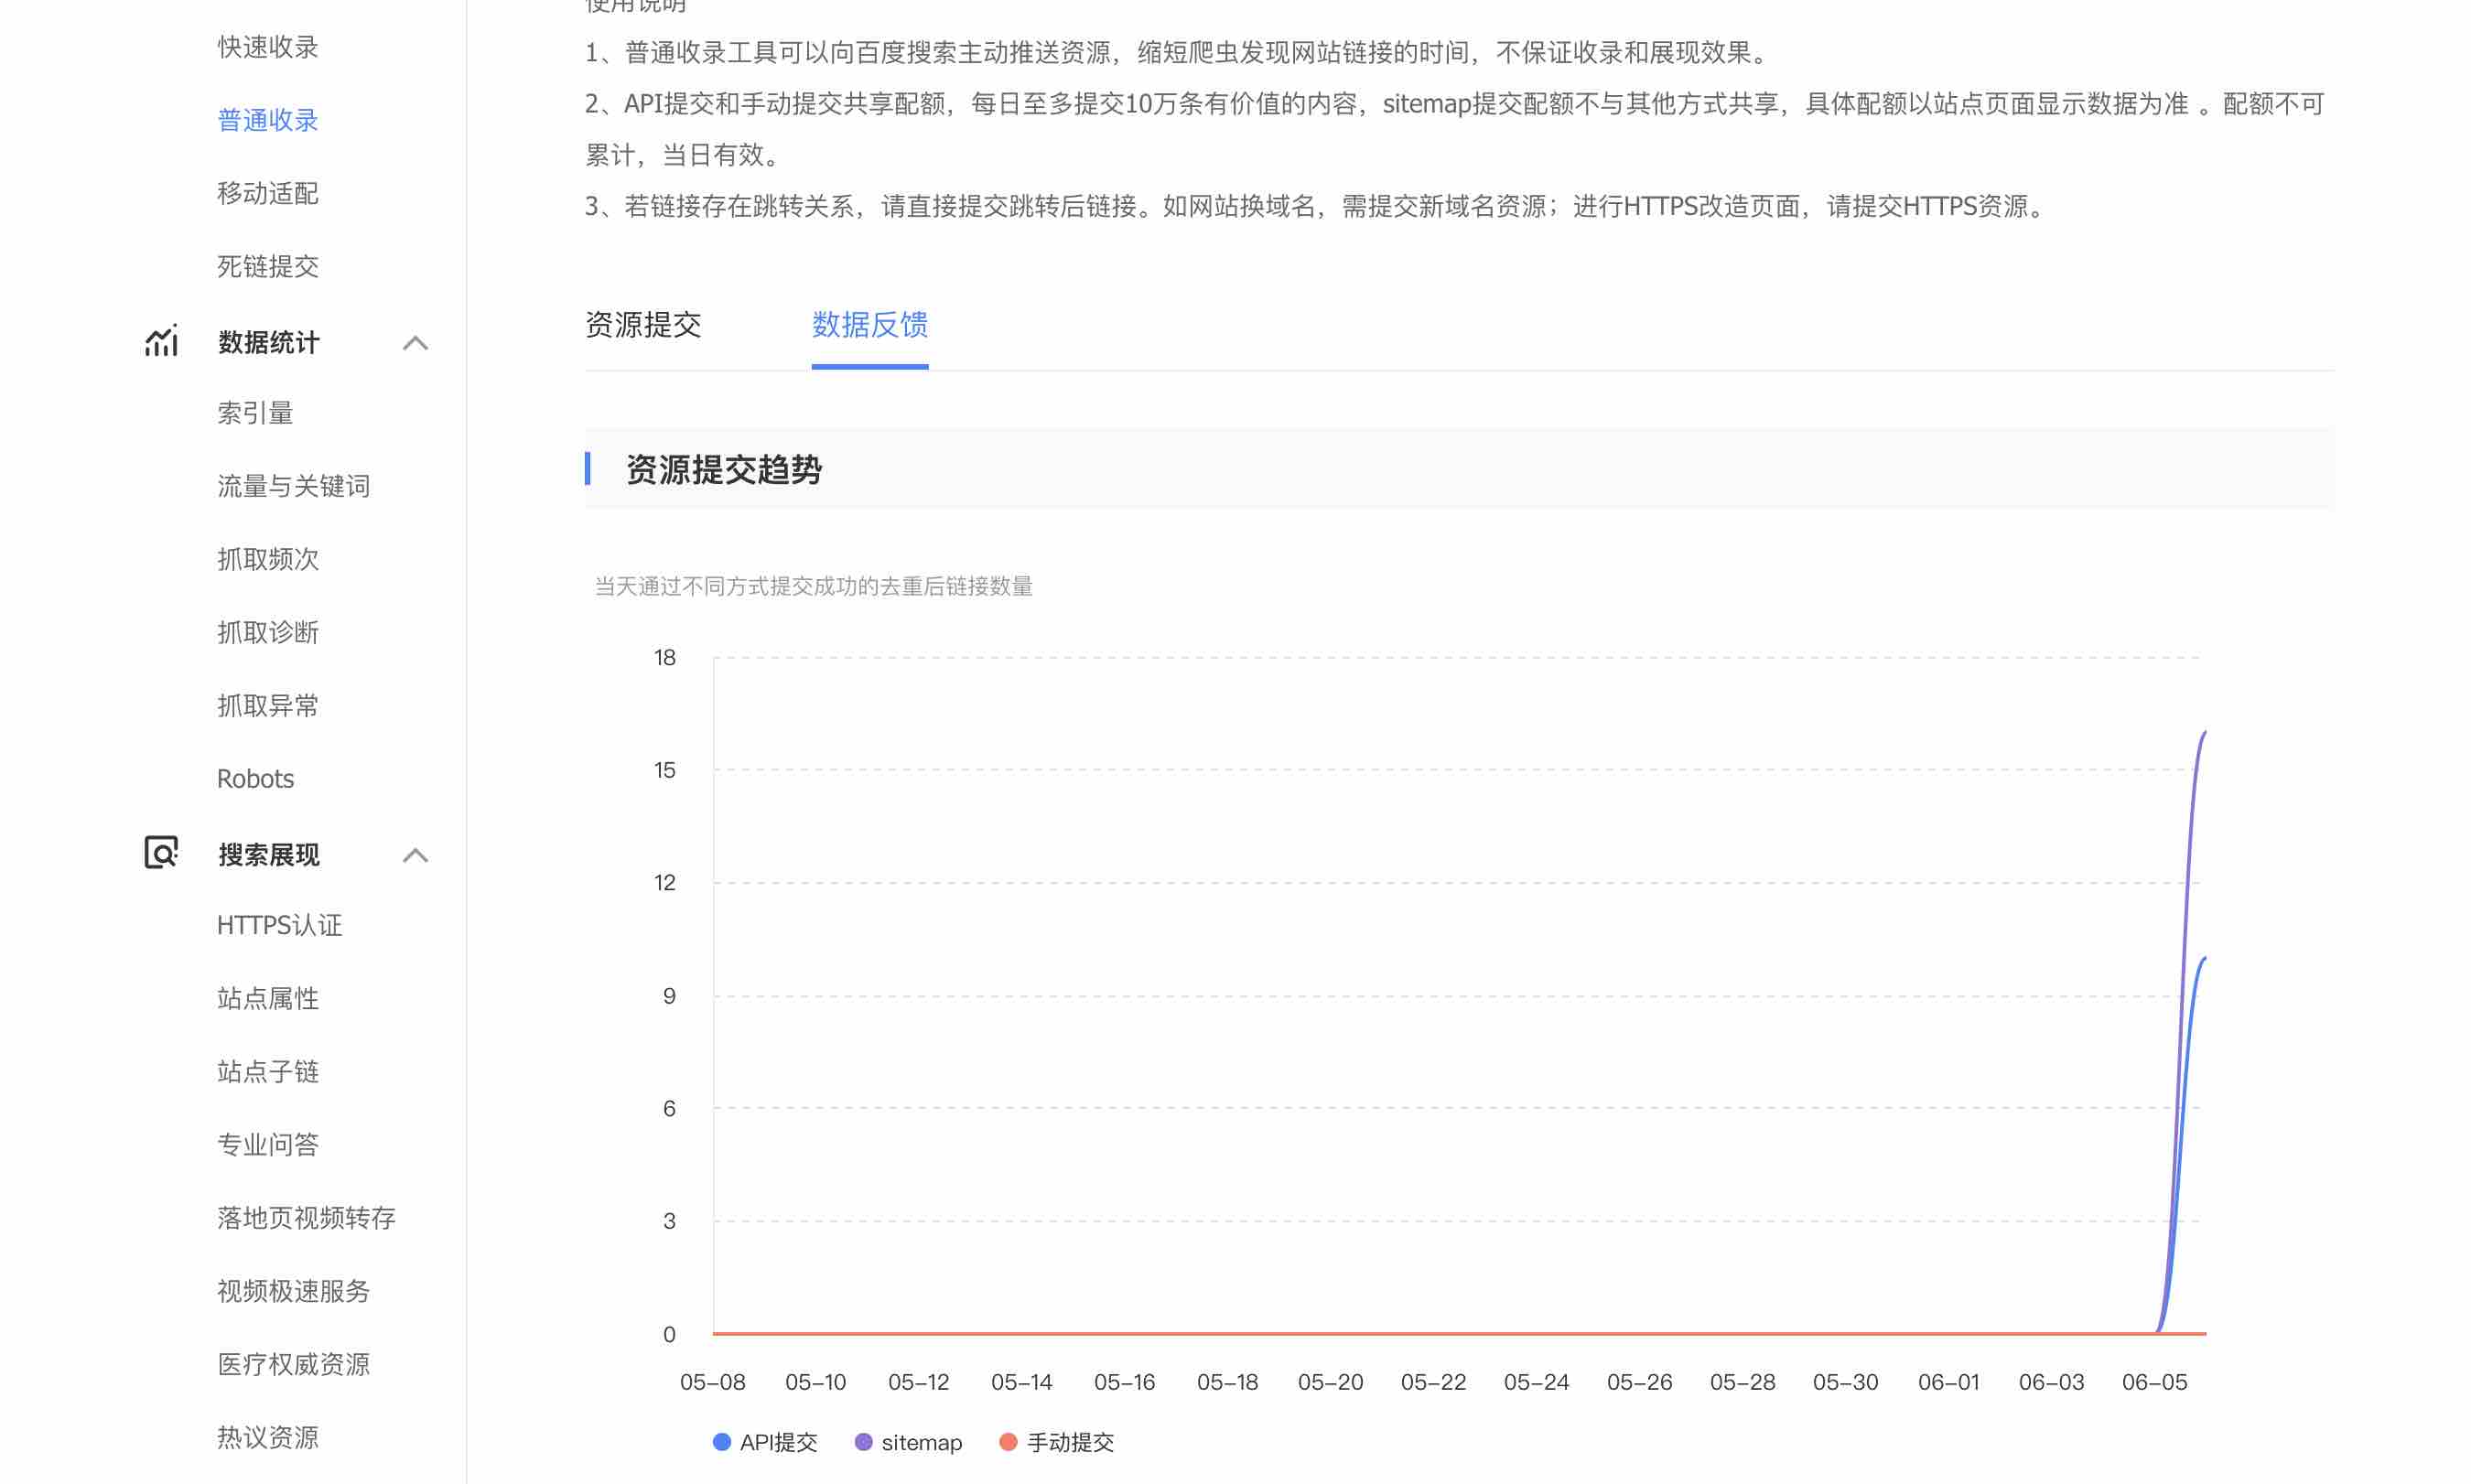
百度页面结果
打开百度站长, 选择对应站点, 选择普通收录中的数据反馈.
看到当日API提交有值, 说明成功了. 但是这个页面好像有延迟, 不是GitHub Action那么指定完这个页面就能刷出来结果.
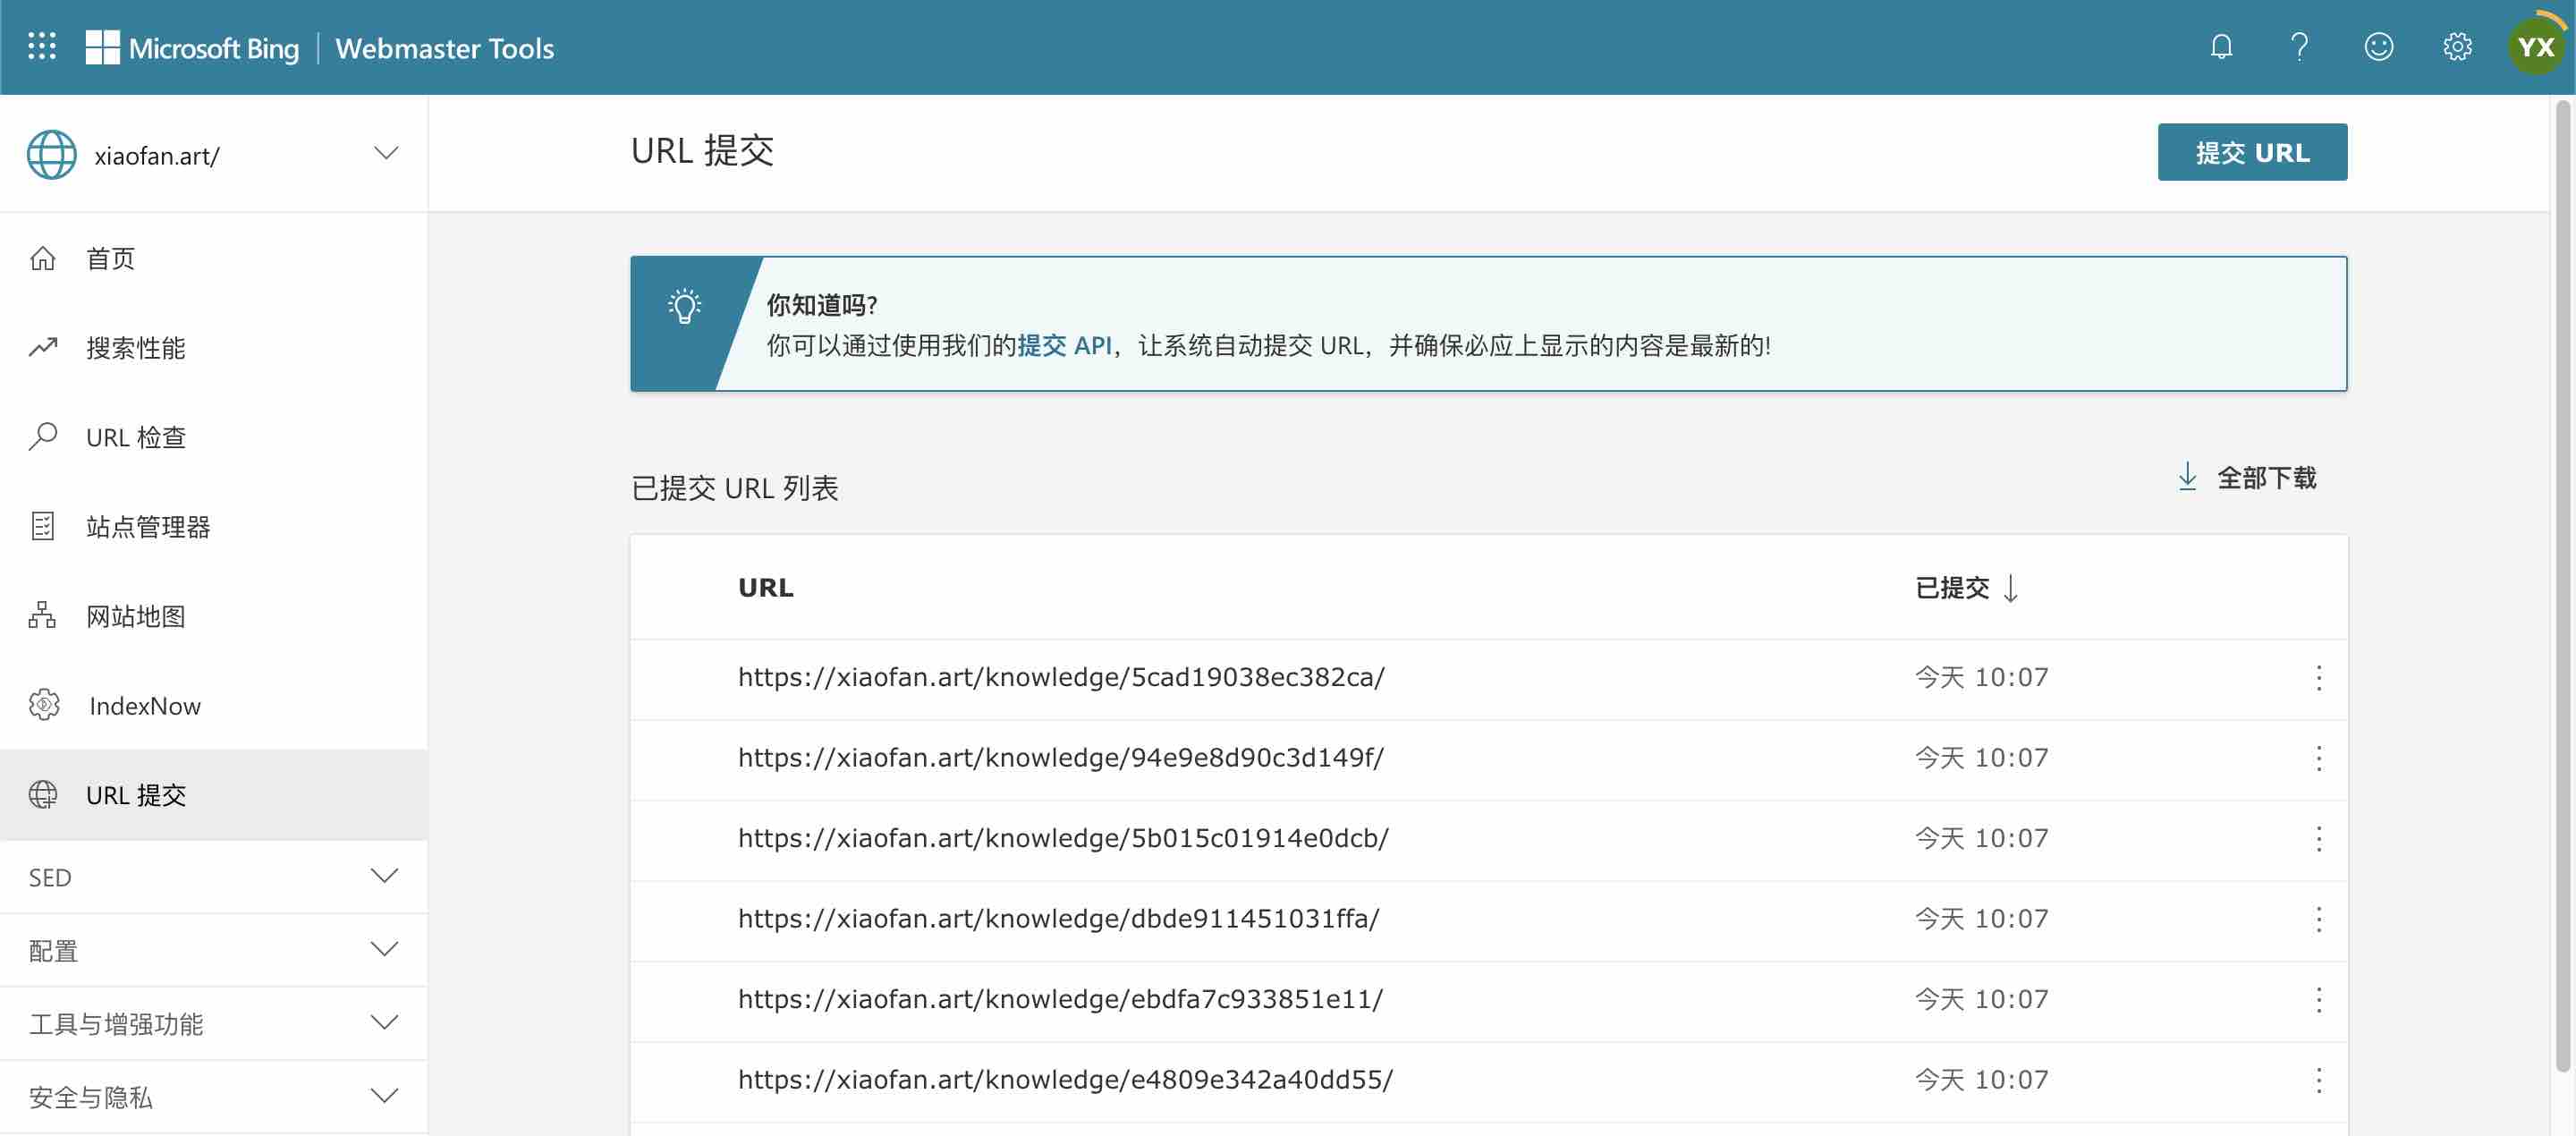
必应页面结果
打开Home - Bing Webmaster Tools, URL提交标签
有提交信息说明成功了.
谷歌页面结果
在Google Cloud Platform 中查看.
错误率只要不是100%, 就说明成功了.

