generator-esri-appbuilder-js
v4.7.0
Published
Yeoman generator to help customize the ArcGIS Web AppBuilder
Downloads
11
Readme
generator-esri-appbuilder-js 
Yeoman generator to help customize the ArcGIS Web AppBuilder.
About
This generator scaffolds out the boilerplate files that are needed when you are customizing the Web AppBuilder. This includes generators to set up your project and scaffold out the files needed to create custom widgets.

Getting Started
Installation
The first prerequisite is to have the grunt-cli installed. To install this, run:
npm install -g grunt-cliNext you must install Yeoman:
$ npm install -g yoFinally install generator-esri-appbuilder-js from npm:
$ npm install -g generator-esri-appbuilder-jsRunning the Generators
The generators should be run in the root of a working folder for your project. This should be outside of the Web AppBuilder's folder structure (i.e. NOT in the stem app or an app that you've already created with the Web AppBuilder). The grunt tasks configured by the generators will handle copying the widget files to the appropriate folders under the Web AppBuilder's install directory. Because of this, the generator will ask you what app to use. If you select None or do not have any Web AppBuilder apps in your Web AppBuilder install directory, the grunt file will be created but will not be configured to copy your code to the appropriate app directory. If you create an app after running the Yeoman generator, you can either go to the Gruntfile and make manual edits (you'll see details in there), or you can re-run this generator and it will offer to overwrite your Gruntfile.
App (Default) Generator
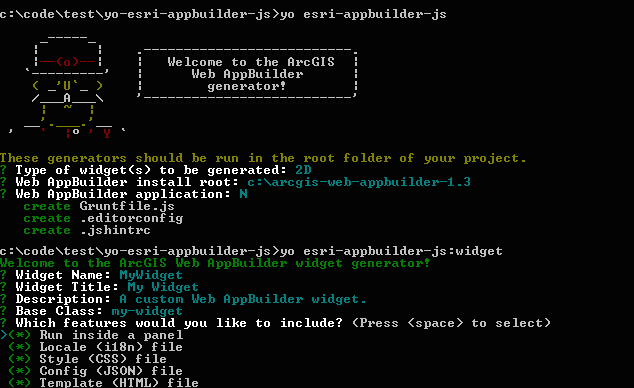
The app generator installs and configures the grunt tasks and other project files and ensures that required subfolders (like widgets) exist.
- Navigate into the root folder of your project
- Run the generator with
yo esri-appbuilder-js - Answer the man's questions!
|Prompt|Description|Default| |------|-----------|-------| |Type of widget(s) to be generated|Whether you want to build 2D or 3D widgets|2D| |Web AppBuilder install root|The root folder where you installed (unzipped) the Web AppBuilder Developer Edition|[USER_HOME_FOLDER]/WebAppBuilderForArcGIS| |Web AppBuilder application|The name of the application you would like the grunt task to sync your code with|None| |Would you like to use SASS for CSS preprocessing?|If you choose yes, you can utilize features from SASS like nesting, variables, etc.|Yes| |Which JavaScript syntax version would you like to develop in?|Will widget and settings JavaScript files use ES5, ES2015, or TypeScript?|ES5|
Widget Generator
Scaffolds out the files needed to create a new custom widget.
- Navigate into the root folder of your project
- Run the generator with
yo esri-appbuilder-js:widget - Answer the man's questions!
|Prompt|Description|Default| |------|-----------|-------| |Widget Name|Folder name for output files and widget identifier|MyWidget| |Widget Title|Name users see in widget selector and panel title bar|My Widget| |Description|What does this widget do? (optional)|A custom Web AppBuilder widget| |Base Class|The widget's base class|my-widget| |Run inside a panel|Will your widget run inside a panel?|Yes| |Locale (i18n) file|Will your widget require a locale file?|Yes| |Style (CSS) file|Will your widget require a style file?|Yes| |Config (JSON) file|Will your widget require a configuration file?|Yes| |Template (HTML) file|Will your widget require a template file?|Yes| |Would you like a settings page?|Will your widget have a settings page?|Yes |Settings template (HTML) file|Will your settings page require a template file?|Yes| |Settings locale (i18n) file|Will your settings page require a locale file?|Yes| |Settings style (CSS) file|Will your settings page require a style file?|Yes|
Taking the default values for the prompts will generate the following output under the widgets folder (note: if you choose TypeScript style, there will be .ts files instead of JS):
MyWidget
│   config.json
│   manifest.json
│   Widget.html
│   Widget.js
│
├───css
│       style.css (or style.scss)
│
├───images
│       icon.png
│
├───nls
│       strings.js
│
└───setting
    |   Setting.js
    |   Setting.html
    ├───nls
    |       strings.js
    └───css
            style.css
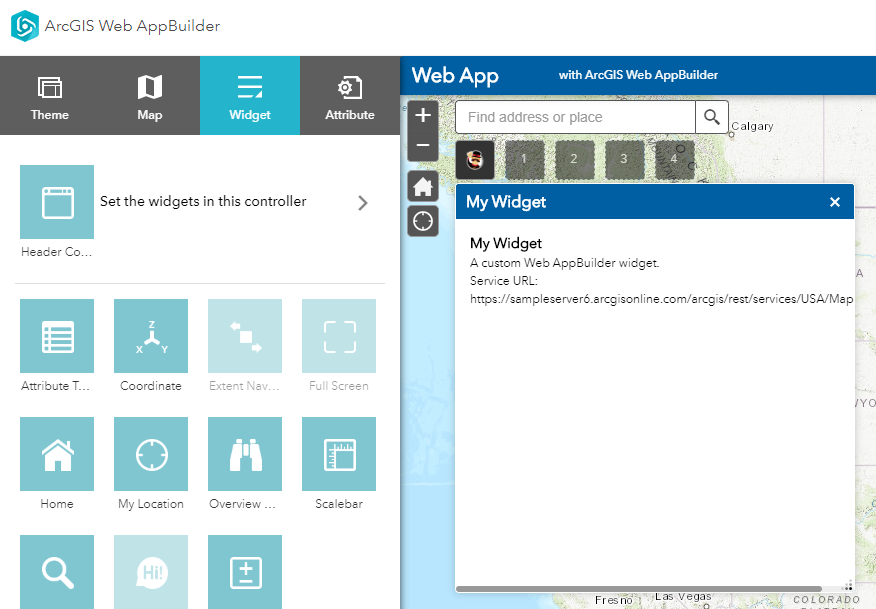
After you copy the widget files to the Web AppBuilder's stemapp, the next time you run the Web AppBuilder, you will see something like the following on the widgets panel:

Optional Settings
Users are also able to scaffold out widgets without creating an application base. When running yo esri-appbuilder-js:widget from a root without an existing .yo-rc.json file, these additional questions will be asked prior to the questions above.
|Prompt|Description|Default|
|------|-----------|-------|
|Choose your widget directory| The location you want your widgt to be built. E.g ./ for root| None|
|Type of widget(s) to be generated|Whether you want to build 2D or 3D widgets|2D|
|Would you like to use SASS for CSS preprocessing?|If you choose yes, you can utilize features from SASS like nesting, variables, etc.|Yes|
|Which JavaScript syntax version would you like to develop in?|Will widget and settings JavaScript files use ES5, ES2015, or TypeScript?|ES5|
Copying Widget Files
In order for the widgets that you're working on to be available in the Web AppBuilder you will need to copy their files to the appropriate folder under the Web AppBuilder's install root.
Copying the Files Manually
For example, let's say you've installed the Web AppBuilder in c:\WebAppBuilderForArcGIS, then you'll need to copy widget files to the following folder under the stem app:
c:\WebAppBuilderForArcGIS\client\stemapp\widgetsAlso, you'll likely want to copy widget files to any applications that you've created that use them:
c:\WebAppBuilderForArcGIS\server\apps\[appId]\widgetsUnless you're using the grunt tasks, you'll need to re-copy the files each time you make changes to the files.
Running the Grunt Tasks
The easiest way to keep your widget files in sync with the Web AppBuilder is to run the grunt tasks. After running the generators, you can run the default grunt task following at the project root:
gruntThis will copy over any files that haven't already been copied over, and then start watching all files under the widgets folder for changes and re-copy the files to the Web AppBuilder's folders.
Livereload
The generator enables Livereload by default in the Gruntfile that it creates. This means the Grunt watch task will run at the default livereload port so you can use a browser extension to have the page reload when you save your source widget files. See grunt-contrib-watch for advanced customization. Extensions are available in all major browsers (Example for Google Chrome)
Linting Your Code
The app generator does not scaffold out any linting files. We recommend that you use some form of linting, either jshint, semistandard, or eslint. An example of using semistandard is below:
- Install semistandard:
npm install -g semistandard- Below is a sample configuration you can add to your package.json:
  "semistandard": {
    "globals": [
      "define"
    ],
    "ignore": [
      "Gruntfile.js",
      "**/dist/**/*.js"
    ]
}- Validate your code:
semistandardSee the semistandard docs for more information.
TypeScript
If you choose TypeScript as the answer to the Which JavaScript syntax version would you like to develop in?, the TypeScript compiler will be used to build your Widget TypeScript file into an AMD Widget JS file that Web AppBuilder is expecting. There are a few considerations to understand when doing this.
Widgets in Template
If you add templated widgets to your html (ex: <div data-dojo-type="dijit/layout/AccordionPane" title="pane #1">accordion pane #1</div>), you both need to mix in the template:
@declare(BaseWidget, _WidgetsInTemplateMixin)
class Widget implements IWidget {
AND call the startup of _WidgetsInTemplateMixin
 public startup(args: any): void {
    BaseWidget.prototype.startup.call(this, args);
    _WidgetsInTemplateMixin.prototype.startup.call(this, args);
See here for more information on this pattern.
Building for Production
When you're ready to publish your application in a user facing environment, improve performance by running:
npm run build
The resulting package can be found in dist/buildOut/app.zip
This will repackage and compress your application with only the neccessary elements. We have found this to result in massive performance improvements.
NOTE: This feature is only available for 2D applications with a chosen Web AppBuilder application.
System Requirements
We aim to support LTS versions of Node.js. Right now that means Node.js v8.0 and heigher.
Issues
Find a bug or want to request a new feature? Please let us know by submitting an issue.
Contributing
We welcome contributions from anyone and everyone. Please see Esri's guidelines for contributing.
Credit
This generator was inspired by @steveoh and @stdavis's generator-dojo-widget as well as @dbouwman's generator-bootmap.
Licensing
Licensed under the Apache License, Version 2.0 (the "License"); you may not use this file except in compliance with the License. You may obtain a copy of the License at
http://www.apache.org/licenses/LICENSE-2.0
Unless required by applicable law or agreed to in writing, software distributed under the License is distributed on an "AS IS" BASIS, WITHOUT WARRANTIES OR CONDITIONS OF ANY KIND, either express or implied. See the License for the specific language governing permissions and limitations under the License.
A copy of the license is available in the repository's license.txt file.
