
ftech-web-sdk
v0.3.6
Published
本项目基于 qianqun 来实现智能客服,质检,辅助等页面的极易集成 APAAS 方案。 本项目提供便利的 JS SDK 接入,可以将智能客服,质检,辅助页面快速接入到业务系统中,可以避免传统 iframe 的页面引入方式的跨域,身份认证等业务开发,也可以避免代码直接引入带来的 JS、CSS 样式冲突。
Downloads
7

Readme
ftech-web-sdk
本项目基于 qianqun 来实现智能客服,质检,辅助等页面的极易集成 APAAS 方案。 本项目提供便利的 JS SDK 接入,可以将智能客服,质检,辅助页面快速接入到业务系统中,可以避免传统 iframe 的页面引入方式的跨域,身份认证等业务开发,也可以避免代码直接引入带来的 JS、CSS 样式冲突。
1、安装
npm i @tencent/ftech-web-sdk2、APAAS页面集成介绍
当前SDK目前仅服务于腾讯云小微产品,包括智能质检、智能辅助、交互式数智人、客服机器人、语音助手等产品。
1、智能客服页面-industryPlatform页面接入
- [x] 微应用改造
- [x] 配置平台配置
- [x] SDK引入
2、智能客服页面-smart-contact-cms
- [x] 微应用改造
- [x] 配置平台配置
- [x] SDK引入 智能客服页面快速链接
3、智能质检页面
- [ ] 微应用改造
- [ ] 配置平台配置
- [ ] SDK引入 智能质检页面快速链接
4、智能辅助页面
- [ ] 微应用改造
- [ ] 配置平台配置
- [ ] SDK引入 智能辅助页面快速链接
3、接入流程
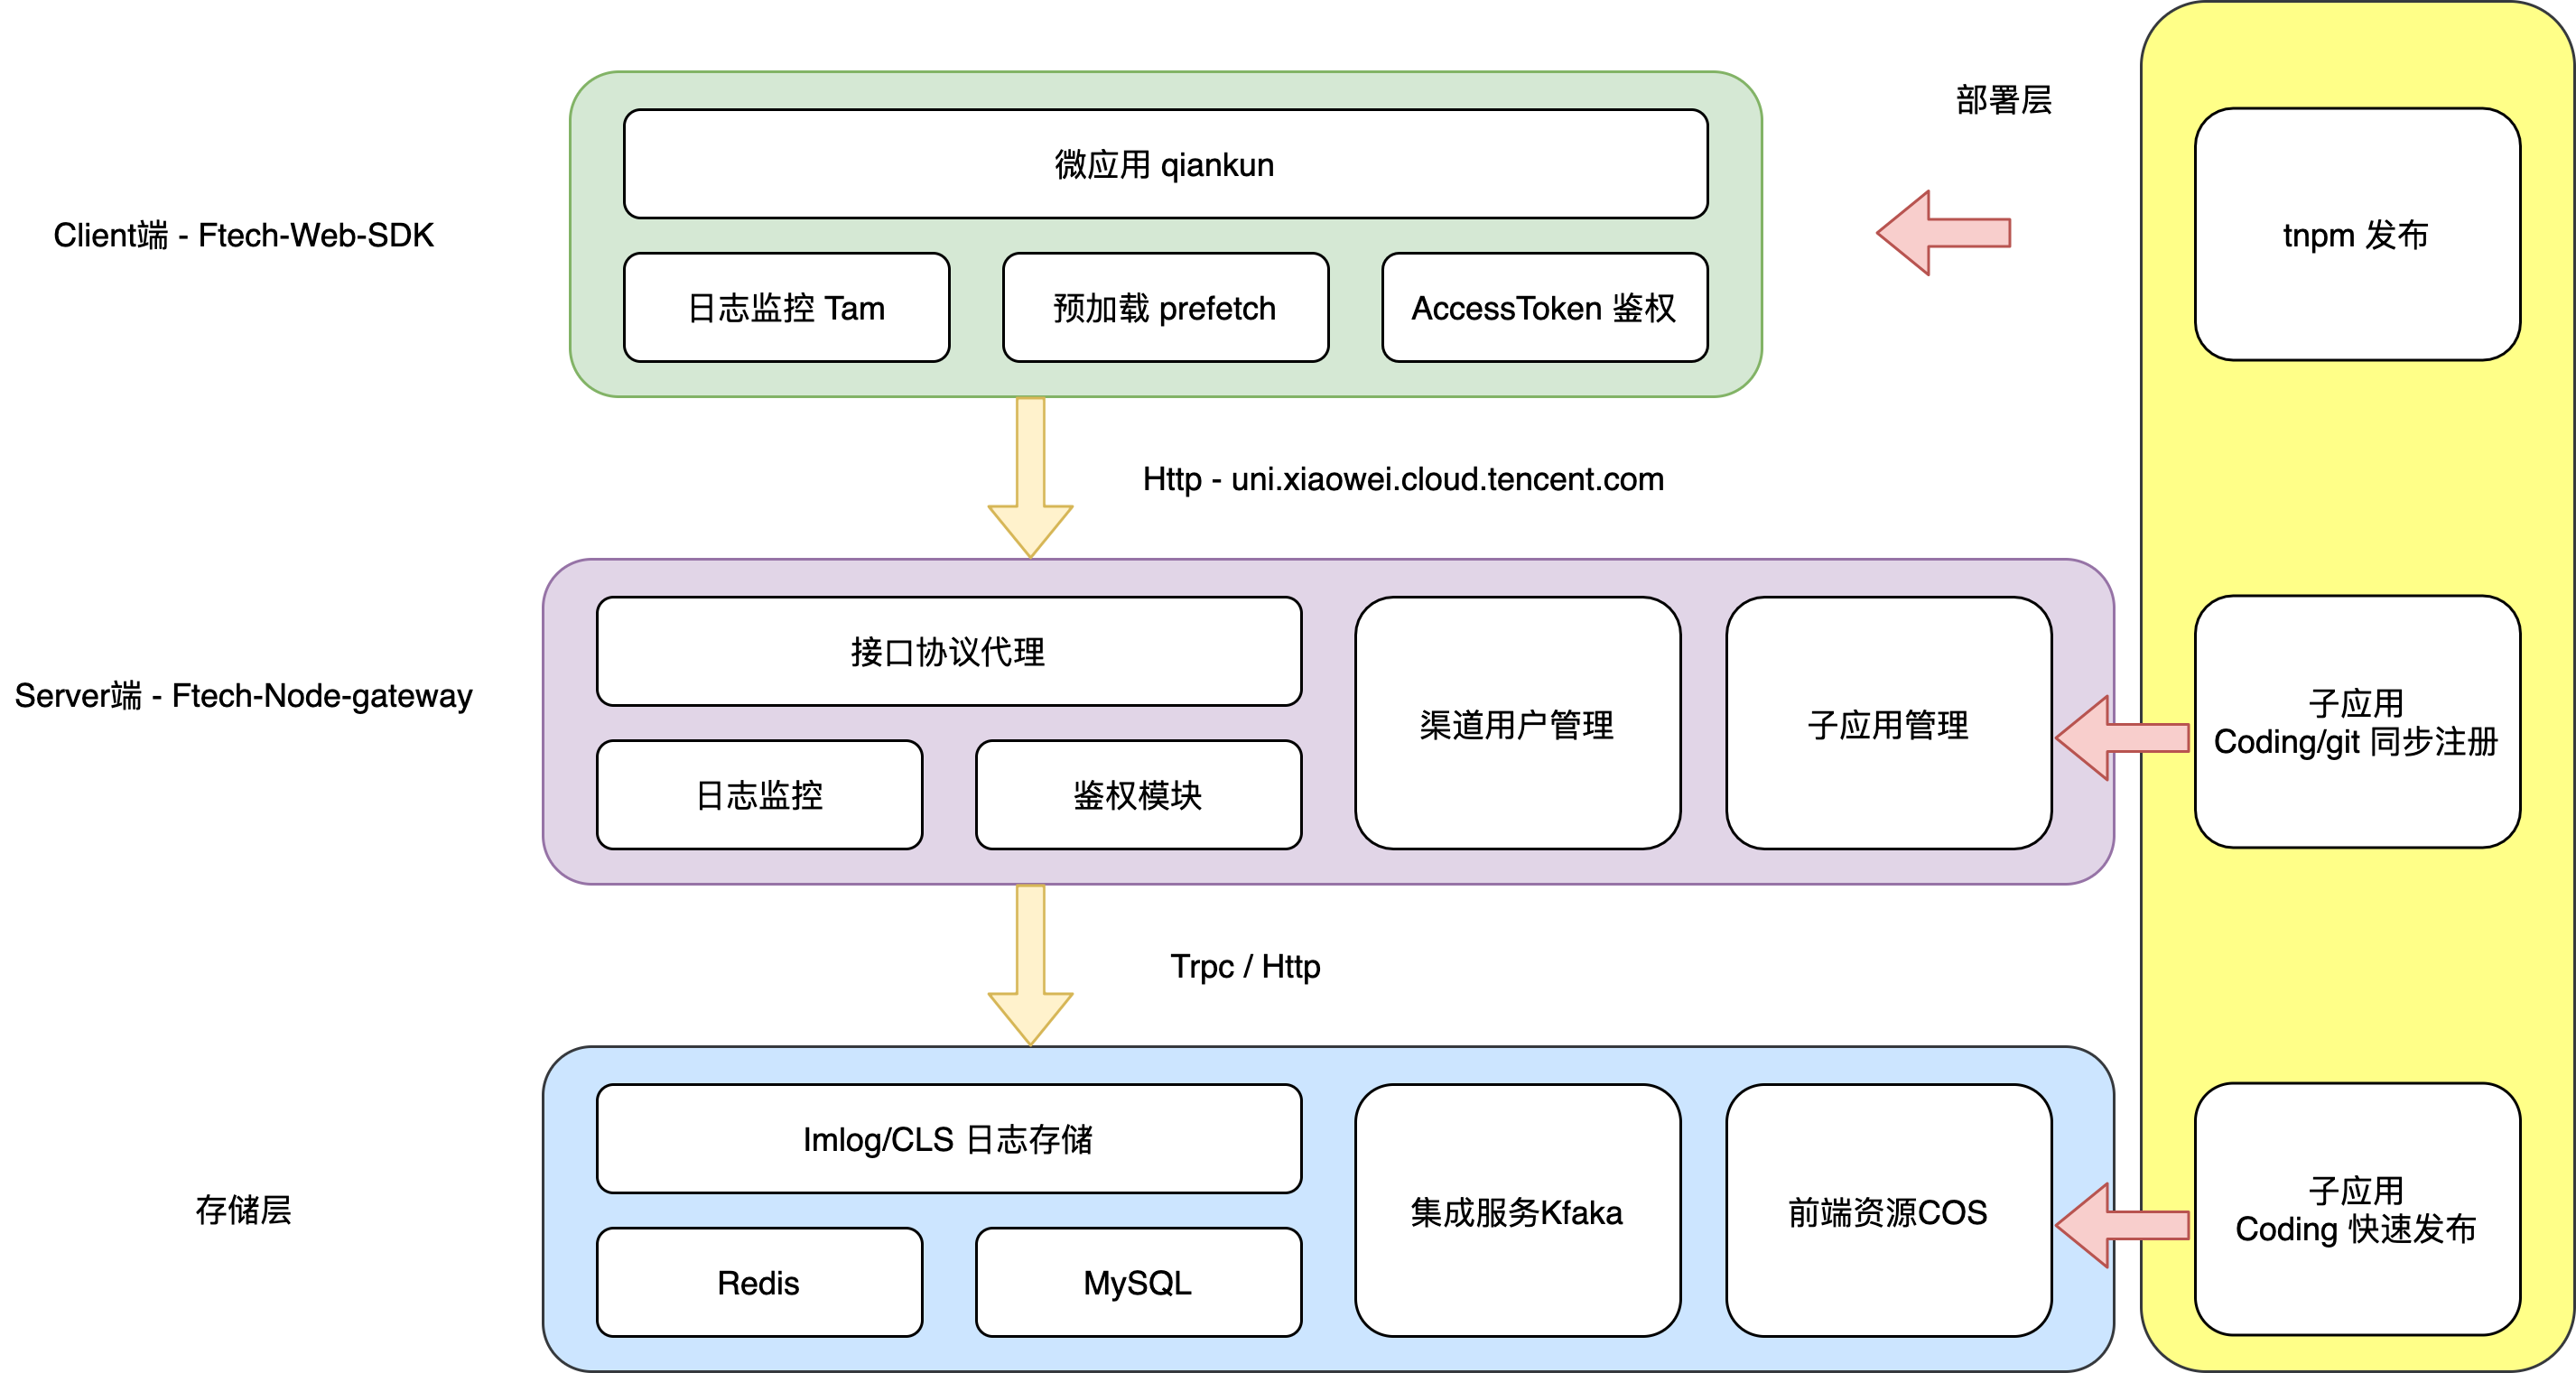
设计架构
1、vue 引入
import FtechWebSDK, { MicroApp } from '@tencent/ftech-web-sdk';

// 在页面初始化,调用 initial 接口获取 相关页面信息
const pageInfos = FtechWebSDK.initial({
  app_id: 'xxx', // 需要申请的app_id
  prefetch: true, // 是否预加载
  signUrl: isProd ? 'https://uni.xiaowei.cloud.tencent.com/api/common/getTestSign' : 'https://uni.xiaowei.cloud.tencent.com/test/api/common/getTestSign', // 参考 FAQ 如何实现
});
在对应页面容器中,启动该页面的加载过程。
<template>
  <div
    :style="{ height: visible ? 'auto' : 0 }"
    class="micro-app-wrapper"
    :class="{
      hidden: !visible,
    }"
  >
    <div v-show="loading && visible" class="micro-app-loading">
      <a-spin :spinning="loading" />
    </div>
    <div
      id="micro-app-container"
      :class="{
        'has-outset': isInNoBreadcrumbContainer,
      }"
    ></div>
  </div>
</template>
<script lang="ts">
import FtechWebSDK, { MicroApp } from '@tencent/ftech-web-sdk';
import Vue from 'vue';
export default Vue.extend({
  name: 'Container',
  data() {
    return {
      loading: false,
      microInstance: {} as MicroApp,
      pages: [],
    };
  },
  props: {
  },
  computed: {
    visible() {
      // 开始控制当前组件是否显示
      console.log('computed visible', this.$router);
      return location.hash.endsWith('/qa_pairs/all/all');
    },
  },
  beforeDestroy() {
    console.log('开始执行销毁逻辑', this.microInstance);
    this.microInstance?.unmount?.();
  },
  updated() {
    console.log('开始执行更新逻辑', this.microInstance);
    this.microInstance?.update?.({ ...props });
  },
  async mounted() {
    console.log('开始执行创建逻辑');
    FtechWebSDK.subscribe((value: any) => {
      console.log('监听子应用抛出事件', value);
    });
    const info: any = await FtechWebSDK.initial({
      app_id: 'xxx', // 需要申请的app_id
      prefetch: true, // 是否预加载
      signUrl: isProd ? 'https://uni.xiaowei.cloud.tencent.com/api/common/getTestSign' : 'https://uni.xiaowei.cloud.tencent.com/test/api/common/getTestSign', // 参考 FAQ 如何实现
    });
    this.microInstance = await FtechWebSDK.load({
      pageId: info.appId,
      container: '#micro-app-container',
      props: {
        loginUrl: '', // 腾讯登录之后的重定向地址, 默认指向当前页面地址
        baseApiUrl: info.apiBaseUrl,
        useNativeRoute: 3, // 具体参考 FAQ 如何决定采用何种路由方式去加载微应用?
      },
    }, configration?);
  },
});
</script>

<style lang="less" scoped>
#micro-app-container {
  height: 100%;
  overflow: auto;

  .has-outset {
    margin: -16px -20px;
  }
}

#micro-app-container > div {
  height: 100%;
}

.micro-app-wrapper {
  &.hidden {
    display: none;
  }

  .micro-app-loading {
    height: 100%;
    width: 100%;
    display: inline-flex;
    align-items: center;
    justify-content: center;
  }
}
</style>
2、react 引入
待补充
4、参数文档
initial(appInfo) 接口
appInfo参数列表:
{
  app_id: 'xxx', // 需要申请的app_id
  prefetch: true, // 是否预加载
  signUrl: 'remote-url', // 参考 FAQ 如何实现
}
返回值:
{
  "appId":"001",
  "appName":"问答知识库",
  "appUrl":"https://xiaowei.cloud.tencent.com/chatbot/",
  "path":"/#/products/2a_1645433697270_40/-/qa_pairs/all/all",
  "apiBaseUrl":"https://uni.xiaowei.cloud.tencent.com/chatbot/api",
  "platform":"industry"
}
load(FloadConfig) 接口
FloadConfig 参数列表
interface FLoadConfig {
  container: string;
  pageId: string;
  props?: FMicroProps; // 传入对应微应用所需要的参数
}
返回 MicroApp 实例:
- mount(): Promise;
- unmount(): Promise;
- update(customProps: object): Promise;
- getStatus(): | "NOT_LOADED" | "LOADING_SOURCE_CODE" | "NOT_BOOTSTRAPPED" | "BOOTSTRAPPING" | "NOT_MOUNTED" | "MOUNTING" | "MOUNTED" | "UPDATING" | "UNMOUNTING" | "UNLOADING" | "SKIP_BECAUSE_BROKEN" | "LOAD_ERROR";
- loadPromise: Promise;
- bootstrapPromise: Promise;
- mountPromise: Promise;
- unmountPromise: Promise;
详情参考参考 qiankun官方文档
subscribe(callback: (value: FMicroEvent) => void): Unsubscribe
监听主子应用的事件和数据,callback 函数({ type: string; data: any }) => { 处理程序 } 目前通用返回加载完成事件 type: load,其他自定义事件由主子应用自行定义。
返回值:返回取消订阅的句柄。
5、FAQ
1、如何实现生成秘钥的算法?
实例代码-Node.js
const crypto = require('crypto');
/**
 * @params options: https request body
 * @params apiAppKey: 申请APAAS页面接入时生成的app_key, 请妥善保存
 * @params apiAppSecret: 申请APAAS页面接入时生成的secret, 请妥善保存
 * @return authorization: 生成的秘钥串
 * @return dateTime: 服务器当前时间
*/
interface GetAuthorizedHeaderProps {
  options: {
    method: 'GET' | 'POST' | 'DELETE' | 'PUT' | 'OPTIONS';
    headers: {
      Accept: string;
      'Content-Type': string;
      'Content-MD5': any;
    };
    path: string;
  };
  apiAppKey: string;
  apiAppSecret: string;
}
// 生成秘钥的主函数
export const getAuthorizedHeader = ({ options, apiAppKey, apiAppSecret }: GetAuthorizedHeaderProps) => {
  const dateTime = new Date().toUTCString();
  const signingStr = [
    `x-date: ${dateTime}`,
    options.method,
    options.headers.Accept,
    options.headers['Content-Type'],
    options.headers['Content-MD5'],
    options.path,
  ].join('\n');
  const signing = crypto.createHmac('sha1', apiAppSecret).update(signingStr, 'utf8').digest('base64');
  const sign = `hmac id="${apiAppKey}", algorithm="hmac-sha1", headers="x-date", signature="${signing}"`;
  return {
    authorization: sign,
    dateTime,
  };
};
其他语言DEMO待补充
2、如何决定采用何种路由方式去加载微应用?
主应用 xxx.qq.com/chatbot/ 对于即将集成进来的页面,例如云小微智能客服页面,其本身采用的是 vue-router/Hash 模式,因此引入其页面时必须适配其路由模式。 目前 SDK 在加载页面时,提供了三种路由适配模式,来应对不同场景的引入,
1、useNativeRoute = 0 采用配置端数据返回的路由路径 2、useNativeRoute = 1 采用当前页面hash前缀 + 配置端数据返回的路由路径作为新路由 3、useNativeRoute = 3 采用当前的页面路由不做任何改动, 默认 0
这里以具体例子来讲解。
主应用要集成云小微智能客服/问答知识库页面,其hash地址是#/products/2a_1642564944681_44/-/qa_pairs/all/all。
主应用如果采用后台返回的注册路径,即 useNativeRoute = 0,其页面路径会被替换成 xxx.qq.com/chatbot/#/products/2a_1642564944681_44/-/qa_pairs/all/all, 比较适用于主应用采用的 history 模式或者配置端直接接入的方式,不用关心路径中的参数配置,也是最推荐的模式。
主应用如果采用后台返回的注册路径,即 useNativeRoute = 1,引入页面已经存在了hash的部分路径#/jce,其页面路径会被替换成 xxx.qq.com/chatbot/#/jce/products/2a_1642564944681_44/-/qa_pairs/all/all, 比较适用于主应用采用的 hash 模式, 且页面路由要求存在特定前缀。这种模式能够保证同一页面能够被多次引入,且不干预主应用路由配置。
主应用如果采用后台返回的注册路径,即 useNativeRoute = 3,就是不对当前路由进行任何修改,采用主应用的路由来让子应用进行自行解析,比较适合和微应用同源的主应用进行引入。