
easyexceljs
v1.1.2
Published
简单的操作生成漂亮的EXCEL,快速上手。提供漂亮模板直接使用
Downloads
47
Maintainers
 liyuec
Readme
easyExcelJs

简单的操作生成漂亮的EXCEL,快速上手。提供漂亮模板直接使用
若存在疑问和支持,请邮件2362259057#qq.com('#'替换为'@') 或则 isSues
目录
npm install⬆
组件依附 exceljs 和 file-saver 进行封装,需要install相关依赖;
npm install easyexceljs -S
npm install exceljs -S
npm install file-saver -S
快速开始(生成一个Excel 以vue项目里使用为例)⬆
import {createExcelByOneSheet,ExcelStyleTemplate,getCellPosLetter} from "easyexceljs"
//用例数据 github上已提供 uri:https://github.com/liyuec/easyExcelJs/tree/main/expmale/testData
import headArray from "./expmaleDate/headarray";
import bodyarray from "./expmaleDate/bodyarray";
methods:{
createExcelExpmale(){
//new的时候需要传入基本的options,不传会默认变为'sheet1' 和 'excel'
const excelOptions = {
excelFileName: "XX公司年度报表",
sheetName:'本季度报表1'
};
//创建一个实例
const _createExcelByOneSheet = new createExcelByOneSheet(excelOptions);
//定义excel head部分的格式
const _head = [];
//选择整个excel的样式 目前一共3个
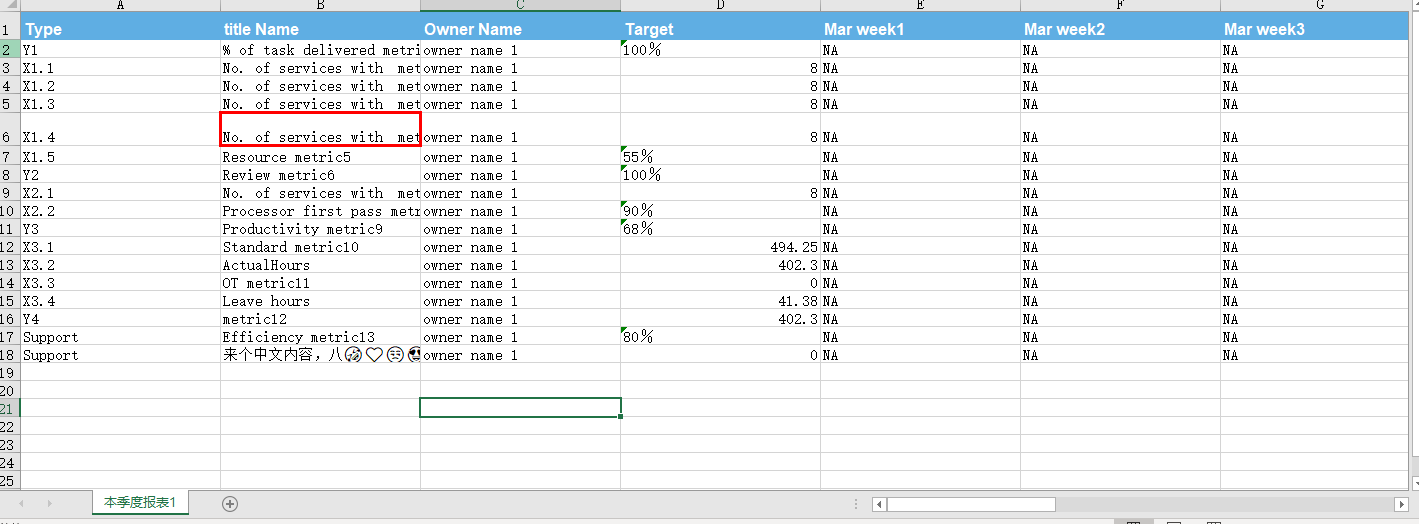
const red = ExcelStyleTemplate.red;
/*需要对应到列
其中header,key,width必传,
key 对应 bodyArray的key ,body中每行需对应的key
header为第1行head显示的可见内容,比如 keyFiled1 对应的 title:“字段名称”,
width为每列宽度
*/
headArray.forEach((i) => {
_head.push({
header: i.title,
key: i.field,
width: 25
});
});
//赋值excel head数据(第1行)
_createExcelByOneSheet.sheetColumnsData = [..._head];
//赋值excel body数据, 按照head[] 数据结构进行匹配
_createExcelByOneSheet.sheetRowsData = [...bodyarray];
//传入样式
_createExcelByOneSheet.rowStyleOptions.push(red.rowStyle);
//下载得到excel
_createExcelByOneSheet.saveAsExcel();
}
}
可见基本模板(1.0.0提供的3个可立即使用的模板)⬆

//引入提供模板Style
import {ExcelStyleTemplate} from "easyexceljs"

//一共三个模板
const red = ExcelStyleTemplate.red;
const blue = ExcelStyleTemplate.blue;
const green = ExcelStyleTemplate.green;
red模板最终样式

blue模板最终样式
green模板最终样式

复杂表格示例
提供的模板对象⬆
默认提供如下样式的模板对象,可根据需求自行修改颜色, 建议不要更改属性,方便兼容
  import {ExcelStyleTemplate,getExcelCellStyle} from "easyexceljs"

  //默认结构,未考虑版本兼容,可以理解为baseDTO
  CellStyleDTO(){
    let obj = new Object(
        {
            cellIndex:1,
            rowIndex:1,
            cellName:'',
            BorderColor:'',
            BorderStyle:'',
            font:{
                name:'',
                size:'',
                bold:'',
                color:''
            }
        }
    )

    return obj;
  }

  //获取基本的cell样式,可自行根据需求更改颜色,字体大小,字体等
  getExcelCellStyle = function(colorTemplate){
    var cellStyle = new CellStyleDTO();
    switch(colorTemplate){
        case "red":
            cellStyle.BorderColor = 'ffff0000'
            cellStyle.BorderStyle = 'thin'
            cellStyle.font = {
                name:'Malgun Gothic Semilight',
                size:11,
                bold:true,
                color:'ffff0000'
            }
        break;
        case "blue":
            cellStyle.BorderColor = 'ff5faee3'
            cellStyle.BorderStyle = 'thin'
            cellStyle.font = {
                name:'Malgun Gothic Semilight',
                size:11,
                bold:true,
                color:'ff5faee3'
            }
        break;
        case "green":
            cellStyle.BorderColor = 'ff48c9b0'
            cellStyle.BorderStyle = 'thin'
            cellStyle.font = {
                name:'Malgun Gothic Semilight',
                size:11,
                bold:true,
                color:'ff48c9b0'
            }
        break;
        default:
            cellStyle.BorderColor = ''
            cellStyle.BorderStyle = ''
            cellStyle.font = {
                name:'宋体',
                size:11,
                bold:false,
                color:'ff000000'
            }
        break;
    }

    return cellStyle;
}

  //默认模板样式
  ExcelStyleTemplate = {
    'red': {
        rowStyle:{
            rowNum:1,
            rowBgColor: 'FFFF0000',
            font:{
                name:'Arial',
                size:12,
                bold:true,
                color:'ffffffff'
            }
        },
        cellStyle:{
            cellName:'',
            BorderColor: 'FFFF0000',
            BorderStyle:'thin',
            font:{
                name:'Arial',
                size:11,
                bold:true,
                color:'ff707b7c'
            }
        }
    },
    'blue':{
        rowStyle:{
            rowNum:1,
            rowBgColor: 'ff5faee3',
            font:{
                name:'Arial',
                size:12,
                bold:true,
                color:'ffffffff'
            }
        },
        cellStyle:{
            cellName:'',
            BorderColor: 'ff48c9b0',
            BorderStyle:'thin',
            font:{
                name:'Arial',
                size:11,
                bold:true,
                color:'ff707b7c'
            }
        }
    },
    'green':{
        rowStyle:{
            rowNum:1,
            rowBgColor: 'ff48c9b0',
            font:{
                name:'Arial',
                size:12,
                bold:true,
                color:'ffffffff'
            }
        },
        cellStyle:{
            cellName:'',
            BorderColor: 'ffff0000',
            BorderStyle:'thin',
            font:{
                name:'Arial',
                size:11,
                bold:true,
                color:'ff707b7c'
            }
        }
    }
}
easyExceljs使用DEMO地址⬆
easyExceljs 使用DEMO地址
通过行数和列数获取Excel坐标⬆
  import {getCellPosLetter} from "easyexceljs"

  /*
    比如传入 getCellPosLetter(1,1) 得到 A1
    传入 getCellPosLetter(27,1) 得到 AA1
  */
  getCellPosLetter(cellIndex,rowIndex)
通过Where条件设置Cell样式⬆
方法名称 setCellStyleByWhere
where数据结构
  /*
    where条件必传,结构见下段代码
    cellStyle 可不指定,不指定将默认使用 默认样式

    可以链式调用
  */
  setCellStyleByWhere(where,cellStyle)
  /*
    必传
    若实体结构不正确,或则不包含对应的值,将忽略本次where条件
  */
   where:{
        valueKey: '传入头部的key的值'
        whereType: < | > | == | != | === | !== | indexOf | unIndexOf
        whereValue: number | string
    }
| 属性名 | 描述 | | ---------------- | ----------- | | > | 找到 大于 whereValue | | < | 找到 小于 whereValue | | == | 找到 等于 whereValue的字段,并隐式类型转换 | | === | 找到 等于 whereValue的字段,并且进行类型判断 | | !== | 找到 不等于 whereValue的字段,并且进行类型判断 | | indexOf | 找到 包含 whereValue的字段,可以理解为左右模糊查询 | | unIndexOf | 找到 不包含 whereValue的字段 |
参考使用代码
import {createExcelByOneSheet,getExcelCellStyle} from "easyexceljs"

    const excelOptions = {
          excelFileName: "XX公司年度报表",
          sheetName:'本季度报表1'
    };
      //创建一个实例
    const _createExcelByOneSheet = new createExcelByOneSheet(excelOptions);
    /*
      设置header , body
      此处代码略,参照  “快速开始”
    */

    let whereSelectByUserName = {
      valueKey:'userName',
      whereType:'indexOf',
      whereValue:'李三'
    },
    whereSelectByUserId = {
      valueKey:'userId',
      whereType:'>',
      whereValue:10000
    },
    whereSelectByNickName = {
      valueKey:'NickName',
      whereType:'indexOf',
      whereValue:'用户名'
    },
    cellStyle = getExcelCellStyle('red';

    _createExcelByOneSheet
    .setCellStyleByWhere(whereSelectByUserName,cellStyle)
    .setCellStyleByWhere(whereSelectByUserId,cellStyle)
    .setCellStyleByWhere(whereSelectByUserId)
通过指定行·列设置,Cell样式⬆
setCellStyleByRowCellIndex(rowCellIndex,cellStyle)
rowCellIndex数据结构 = [[rowIndex,cellIndex],[rowIndex,cellIndex]]
import {createExcelByOneSheet,getExcelCellStyle} from "easyexceljs"

    const excelOptions = {
          excelFileName: "XX公司年度报表",
          sheetName:'本季度报表1'
    };
      //创建一个实例
    const _createExcelByOneSheet = new createExcelByOneSheet(excelOptions);
    /*
      设置header , body
      此处代码略,参照  “快速开始”
    */

    let cellStyle = getExcelCellStyle('blue');

    _createExcelByOneSheet
    .setCellStyleByRowCellIndex([[rowIndex,cellIndex],[rowIndex,cellIndex]],cellStyle)
    .setCellStyleByRowCellIndex([[rowIndex,cellIndex],[rowIndex,cellIndex]])
通过指定行·列设置,Cell的注解⬆
setCellNoteTextByRowCellIndex(rowCellIndex,noteTexts)
rowCellIndex : [[rowIndex,cellIndex],[rowIndex,cellIndex]]
noteTexts : [string,string]
import {createExcelByOneSheet,getExcelCellStyle} from "easyexceljs"

    const excelOptions = {
          excelFileName: "XX公司年度报表",
          sheetName:'本季度报表1'
    };
      //创建一个实例
    const _createExcelByOneSheet = new createExcelByOneSheet(excelOptions);
    /*
      设置header , body
      此处代码略,参照  “快速开始”
    */

    let cellStyle = getExcelCellStyle('blue');

    _createExcelByOneSheet
    .setCellNoteTextByRowCellIndex([[rowIndex,cellIndex],[rowIndex,cellIndex]],['注册可以是任何内容,若存在特殊表情,需要依赖系统自身解析',''])
    .setCellNoteTextByRowCellIndex([[rowIndex,cellIndex],[rowIndex,cellIndex]],['',''])
通过指定行·列设置,返回原始Cell,用户可根据原始Cell进行callBack⬆
customSetValueByIndex(rowCellIndex,noteTexts,repairLength)
rowCellIndex数据结构 = [[rowIndex,cellIndex],[rowIndex,cellIndex]] 或则 '*'
callBack : function(cell){} 其中cell是得到每列的原始数据,可进行操作
repairLength : int32 冗余行数 需要补充的row length 遍历,若head只有一行,则为1
  import {createExcelByOneSheet,getExcelCellStyle} from "easyexceljs"

    const excelOptions = {
          excelFileName: "XX公司年度报表",
          sheetName:'本季度报表1'
    };
      //创建一个实例
    const _createExcelByOneSheet = new createExcelByOneSheet(excelOptions);
    /*
      设置header , body
      此处代码略,参照  “快速开始”
    */

    _createExcelByOneSheet
    .customSetValueByIndex('*',function(cell){
                //可打印cell 查看需要包含的属性
                console.log(cell)
                let {value} = cell;

                if(typeof value == 'string'){
                    if(value.indexOf('%') > -1){
                      let _temp = value.replace('%','');
                      if(!isNaN(parseFloat(_temp,10))){
                          value = value.replace('%','');
                          cell.value = value / 100;
                          cell.numFmt = '0.00%';
                      }
                    }else if(!isNaN(parseFloat(value,10))){
                      cell.value = parseFloat(value,10);
                    }
                }
      },2)
      .customSetValueByIndex([[1,1],[1,2]],function(cell){
          //做和业务相关的事
      })
合并行列mergeCells⬆
| 属性名 | 描述 | | ---------------- | ----------- | | cellName | 行列号,比如'B3:B4','B3:C3',若不传参数,则返回this |
柯里化函数,若不传参,则返回当前this
//合并单元格
_createExcelByOneSheet.mergeCells('B1:C1')('A1:A2')('D1:D2')('E1:F1')('G1:G2')();
单元格居中与缩进⬆
| 属性名 | 描述 | | ---------------- | ----------- | | cellName | 行列号,比如'B3:B4','B3:C3',若不传参数,则返回this | | alignment | { vertical: 'middle', horizontal: 'center' ,wrapText: true} |
| alignment | 描述 | | ---------------- | ----------- | | vertical,horizontal | left:居左 ,right:居右,center:居中。 | | wrapText | true:自动换行 , false:不换行 |
柯里化函数,若不传参,则返回当前this
//控制合并后的格式   各cell 配置
 let alignObj =  { vertical: 'middle', horizontal: 'center' ,wrapText: true},
  alignContent = {vertical: 'middle', horizontal: 'left' ,wrapText: true};

  _createExcelByOneSheet.alignmentCells({cellName:'B1:C1',alignment:alignObj})
  ({cellName:'A1:A2',alignment:alignObj})({cellName:'D1:D2',alignment:alignObj})
  ({cellName:'E1:F1',alignment:alignObj})({cellName:'G1:G2',alignment:alignObj})
  ({cellName:'B2',alignment:alignObj})({cellName:'C2',alignment:alignObj})
  ({cellName:'E2',alignment:alignObj})({cellName:'F2',alignment:alignObj});

  //其他相似列列处理
  let otherCells = [];
  otherCells = [3,4,5,6].map(num=>{
    return ['A','B','C','D','E','F','G'].map(letter=>{
      let res = letter+num
      return res
    })
  })
  otherCells = otherCells.flat();
  otherCells.forEach(cellName=>{
    _createExcelByOneSheet.alignmentCells({cellName:cellName,alignment:alignContent})
  })
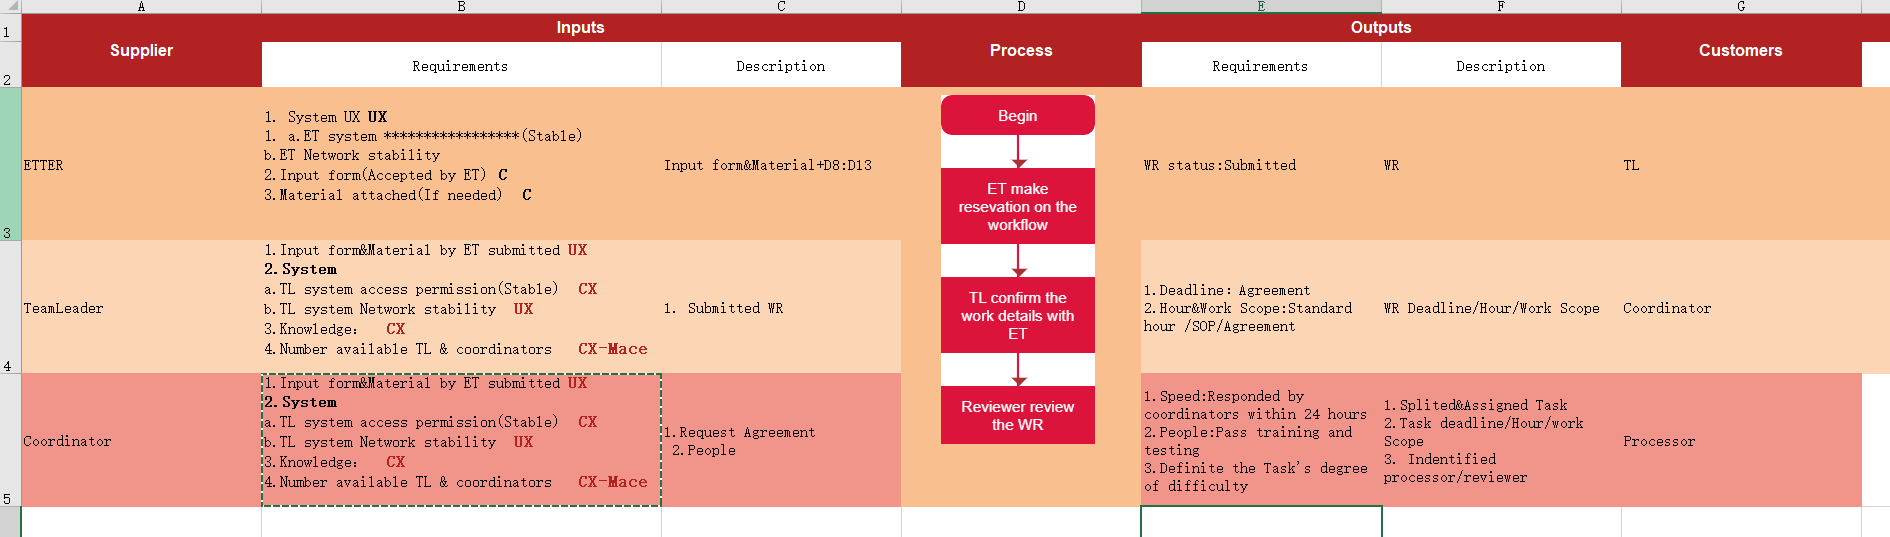
设置样式化富文本⬆
| 属性名 | 描述 | | ---------------- | ----------- | | cellName | 行列号,比如'B3:B4','B3:C3',若不传参数,则返回this | | richText | [] |
柯里化函数,若不传参,则返回当前this
//设置富文本的值
        let B3richText = [
            {'font': {'size': 12,'color': {'argb': 'ff000000'}},'text': '1. System UX '},
            {'font': {'bold': true,'size': 13,'color': {'argb': 'ffb22222'}},'text': 'UX \n'},
            {'font': {'size': 12,'color': {'argb': 'ff000000'}},'text': '1. a.ET system access permission(Stable) \n'},
            {'font': {'size': 12,'color': {'argb': 'ff000000'}},'text': 'b.ET Network stability  \n'},
            {'font': {'size': 12,'color': {'argb': 'ff000000'}},'text': '2.Input form(Accepted by ET)'},
            {'font': {'bold': true,'size': 13,'color': {'argb': 'ffb22222'}},'text': ' C \n'},
            {'font': {'size': 12,'color': {'argb': 'ff000000'}},'text': '3.Material attached(If needed) '},
            {'font': {'bold': true,'size': 13,'color': {'argb': 'ffb22222'}},'text': ' C \n'},
        ],
        B4richText = [
            {'font': {'size': 12,'color': {'argb': 'ff000000'}},'text': '1.Input form&Material by ET submitted '},
            {'font': {'bold': true,'size': 13,'color': {'argb': 'ffb22222'}},'text': 'UX \n'},
            {'font': {'bold': true,'size': 12,'color': {'argb': 'ff000000'}},'text': '2.System \n'},
            {'font': {'size': 12,'color': {'argb': 'ff000000'}},'text': 'a.TL system access permission(Stable) '},
            {'font': {'bold': true,'size': 13,'color': {'argb': 'ffb22222'}},'text': ' CX \n'},
            {'font': {'size': 12,'color': {'argb': 'ff000000'}},'text': 'b.TL system Network stability '},
            {'font': {'bold': true,'size': 13,'color': {'argb': 'ffb22222'}},'text': ' UX \n'},
            {'font': {'size': 12,'color': {'argb': 'ff000000'}},'text': '3.Knowledge: '},
            {'font': {'bold': true,'size': 13,'color': {'argb': 'ffb22222'}},'text': ' CX \n'},
            {'font': {'size': 12,'color': {'argb': 'ff000000'}},'text': '4.Number available TL & coordinators  '},
            {'font': {'bold': true,'size': 13,'color': {'argb': 'ffb22222'}} ,outline:false,'text': ' CX-Mace \n'},
        ]
        _createExcelByOneSheet.RichTextCells({cellName:'B3',richText:B3richText})
       ({cellName:'B4',richText:B4richText})
       ({cellName:'B5',richText:B4richText})();
设置行高⬆
| 属性名 | 描述 | | ---------------- | ----------- | | rowIndex | 行数,从1开始 | | height | number,若不传入默认15 |
//设置行高
        _createExcelByOneSheet.rowsHeight
        ({rowIndex:2,height:35})
        ({rowIndex:3,height:100})
        ({rowIndex:4,height:100})
        ({rowIndex:5,height:100})
        ({rowIndex:6,height:100})
        ({rowIndex:7,height:100})()
插入图片base64⬆
| 属性名 | 描述 | | ---------------- | ----------- | | base64Image | 图片转base64 | | tl | {col: 3.6, row: 2} | | ext | { width: 100, height: 200 } |
    //获取配图
    var _canvas = document.querySelector("#_canvas"),
    _base64Image = _canvas.toDataURL('image/png',1);

_createExcelByOneSheet.ImageInWorkBookBase64({base64Image:_base64Image,tl:{col: 3.6, row: 2.4},ext:{ width: _canvas.width, height: _canvas.height }})保存EXCEL⬆
saveAsExcel 其中保存完毕后,所有的设置将会清空
  import {createExcelByOneSheet,getExcelCellStyle} from "easyexceljs"

    const excelOptions = {
          excelFileName: "XX公司年度报表",
          sheetName:'本季度报表1'
    };
      //创建一个实例
    const _createExcelByOneSheet = new createExcelByOneSheet(excelOptions);
    /*
      设置header , body
      此处代码略,参照  “快速开始”
    */

   _createExcelByOneSheet.saveAsExcel()
继续开发计划⬆
- [x] 方便的表头合并
- [x] 方便的列合并
- [ ] 生成在线预览Excel
- [ ] typeScipt重写
- [ ] 编写测试用例,增加覆盖率