data-api-client-workers
v1.2.1
Published
A lightweight wrapper that simplifies working with the Amazon Aurora Serverless Data API
Downloads
15
Maintainers
Readme
Data API Client For Cloudflare Workers
Why the fork?
This is a forked version of Jeremy Daly's awesome Data API Client that adds support for Cloudflare Workers.
Unfortunately since aws-sdk doesn't work in a workers environment, the original client will also not work.
Instead this change uses @aws-sdk/client-rds-data which means it allows it to work in nodeJs, browser, react native and cloudflare workers.
I've submitted a PR to the original repo, but unfortunately it seems the project has gone stale. I'll leave this repo here in case anyone else wants to use this in a worker.
https://github.com/jeremydaly/data-api-client/pull/115
Overview
The Data API Client is a lightweight wrapper that simplifies working with the Amazon Aurora Serverless Data API by abstracting away the notion of field values. This abstraction annotates native JavaScript types supplied as input parameters, as well as converts annotated response data to native JavaScript types. It's basically a DocumentClient for the Data API. It also promisifies the AWS.RDSDataService client to make working with async/await or Promise chains easier AND dramatically simplifies transactions.
For more information about the Aurora Serverless Data API, you can review the official documentation or read Aurora Serverless Data API: An (updated) First Look for some more insights on performance.
Simple Examples
The Data API Client makes working with the Aurora Serverless Data API super simple. Require and instantiate the library with basic configuration information, then use the query() method to manage your workflows. Below are some examples.
// Require and instantiate data-api-client-workers with secret and cluster
const data = require('data-api-client-workers')({
  secretArn: 'arn:aws:secretsmanager:us-east-1:XXXXXXXXXXXX:secret:mySecret',
  resourceArn: 'arn:aws:rds:us-east-1:XXXXXXXXXXXX:cluster:my-cluster-name',
  database: 'myDatabase' // default database
})

/*** Assuming we're in an async function ***/

// Simple SELECT
let result = await data.query(`SELECT * FROM myTable`)
// {
//   records: [
//     { id: 1, name: 'Alice', age: null },
//     { id: 2, name: 'Mike', age: 52 },
//     { id: 3, name: 'Carol', age: 50 }
//   ]
// }

// SELECT with named parameters
let resultParams = await data.query(
  `SELECT * FROM myTable WHERE id = :id`,
  { id: 2 }
)
// { records: [ { id: 2, name: 'Mike', age: 52 } ] }

// INSERT with named parameters
let insert = await data.query(
  `INSERT INTO myTable (name,age,has_curls) VALUES(:name,:age,:curls)`,
  { name: 'Greg',   age: 18,  curls: false }
)

// BATCH INSERT with named parameters
let batchInsert = await data.query(
  `INSERT INTO myTable (name,age,has_curls) VALUES(:name,:age,:curls)`,
  [
    [{ name: 'Marcia', age: 17,  curls: false }],
    [{ name: 'Peter',  age: 15,  curls: false }],
    [{ name: 'Jan',    age: 15,  curls: false }],
    [{ name: 'Cindy',  age: 12,  curls: true  }],
    [{ name: 'Bobby',  age: 12,  curls: false }]
  ]
)
// Update with named parameters
let update = await data.query(
  `UPDATE myTable SET age = :age WHERE id = :id`,
  { age: 13, id: 5 }
)

// Delete with named parameters
let remove = await data.query(
  `DELETE FROM myTable WHERE name = :name`,
  { name: 'Jan' } // Sorry Jan :(
)

// A slightly more advanced example
let custom = data.query({
  sql: `SELECT * FROM myOtherTable WHERE id = :id AND active = :isActive`,
  continueAfterTimeout: true,
  database: 'myOtherDatabase',
  parameters: [
    { id: 123},
    { name: 'isActive', value: { booleanValue: true } }
  ]
})
Why do I need this?
The Data API requires you to specify data types when passing in parameters. The basic INSERT example above would look like this using the native AWS.RDSDataService class:
const AWS = require('aws-sdk')
const data = new AWS.RDSDataService()

/*** Assuming we're in an async function ***/

// INSERT with named parameters
let insert = await data.executeStatement({
  secretArn: 'arn:aws:secretsmanager:us-east-1:XXXXXXXXXXXX:secret:mySecret',
  resourceArn: 'arn:aws:rds:us-east-1:XXXXXXXXXXXX:cluster:my-cluster-name',
  database: 'myDatabase',
  sql: 'INSERT INTO myTable (name,age,has_curls) VALUES(:name,:age,:curls)',
  parameters: [
    { name: 'name', value: { stringValue: 'Cousin Oliver' } },
    { name: 'age', value: { longValue: 10 } },
    { name: 'curls', value: { booleanValue: false } }
  ]
).promise()
Specifying all of those data types in the parameters is a bit clunky. In addition to requiring types for parameters, it also returns each field as an object with its value assigned to a key that represents its data type, like this:
{ // id field
  "longValue": 9
},
{ // name field
  "stringValue": "Cousin Oliver"
},
{ // age field
  "longValue": 10
},
{ // has_curls field
  "booleanValue": false
}
Not only are there no column names, but you have to pull the value from the data type field. Lots of extra work that the Data API Client handles automatically for you. 😀
Installation and Setup
npm i data-api-client-workersFor more information on enabling Data API, see Enabling Data API.
Configuration Options
Below is a table containing all of the possible configuration options for the data-api-client-workers. Additional details are provided throughout the documentation.
| Property | Type | Description | Default |
| -------- | ---- | ----------- | ------- |
| resourceArn | string | The ARN of your Aurora Serverless Cluster. This value is required, but can be overridden when querying. | |
| secretArn | string | The ARN of the secret associated with your database credentials. This is required, but can be overridden when querying. | |
| database | string | Optional default database to use with queries. Can be overridden when querying. | |
| engine | mysql or pg | The type of database engine you're connecting to (MySQL or Postgres). | mysql |
| hydrateColumnNames | boolean | When true, results will be returned as objects with column names as keys. If false, results will be returned as an array of values. | true |
| ~~keepAlive~~ (deprecated) | boolean | See Connection Reuse below. | |
| ~~sslEnabled~~ (deprecated) | boolean | Set this in the options | true |
| options | object | An optional configuration object that is passed directly into the RDSDataService constructor. See here for available options. | {} |
| ~~region~~ (deprecated) | string | Set this in the options | |
| formatOptions | object | Formatting options to auto parse dates and coerce native JavaScript date objects to MySQL supported date formats. Valid keys are deserializeDate and treatAsLocalDate. Both accept boolean values. | Both false |
Connection Reuse
It is recommended to enable connection reuse as this dramatically decreases the latency of subsequent calls to the AWS API. This can be done by setting an environment variable
AWS_NODEJS_CONNECTION_REUSE_ENABLED=1. For more information see the AWS SDK documentation.
How to use this module
The Data API Client wraps the RDSDataService Class, providing you with a number of convenience features to make your workflow easier. The module also exposes promisified versions of all the standard RDSDataService methods, with your default configuration information already merged in. 😉
To use the Data API Client, require the module and instantiate it with your Configuration options. If you are using it with AWS Lambda, require it OUTSIDE your main handler function. This will allow you to reuse the initialized module on subsequent invocations.
// Require and instantiate data-api-client-workers with secret and cluster arns
const data = require('data-api-client-workers')({
  secretArn: 'arn:aws:secretsmanager:us-east-1:XXXXXXXXXXXX:secret:mySecret',
  resourceArn: 'arn:aws:rds:us-east-1:XXXXXXXXXXXX:cluster:my-cluster-name',
  database: 'myDatabase' // set a default database
})
Running a query
Once initialized, running a query is super simple. Use the query() method and pass in your SQL statement:
let result = await data.query(`SELECT * FROM myTable`)By default, this will return your rows as an array of objects with column names as property names:
[
  { id: 1, name: 'Alice', age: null },
  { id: 2, name: 'Mike', age: 52 },
  { id: 3, name: 'Carol', age: 50 }
]
To query with parameters, you can use named parameters in your SQL, and then provider an object containing your parameters as the second argument to the query() method:
let result = await data.query(`
  SELECT * FROM myTable WHERE id = :id AND created > :createDate`,
  { id: 2, createDate: '2019-06-01' }
)
The Data API Client will automatically convert your parameters into the correct Data API parameter format using native JavaScript types. If you prefer to use the clunky format, or you need more control over the data type, you can just pass in the RDSDataService format:
let result = await data.query(
  `SELECT * FROM myTable WHERE id = :id AND created > :createDate`,
  [ // An array of objects is totally cool, too. We'll merge them for you.
    { id: 2 },
    // Data API Client just passes this straight on through
    { name: 'createDate', value: { blobValue: new Buffer('2019-06-01') } }
  ]
)
If you want even more control, you can pass in an object as the first parameter. This will allow you to add additional configuration options and override defaults as well.
let result = await data.query({
  sql: `SELECT * FROM myTable WHERE id = :id`,
  parameters: [ { id: 2 } ], // or just { id: 2 }
  database: 'someOtherDatabase', // override default database
  schema: 'mySchema', // RDSDataService config option
  continueAfterTimeout: true, // RDSDataService config option (non-batch only)
  includeResultMetadata: true, // RDSDataService config option (non-batch only)
  hydrateColumnNames: false, // Returns each record as an arrays of values
  transactionId: 'AQC5SRDIm...ZHXP/WORU=' // RDSDataService config option
}
Sometimes you might want to have dynamic identifiers in your SQL statements. Unfortunately, the RDSDataService doesn't do this, but the Data API Client does! We're using the sqlstring module under the hood, so as long as NO_BACKSLASH_ESCAPES SQL mode is disabled (which is the default state for Aurora Serverless), you're good to go. Use a double colon (::) prefix to create named identifiers and you can do cool things like this:
let result = await data.query(
  `SELECT ::fields FROM ::table WHERE id > :id`,
  {
    fields: ['id','name','created'],
    table: 'table_' + someScaryUserInput, // someScaryUserInput = 123abc
    id: 1
  }
)
Which will produce a query like this:
SELECT `id`, `name`, `created` FROM `table_123abc` WHERE id > :id LIMIT 10You'll notice that we leave the named parameters alone. Anything that Data API and the RDSDataService Class currently handles, we defer to them.
Type-Casting
The Aurora Data API can sometimes give you trouble with certain data types, such as uuid, unless you explicitly cast them. While you can certainly do this manually in your SQL string, the Data API Client offers a really easy way to handle this for you.
const result = await data.query(
  'INSERT INTO users(id, email, full_name, metadata) VALUES(:id, :email, :fullName, :metadata)',
  [
    {
      name: 'id',
      value: newUserId,
      cast: 'uuid'
    },
    {
      name: 'email',
      value: email
    },
    {
      name: 'fullName',
      value: fullName
    },
    {
      name: 'metadata',
      value: JSON.stringify(userMetadata),
      cast: 'jsonb'
    }
  ]
)
Batch Queries
The RDSDataService Class provides a batchExecuteStatement method that allows you to execute a prepared statement multiple times using different parameter sets. This is only allowed for INSERT, UPDATE and DELETE queries, but is much more efficient than issuing multiple executeStatement calls. The Data API Client handles the switching for you based on how you send in your parameters.
To issue a batch query, use the query() method (either by passing an object or using the two arity form), and provide multiple parameter sets as nested arrays. For example, if you wanted to update multiple records at once, your query might look like this:
let result = await data.query(
  `UPDATE myTable SET name = :newName WHERE id = :id`,
  [
    [ { id: 1, newName: 'Alice Franklin' } ],
    [ { id: 7, newName: 'Jan Glass' } ]
  ]
)
You can also use named identifiers in batch queries, which will update and escape your SQL statement. ONLY parameters from the first parameter set will be used to update the query. Subsequent parameter sets will only update named parameters supported by the Data API.
Whenever a batch query is executed, it returns an updateResults field. Other than for INSERT statements, however, there is no useful feedback provided by this field.
Retrieving Insert IDs
The Data API returns a generatedFields array that contains the value of auto-incrementing primary keys. If this value is returned, the Data API Client will parse this and return it as the insertId. This also works for batch queries as well.
Transaction Support
Transaction support in the Data API Client has been dramatically simplified. Start a new transaction using the transaction() method, and then chain queries using the query() method. The query() method supports all standard query options. Alternatively, you can specify a function as the only argument in a query() method call and return the arguments as an array of values. The function receives two arguments, the result of the last query executed, and an array containing all the previous query results. This is useful if you need values from a previous query as part of your transaction.
You can specify an optional rollback() method in the chain. This will receive the error object and the transactionStatus object, allowing you to add additional logging or perform some other action. Call the commit() method when you are ready to execute the queries.
let results = await mysql.transaction()
  .query('INSERT INTO myTable (name) VALUES(:name)', { name: 'Tiger' })
  .query('UPDATE myTable SET age = :age WHERE name = :name' { age: 4, name: 'Tiger' })
  .rollback((e,status) => { /* do something with the error */ }) // optional
  .commit() // execute the queries
With a function to get the insertId from the previous query:
let results = await mysql.transaction()
  .query('INSERT INTO myTable (name) VALUES(:name)', { name: 'Tiger' })
  .query((r) => [ 'UPDATE myTable SET age = :age WHERE id = :id', { age: 4, id: r.insertId } ])
  .rollback((e,status) => { /* do something with the error */ }) // optional
  .commit() // execute the queries
Transactions work with batch queries, too! 👊
By default, the transaction() method will use the resourceArn, secretArn and database values you set at initialization. Any or all of these values can be overwritten by passing an object into the transaction() method. Since transactions are for a specific database, you can't overwrite their values when chaining queries. You can, however, overwrite the includeResultMetadata and hydrateColumnNames settings per query.
Using native methods directly
The Data API Client exposes promisified versions of the five RDSDataService methods. These are:
batchExecuteStatementbeginTransactioncommitTransactionexecuteStatementrollbackTransaction
The default configuration information (resourceArn, secretArn, and database) are merged with your supplied parameters, so supplying those values are optional.
let result = await data.executeStatement({
  sql: `SELECT * FROM myTable WHERE id = :id`,
  parameters: [
    { name: 'id', value: { longValue: 1 } }
  ],
  transactionId: 'AQC5SRDIm...ZHXP/WORU='
)
Data API Limitations / Wonkiness
The first GA release of the Data API has a lot of promise, unfortunately, there are still quite a few things that make it a bit wonky and may require you to implement some workarounds. I've outlined some of my findings below.
You can't send in an array of values
The GitHub repo for RDSDataService mentions something about arrayValues, but I've been unable to get arrays (including TypedArrays and Buffers) to be used for parameters with IN clauses. For example, the following query will NOT work:
let result = await data.executeStatement({
  secretArn: 'arn:aws:secretsmanager:us-east-1:XXXXXXXXXXXX:secret:mySecret',
  resourceArn: 'arn:aws:rds:us-east-1:XXXXXXXXXXXX:cluster:my-cluster-name',
  database: 'myDatabase',
  sql: 'SELECT * FROM myTable WHERE id IN (:ids)',
  parameters: [
    { name: 'id', value: { blobValue: [1,2,3,4,5] } }
  ]
).promise()
I'm using blobValue because it's the only generic value field. You could send it in as a string, but then it only uses the first value. Hopefully they will add an arrayValues or something similar to support this in the future.
~~Named parameters MUST be sent in order~~
~~Read that again if you need to. So parameters have to be BOTH named and in order, otherwise the query may fail. I stress may, because if you send in two fields of compatible type in the wrong order, the query will work, just with your values flipped. 🤦🏻♂️ Watch out for this one.~~ 👈This was fixed!
You can't parameterize identifiers
If you want to use dynamic column or field names, there is no way to do it automatically with the Data API. The mysql package, for example, lets you use ?? to dynamically insert escaped identifiers. Something like the example below is currently not possible.
let result = await data.executeStatement({
  secretArn: 'arn:aws:secretsmanager:us-east-1:XXXXXXXXXXXX:secret:mySecret',
  resourceArn: 'arn:aws:rds:us-east-1:XXXXXXXXXXXX:cluster:my-cluster-name',
  database: 'myDatabase',
  sql: 'SELECT ::fields FROM myTable WHERE id = :id',
  parameters: [
    // Note: 'arrayValues' is not a real thing
    { name: 'fields', value: { arrayValues: ['id','name','created'] } },
    { name: 'id', value: { longValue: 1 } }
  ]
).promise()
No worries! The Data API Client gives you the ability to parameterize identifiers and auto escape them. Just use a double colon (::) to prefix your named identifiers.
Batch statements do not give you updated record counts
This one is a bit frustrating. If you execute a standard executeStatement, then it will return a numberOfRecordsUpdated field for UPDATE and DELETE queries. This is handy for knowing if your query succeeded. Unfortunately, a batchExecuteStatement does not return this field for you.
Enabling Data API
In order to use the Data API, you must enable it on your Aurora Serverless Cluster and create a Secret. You also must grant your execution environment a number of permission as outlined in the following sections.
Enable Data API on your Aurora Serverless Cluster

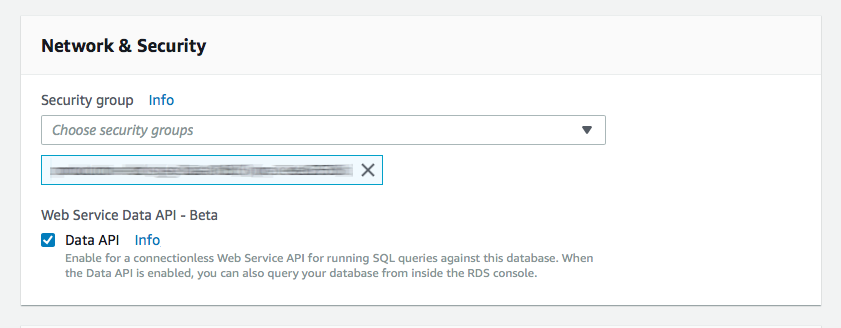
You need to modify your Aurora Serverless cluster by clicking “ACTIONS” and then “Modify Cluster”. Just check the Data API box in the Network & Security section and you’re good to go. Remember that your Aurora Serverless cluster still runs in a VPC, even though you don’t need to run your Lambdas in a VPC to access it via the Data API.
Set up a secret in the Secrets Manager
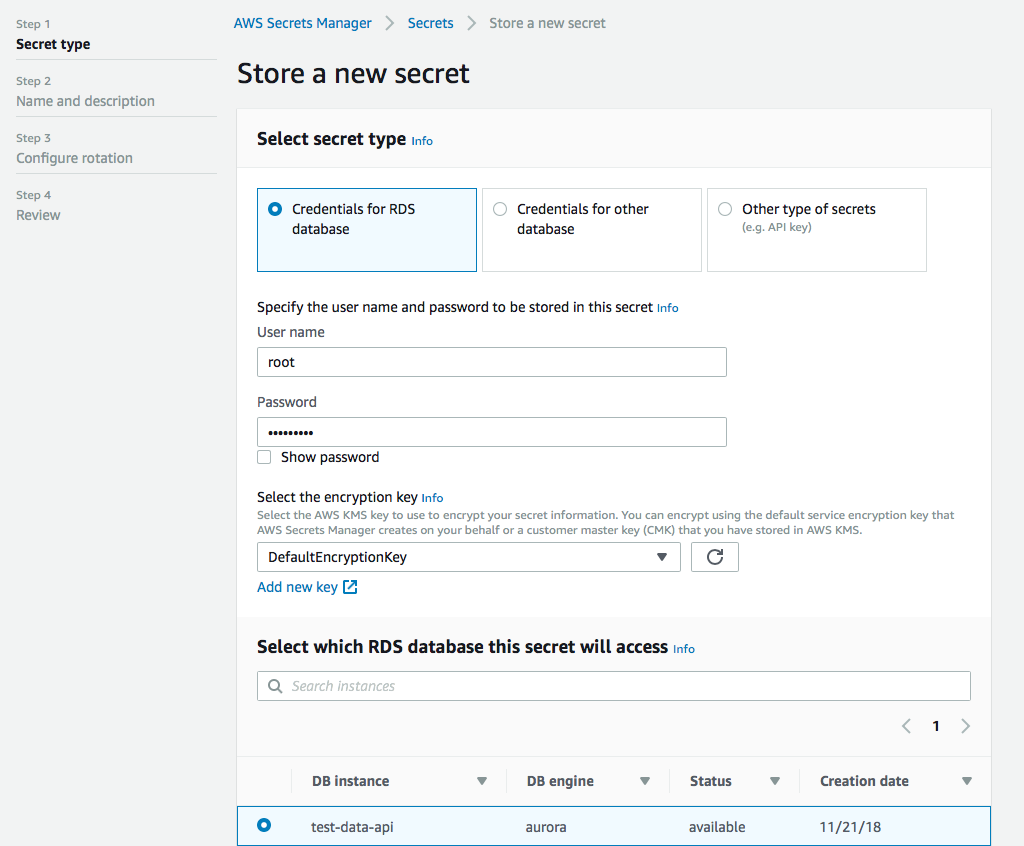
Next you need to set up a secret in the Secrets Manager. This is actually quite straightforward. User name, password, encryption key (the default is probably fine for you), and select the database you want to access with the secret.

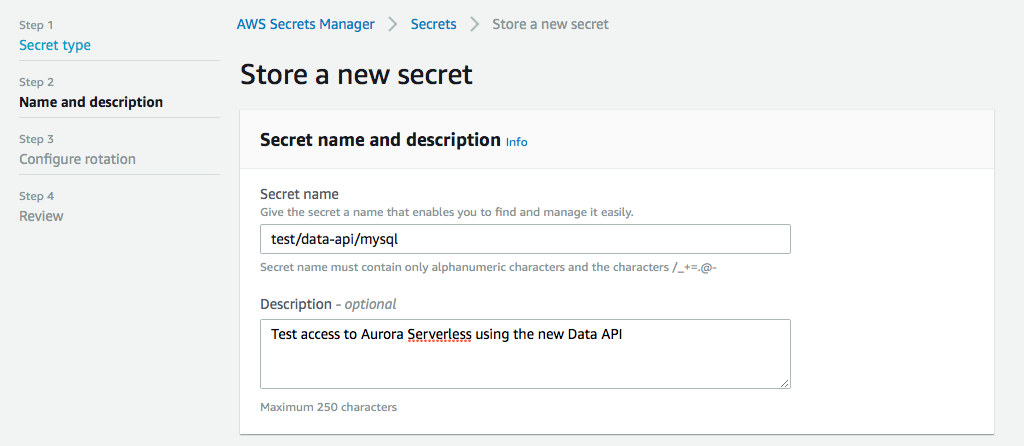
Next we give it a name, this is important, because this will be part of the arn when we set up permissions later. You can give it a description as well so you don’t forget what this secret is about when you look at it in a few weeks.

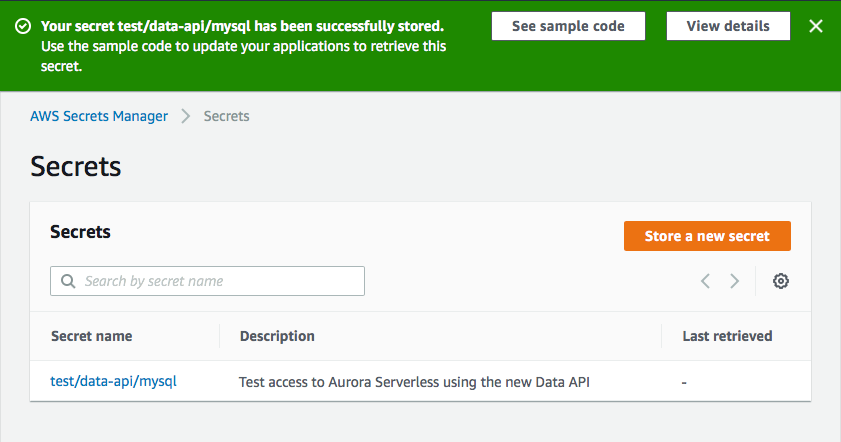
You can then configure your rotation settings, if you want, and then you review and create your secret. Then you can click on your newly created secret and grab the arn, we’re gonna need that next.

Required Permissions
In order to use the Data API, your execution environment requires several IAM permissions. Below are the minimum permissions required. Please Note: The Resource: "*" permission for rds-data is recommended by AWS (see here) because Amazon RDS Data API does not support specifying a resource ARN. The credentials specified in Secrets Manager can be used to restrict access to specific databases.
YAML:
Statement:
  - Effect: "Allow"
    Action:
      - "rds-data:ExecuteSql"
      - "rds-data:ExecuteStatement"
      - "rds-data:BatchExecuteStatement"
      - "rds-data:BeginTransaction"
      - "rds-data:RollbackTransaction"
      - "rds-data:CommitTransaction"
    Resource: "*"
  - Effect: "Allow"
    Action:
      - "secretsmanager:GetSecretValue"
    Resource: "arn:aws:secretsmanager:{REGION}:{ACCOUNT-ID}:secret:{PATH-TO-SECRET}/*"
JSON:
"Statement" : [
  {
    "Effect": "Allow",
    "Action": [
      "rds-data:ExecuteSql",
      "rds-data:ExecuteStatement",
      "rds-data:BatchExecuteStatement",
      "rds-data:BeginTransaction",
      "rds-data:RollbackTransaction",
      "rds-data:CommitTransaction"
    ],
    "Resource": "*"
  },
  {
    "Effect": "Allow",
    "Action": [ "secretsmanager:GetSecretValue" ],
    "Resource": "arn:aws:secretsmanager:{REGION}:{ACCOUNT-ID}:secret:{PATH-TO-SECRET}/*"
  }
]
Sponsors
Contributions
Contributions, ideas and bug reports are welcome and greatly appreciated. Please add issues for suggestions and bug reports or create a pull request. You can also contact me on Twitter: @jeremy_daly.


