
convex-panel
v0.2.14
Published
A React component for monitoring and debugging Convex applications
Downloads
1,292
Maintainers
 devwithbobby
Readme
Convex Panel

A development panel for Convex applications that provides real-time logs, data inspection, and more.
Features
- 📊 Real-time Data View: Browse and filter your Convex tables with ease
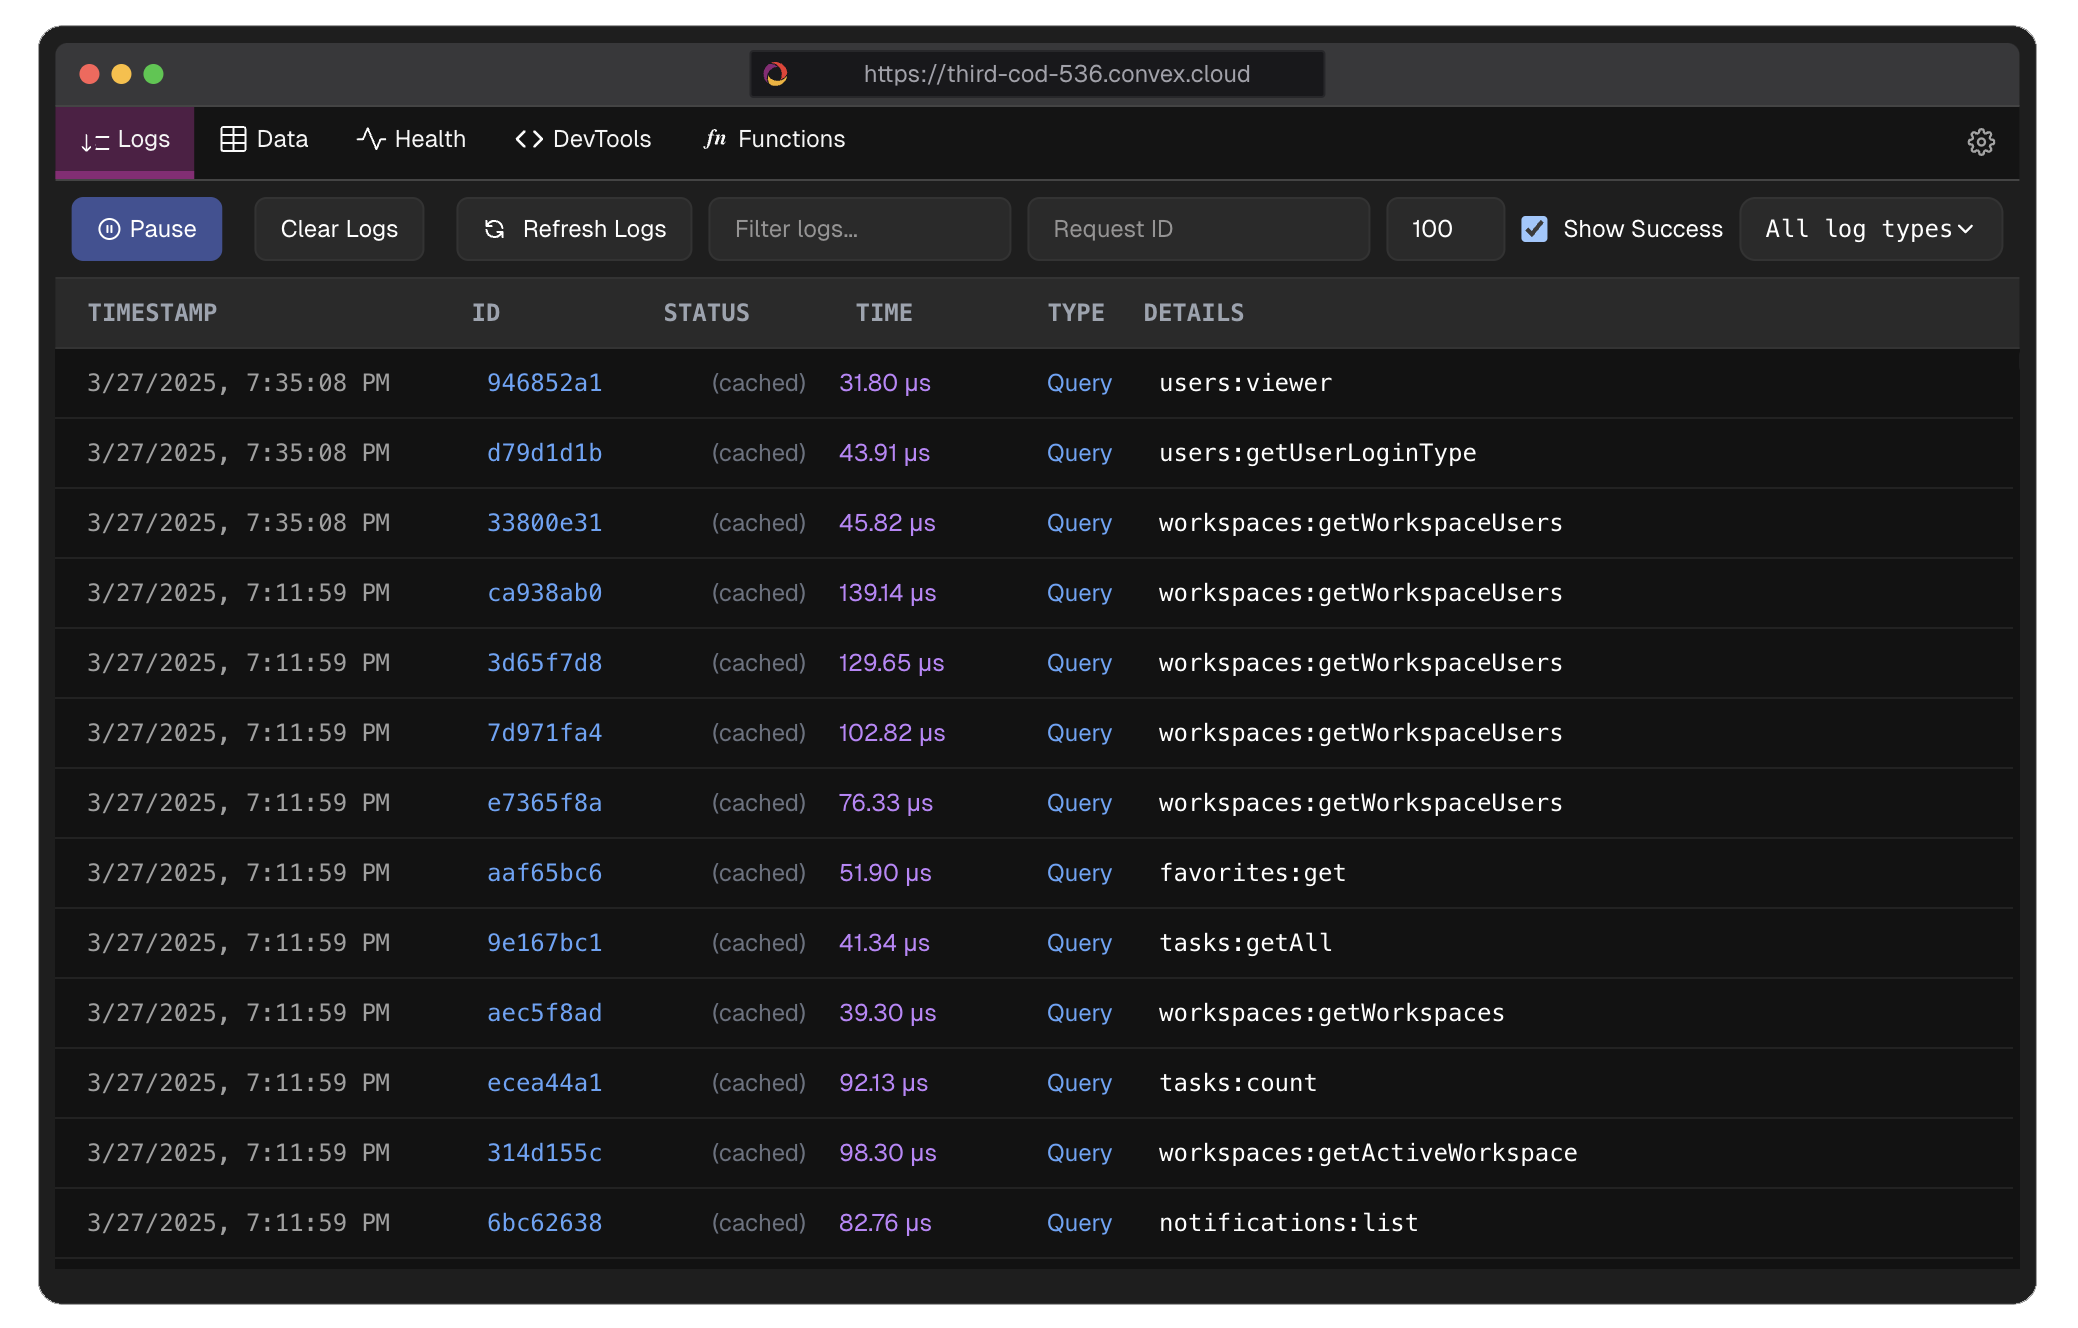
- 📝 Live Logs: Monitor function calls, HTTP actions, and system events in real-time
- 🔍 Advanced Filtering: Filter logs and data with query capabilities
- 🔄 Health Monitoring: Track the health of your application with metrics for cache rates, scheduler health, database performance, and system latency
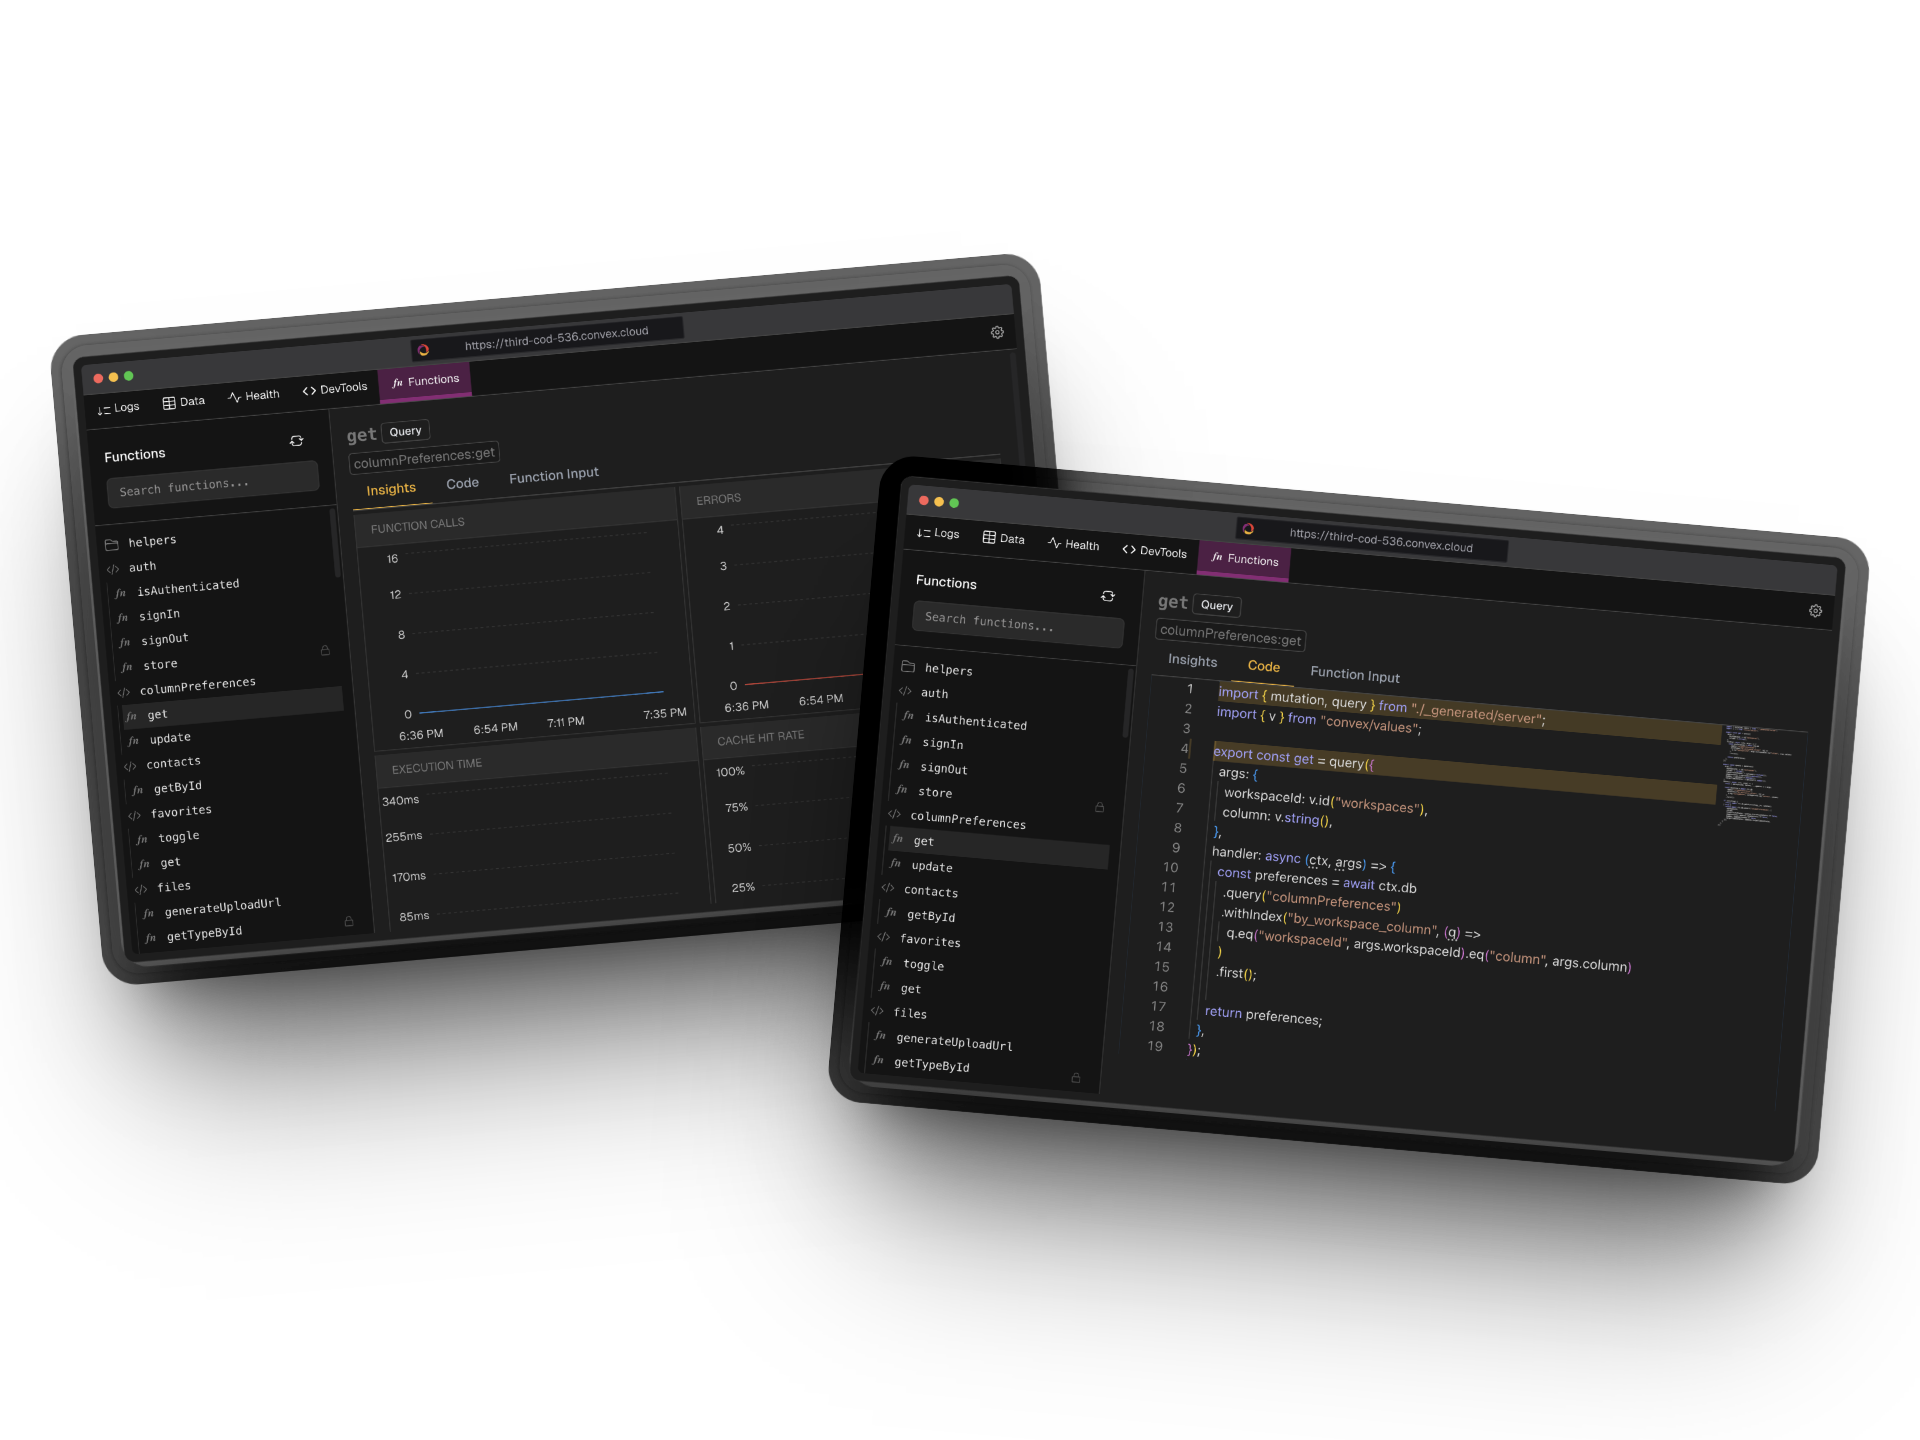
- 📊 Function Performance Monitoring: Track invocation rates, error rates, execution times, and cache hit rates for your functions
- 🔍 Function Code Inspection: View and analyze your function source code with syntax highlighting
- 📈 Performance Metrics Visualization: See your function performance data with interactive charts and graphs
- 🧪 Function Testing: Execute functions directly from the panel with custom inputs and view results
- ✏️ In-place Data Editing: Directly edit your data values with double-click editing capability
- 🎨 Beautiful UI: Sleek, developer-friendly interface that integrates with your app
- 🔐 Automatic Token Setup: Automatically configures your Convex access token during installation
- 💾 State Persistence: Automatically saves panel position, size, and preferences
Installation
bun add convex-panel --dev
# or
npm install convex-panel --save-dev
# or
yarn add convex-panel --dev
# or
pnpm add convex-panel --save-dev
During installation, the package will automatically:
- Check if you're logged in to Convex
- If not logged in, prompt you to run
npx convex login - Once logged in, detect your Convex access token from
~/.convex/config.json(or%USERPROFILE%\.convex\config.jsonon Windows) - Add it to your project's
.envfile asCONVEX_ACCESS_TOKEN
The package will guide you through the login process if needed. You can also manually log in at any time by running:
npx convex loginEnvironment Setup
Create a .env.local file in your project root with the following variables:
# Nextjs
NEXT_PUBLIC_CONVEX_URL="your_convex_url"
NEXT_PUBLIC_ACCESS_TOKEN="your_access_token"
NEXT_PUBLIC_DEPLOY_KEY="your_deploy_key"

# React
REACT_APP_CONVEX_URL="your_convex_url"
REACT_APP_ACCESS_TOKEN="your_access_token"
REACT_APP_DEPLOY_KEY="your_deploy_key"
To get your access token, run:
cat ~/.convex/config.json  # On Unix-based systems
# or
more %USERPROFILE%\.convex\config.json  # On Windows
Usage
Next.js Setup (Recommended)
Create a provider component in your app (e.g., app/providers.tsx):
"use client";

import { ConvexReactClient } from "convex/react";
import { ConvexAuthNextjsProvider } from "@convex-dev/auth/nextjs";
import { ReactNode } from "react";
import dynamic from 'next/dynamic';
import type { ComponentProps } from 'react';

import type ConvexPanelType from "convex-panel";

// Use dynamic import to avoid SSR issues
const ConvexPanel = dynamic<ComponentProps<typeof ConvexPanelType>>(() => import("convex-panel"), {
  ssr: false
});

const convex = new ConvexReactClient(process.env.NEXT_PUBLIC_CONVEX_URL! as string);

export function ConvexClientProvider({ children }: { children: ReactNode }) {
  return (
    <ConvexAuthNextjsProvider client={convex}>
      {children}
      <ConvexPanel
        accessToken={process.env.NEXT_PUBLIC_ACCESS_TOKEN!}
        deployKey={process.env.NEXT_PUBLIC_DEPLOY_KEY!}
      />
    </ConvexAuthNextjsProvider>
  )
}
React Setup (Alternative)
For non-Next.js React applications:
import { ConvexPanel } from 'convex-panel';
import { ConvexReactClient } from "convex/react";

export default function YourComponent() {
  const convex = new ConvexReactClient(process.env.REACT_APP_CONVEX_URL);

  return (
    <>
      {/* Your app content */}
      <ConvexPanel
        accessToken={REACT_APP_ACCESS_TOKEN}
        deployUrl={process.env.REACT_APP_CONVEX_DEPLOYMENT}
      />
    </>
  );
}
Configuration
Required Props
| Prop | Type | Description |
|------|------|-------------|
| deployKey | string | undefined | Convex deployment key for admin-level access. Enables additional admin capabilities. |
| accessToken | string | Your Convex access token (from ~/.convex/config.json). Required for API access. |
Optional Props
| Prop | Type | Default | Description |
|------|------|---------|-------------|
| convex | ConvexReactClient | Initialized Convex client instance for API communication. |
| deployUrl | string | process.env.NEXT_PUBLIC_CONVEX_URL | Your Convex deployment URL. |
| theme | ThemeClasses | {} | Custom theme options (see Theme Customization below). |
| initialLimit | number | 100 | Initial number of logs to fetch and display. |
| initialShowSuccess | boolean | true | Whether to show success logs in the initial view. |
| initialLogType | LogType | 'ALL' | Initial log type filter. Options: 'ALL', 'SUCCESS', 'FAILURE', 'DEBUG', 'LOGINFO', 'WARNING', 'ERROR', 'HTTP' |
| maxStoredLogs | number | 500 | Maximum number of logs to store in memory. |
| onLogFetch | (logs: LogEntry[]) => void | undefined | Callback when logs are fetched. |
| onError | (error: string) => void | undefined | Callback when an error occurs. |
| buttonPosition | ButtonPosition | 'bottom-right' | Position of the panel button. Options: 'bottom-left', 'bottom-center', 'bottom-right', 'right-center', 'top-right' |
| useMockData | boolean | false | Use mock data instead of real API data. |
Theme Customization
The theme prop accepts a ThemeClasses object with the following structure:
interface ThemeClasses {
  colors?: {
    primary?: string;
    secondary?: string;
    background?: string;
    text?: string;
    // ... other color options
  };
  spacing?: {
    padding?: string;
    margin?: string;
    // ... other spacing options
  };
  components?: {
    button?: {
      backgroundColor?: string;
      color?: string;
      // ... other button styles
    };
    // ... other component styles
  };
}
Example theme usage:
<ConvexPanel
  theme={{
    colors: {
      primary: '#6366f1',
      background: '#1f2937'
    },
    components: {
      button: {
        backgroundColor: '#4f46e5'
      }
    }
  }}
  // ... other props
/>
State Persistence
The panel automatically persists several settings in localStorage:
- Panel position on screen
- Panel size (width/height)
- Active tab selection
- Log filter preferences
- Table view configurations
These settings are restored when the panel is reopened.
Features Documentation
Health Monitoring
The health dashboard provides real-time insights into your Convex application's performance metrics:
- Cache Rates: Monitor your application's cache hit rates and efficiency
- Scheduler Health: Track the health and performance of your scheduled functions
- Database Metrics: View database throughput, operation counts, and response times
- System Latency: Visualize overall system response times and identify bottlenecks
Data Editing
The panel supports in-place editing of table data:
- Double-click Editing: Simply double-click on any editable cell to modify its value
- Smart Value Parsing: Automatically converts edited values to the appropriate type (number, boolean, array, object)
- Real-time Updates: Changes are immediately reflected in your Convex database
- Validation: Basic type checking and format validation for edited values
Log Management
Advanced log filtering and management capabilities:
- Type Filtering: Filter by log types (SUCCESS, FAILURE, DEBUG, etc.)
- Search: Full-text search across log messages
- Time Range: Filter logs by time period
- Export: Download logs in JSON format
- Auto-refresh: Real-time log updates
- Memory Management: Automatic cleanup of old logs based on
maxStoredLogs
Troubleshooting
Common Errors
"Convex authentication required":
- Ensure valid
accessTokenis provided - Check
.env.localfile configuration - Verify Convex login status
- Ensure valid
No logs appearing:
- Verify
deployKeyandCONVEX_DEPLOYMENTsettings - Check
convexprop initialization - Confirm access token validity
- Check network connectivity
- Verify
Build warnings about "use client" directive:
- Expected behavior for client components
- Won't affect functionality
- Use dynamic import as shown in setup examples
Panel not appearing:
- Ensure component is mounted inside ConvexProvider
- Check z-index conflicts
- Verify styles are properly injected
Performance Optimization
- Adjust
initialLimitbased on your needs - Set appropriate
maxStoredLogsto prevent memory issues - Use
useMockDatafor development/testing - Consider lazy loading for large datasets
Development
To contribute to this package:
- Clone the repository
- Install dependencies:
npm install - Start the development server:
npm run dev - Run tests:
npm test
Testing
# Run all tests
npm test

# Run specific test suite
npm test -- --grep "feature-name"

# Run tests in watch mode
npm test -- --watch
Publishing Updates
To publish a new version:
- Update version in
package.json - Run tests:
npm test - Build the package:
npm run build - Commit changes
- Create a git tag:
git tag v1.x.x - Push changes and tags:
git push && git push --tags - Publish:
npm publish
License
MIT
Using with Vite
If you're using Vite, you'll need to configure it to properly handle Monaco Editor. The package provides a pre-configured Vite configuration that you can extend:
- First, install the required Vite plugin:
npm install vite-plugin-monaco-editor --save-dev- In your
vite.config.js, import and use the provided configuration:
import { defineConfig } from 'vite';
import convexPanelViteConfig from 'convex-panel/vite';

export default defineConfig({
  ...convexPanelViteConfig,
  // Your other Vite configurations...
});
This will set up the necessary Monaco Editor configuration for Vite.