clx-components
v1.2.1
Published
添加日历组件
Downloads
296
Maintainers
Readme
快速开始
介绍
这个组件库使用 的技术栈 是vite+vue3+ts 开发,所以这个只项目支持vue3项目使用
安装
npm
npm i clx-componentsyarn
npm i clx-components说明
xiaobaikeai这是作者的Github
这个组件库是作者封装于Github上一些有趣的组件,二次封装降低了原组件的灵活度,但提供了更方便快捷的使用。如果和需求有出入,可以去原组件去使用。这个组件库的目标是为程序员们提供一个方便快捷的组件库,也是作者学习的经验总结,
本人实力也是不太行,第一次写组件库,肯定有很多BUG,后续会持续修改
现在属于测试阶段,建议不要用在公司项目,本人开发时间有限,在公司摸鱼的时候才能写,肯定有很多问题。
全局注册
import { createApp } from 'vue'
import App from './App.vue'
// 样式 使用组件先再main中导入样式,必须!!!不管是局部导入或者全局导入
import '../node_modules/clx-components/style.css'
//核心代码
 import CComponents from 'clx-components'

const app = createApp(App)
//注册
app.use(CComponents)
app.mount('#app')
提示
import CComponents from 'clx-components' //如果导入报错请在 src目录下面 新建一个 vite-env.d.ts
里面内容是:
declare module 'clx-components' c-button 组件
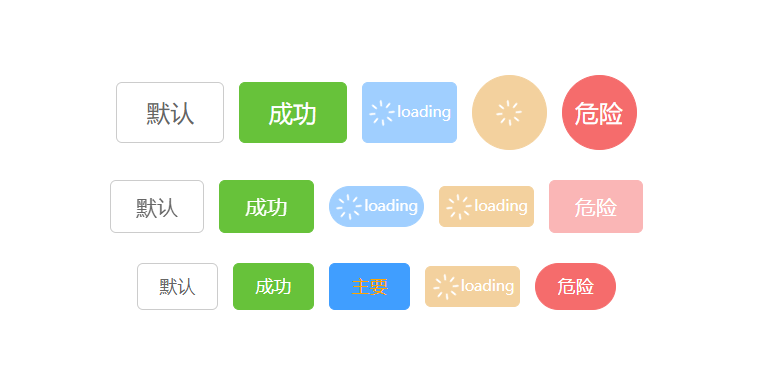
局部导入
import { cButton } from 'clx-components'基本使用
 <!-- 大型按钮 -->
  <c-Button size="large"  type="default">默认</c-Button>
  <c-Button size="large"  type="success">成功</c-Button>
  <c-Button size="large"  type="primary" loading>主要</c-Button>
  <c-Button size="large"  type="warning" loading circle>主要</c-Button>
  <c-Button size="large"  type="danger" circle>危险</c-Button>

  <!-- 默认小型按钮 -->
  <c-Button size="small"  type="default">默认</c-Button>
  <c-Button size="small"  type="success">成功</c-Button>
  <c-Button size="small" round type="primary" loading>主要</c-Button>
  <c-Button size="small"  type="warning" loading>主要</c-Button>
  <c-Button size="small"  type="danger" disabled>危险</c-Button>

   <!-- 迷你按钮 -->
  <c-Button size="mini"  type="default">默认</c-Button>
  <c-Button size="mini"  type="success">成功</c-Button>
  <c-Button size="mini"  type="primary" color="orange">主要</c-Button>
  <c-Button size="mini"  type="warning" loading>主要</c-Button>
  <c-Button size="mini"  round type="danger">危险</c-Button>
参数
| 名称 | 类型 | 默认值 | 说明 | | -------- | ------- | ------- | :----------------------------------------------------------: | | size | string | small | 可选值为 'large' | 'small' | 'mini' | | type | string | default | 可选值为 'default' |'primary'| 'success' | 'warning' | 'danger' | 'gray' | | style | string | '' | 原生样式 | | color | string | '' | 定义按钮文字颜色 | | round | boolean | false | 是否为圆角按钮 | | circle | boolean | false | 是否为圆形按钮 | | disabled | boolean | false | 是否禁用按钮 | | line | boolean | false | 是否为文字按钮 | | loading | boolean | false | 是否显示加载按钮 |
插槽
| 插槽名 | 说明 | | ----------- | ------------------ | | icon | 自定义图标 | | default | 自定义按钮内容 | | loadingName | 自定义加载文字内容 | | loadingIcon | 自定义加载图标内容 |
c-input组件

局部导入
import { cInput } from 'clx-components'基础用法
	<c-input v-model="test"   size="mini"   placeholder="默认"></c-input>

    <c-input v-model="test"   size="small"   placeholder="嵌入">
      <template #prefix>
        <img style="width: 20px;height: 20px;" src="./assets/下雪.png" alt="">
      </template>
    </c-input>

    <c-input v-model="test1"  clearable   size="large"   placeholder="可清空"></c-input>

    <c-input v-model="test1"  showPassword  size="large"   placeholder="密码"></c-input>

    <c-input v-model="test"  maxLength  showWordLimit  size="large"   placeholder="显示"></c-input>

    <c-input v-model="test"  type="textarea" rows="3" maxLength="10"  showWordLimit   placeholder="文本域"		</c-input>

    <c-input v-model="test"  type="textarea" resize showWordLimit    placeholder="可拖动"></c-input>
参数
| 名称 | 类型 | 默认值 | 说明 | | ------------- | ------- | -------------- | :------------------------------------------------------: | | size | string | small | 可选值为 'large' | 'small' | 'mini' (不支持textarea) | | type | string | default | 原生的类型 可选值为 'text' |'textarea'等... | | placeholder | string | 'Please input' | 原生的placeholder | | color | string | '#606266' | 输入框的字体颜色 | | clearable | boolean | false | 是否可以清空 (不支持textarea)默认false | | showPassword | boolean | false | 是否显示密码 (不支持textarea)默认false | | disabled | boolean | false | 是否禁用 默认false | | width | string | '180px' | 输入框的宽度 | | height | string | '25px' | 输入框的高度 | | maxLength | string | 10 | 限制输入 | | rows | string | 2 | 行数 | | cols | string | 20 | 列数 | | resize | boolean | false | 是否可以拖动(只支持textarea)默认false | | showWordLimit | boolean | false | 是否显示字数限制 默认为 false |
插槽
| 插槽名 | 说明 | | ------ | -------------------------------- | | prefix | 输入框前置图片(不支持textarea) | | suffix | 输入框前置图片(不支持textarea) |
BUG
1. 清空需要点击两次。
2. showWordLimit 输入的内容会被部分。
3.有两个个文本域在同一行 拖动其中一个文本域,另一个文本域的显示限制位数会跟着移动。
c-loading组件
备注
这个组件是封装与Github上 (asvae) 发布的loading组件,

局部导入
import { cLoading } from 'clx-components'基本使用
    <c-loading  type="1" animationTime="2000" size="50" color="#409eff"/>
    <c-loading  type="2" animationTime="2000" size="50" color="#409eff"/>
    <c-loading  type="3" animationTime="2000" size="50" color="#409eff"/>
    <c-loading  type="4" animationTime="2000" size="50" color="#409eff"/>
    <c-loading  type="5" animationTime="2000" size="50" color="#409eff"/>
    <c-loading  type="6" animationTime="2000" size="50" color="#409eff"/>
    <c-loading  type="7" animationTime="2000" size="50" color="#409eff"/>
    <c-loading  type="8" animationTime="2000" size="50" color="#409eff"/>
    <c-loading  type="9" animationTime="2000" size="50" color="#409eff"/>
    <c-loading  type="10" animationTime="2000" size="50" color="#409eff"/>
    <c-loading  type="11" animationTime="2000" size="50" color="#409eff"/>
    <c-loading  type="12" animationTime="2000" size="50" color="#409eff"/>
    <c-loading  type="13" animationTime="2000" size="50" color="#409eff"/>
    <c-loading  type="14" animationTime="2000" size="50" color="#409eff"/>
    <c-loading  type="15" animationTime="2000" size="50" color="#409eff"/>
    <c-loading  type="16" animationTime="2000" size="50" color="#409eff"/>
    <c-loading  type="17" animationTime="2000" size="50" color="#409eff"/>
    <c-loading  type="18" animationTime="2000" size="50" color="#409eff"/>
    <c-loading  type="19" animationTime="2000" size="50" color="#409eff"/>
    <c-loading  type="20" animationTime="2000" size="50" color="#409eff"/>
参数
| 名称 | 类型 | 默认值 | 说明 | | ------------- | ------ | ------- | ----------------- | | type | string | 5 | 不同的loading样式 | | size | number | 60 | loading的大小 | | color | string | #409eff | loading的颜色 | | animationTime | number | 1000 | 动画时间 |
c-dragrank组件
这个组件是是封装 Vue3 DnD库的可拖拽排序组件
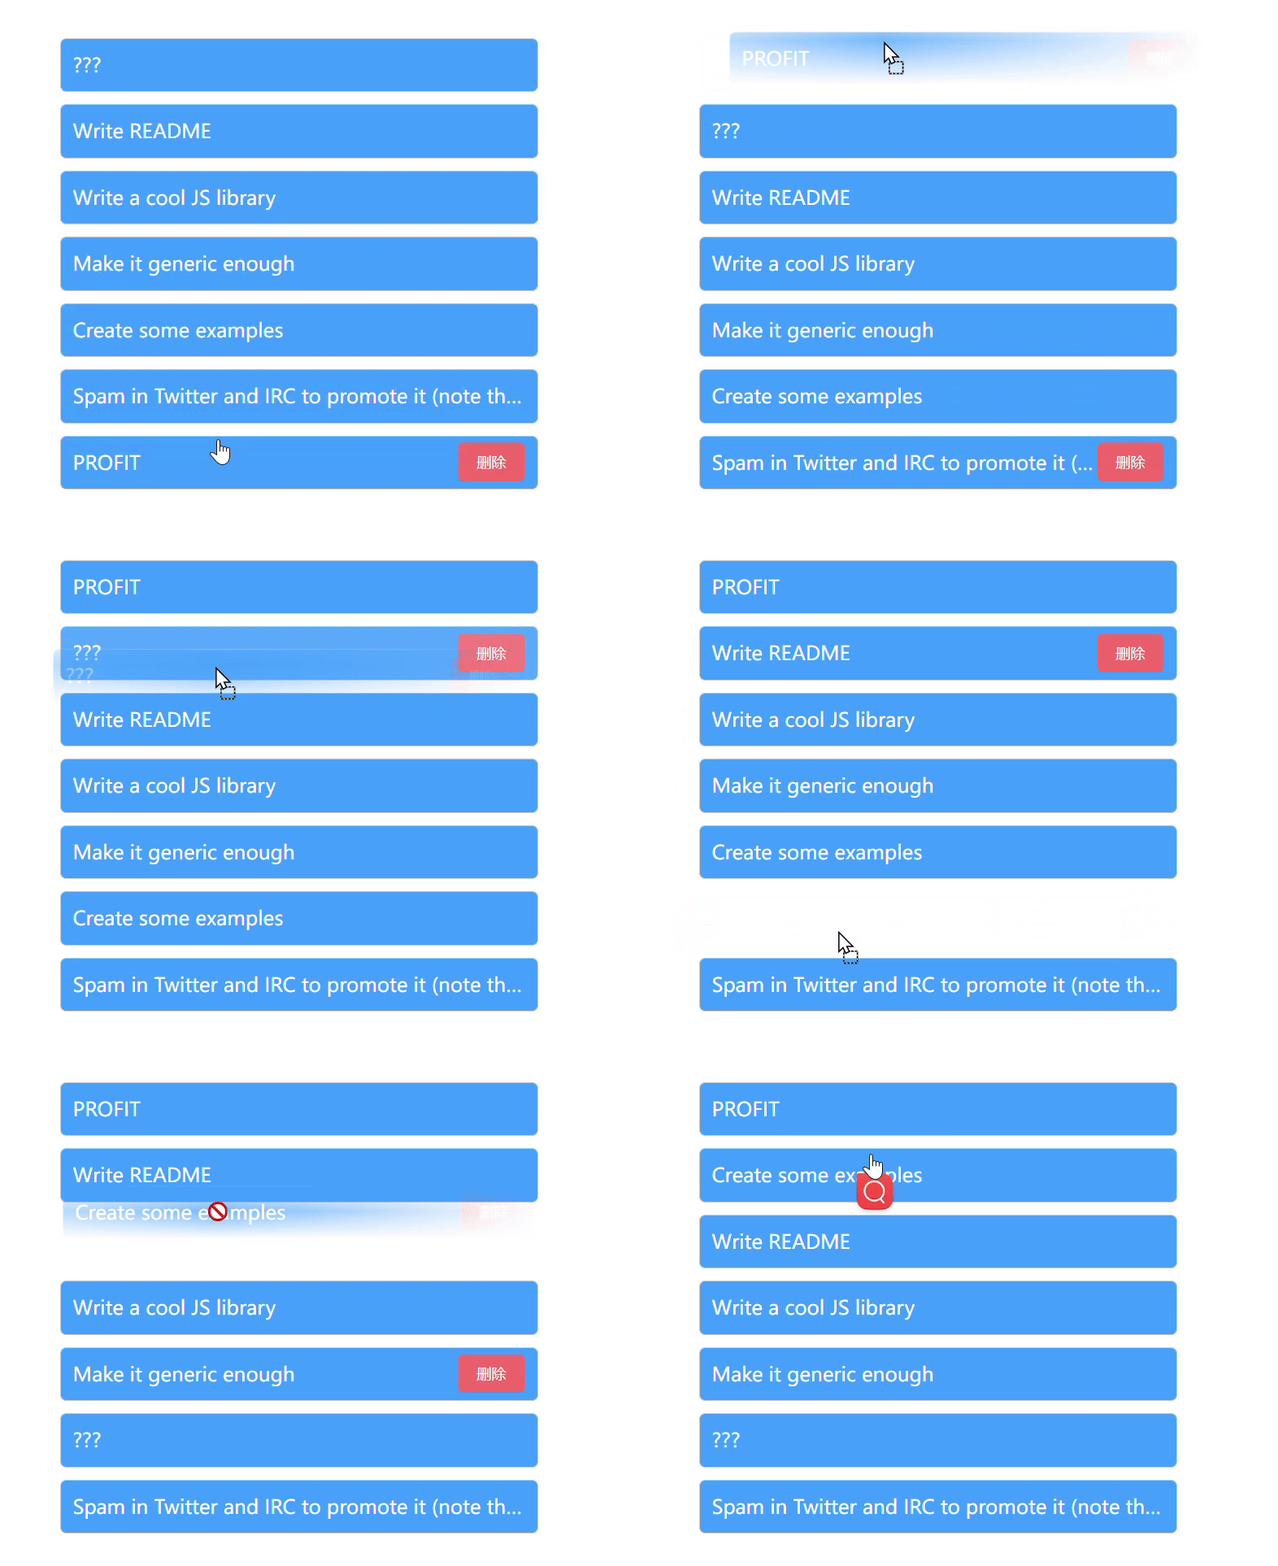
局部导入
import { cDragrank } from 'clx-components'基本使用
<c-dragrank v-model="Lists" @deleteValue="deleteValue" isDelete gap="10px" width="400px" height="400px" /> 参数
| 名称 | 类型 | 默认值 | 说明 | | -------------------- | -------------------------- | ------ | ---------------------- | | modelValue /v-model | {id:number,text:string} | [] | 拖拽列表数据 | | style | string | '' | 每个可拖动数据块的样式 | | width | string | 400px | 组件的宽度 | | height | string | 400px | 组件的高度 | | gap | string | 0px | 数据块之间的间距 | | isDelete | boolean | false | 是否显示删除按钮 |
事件
@deleteValue = (item:any) => {} // 删除事件 item 是当前点击的数据。
插槽
delete 删除按钮插槽
 <c-dragrank v-model="Lists"   @deleteValue="deleteValue"     gap="10px" width="400px" height="400px" >
    //row是点击的块的数据
    <template #delete="{row}">
      删除
    </template>
  </c-dragrank>
c-lialog组件
这是一个弹窗组件 且可以拖拽
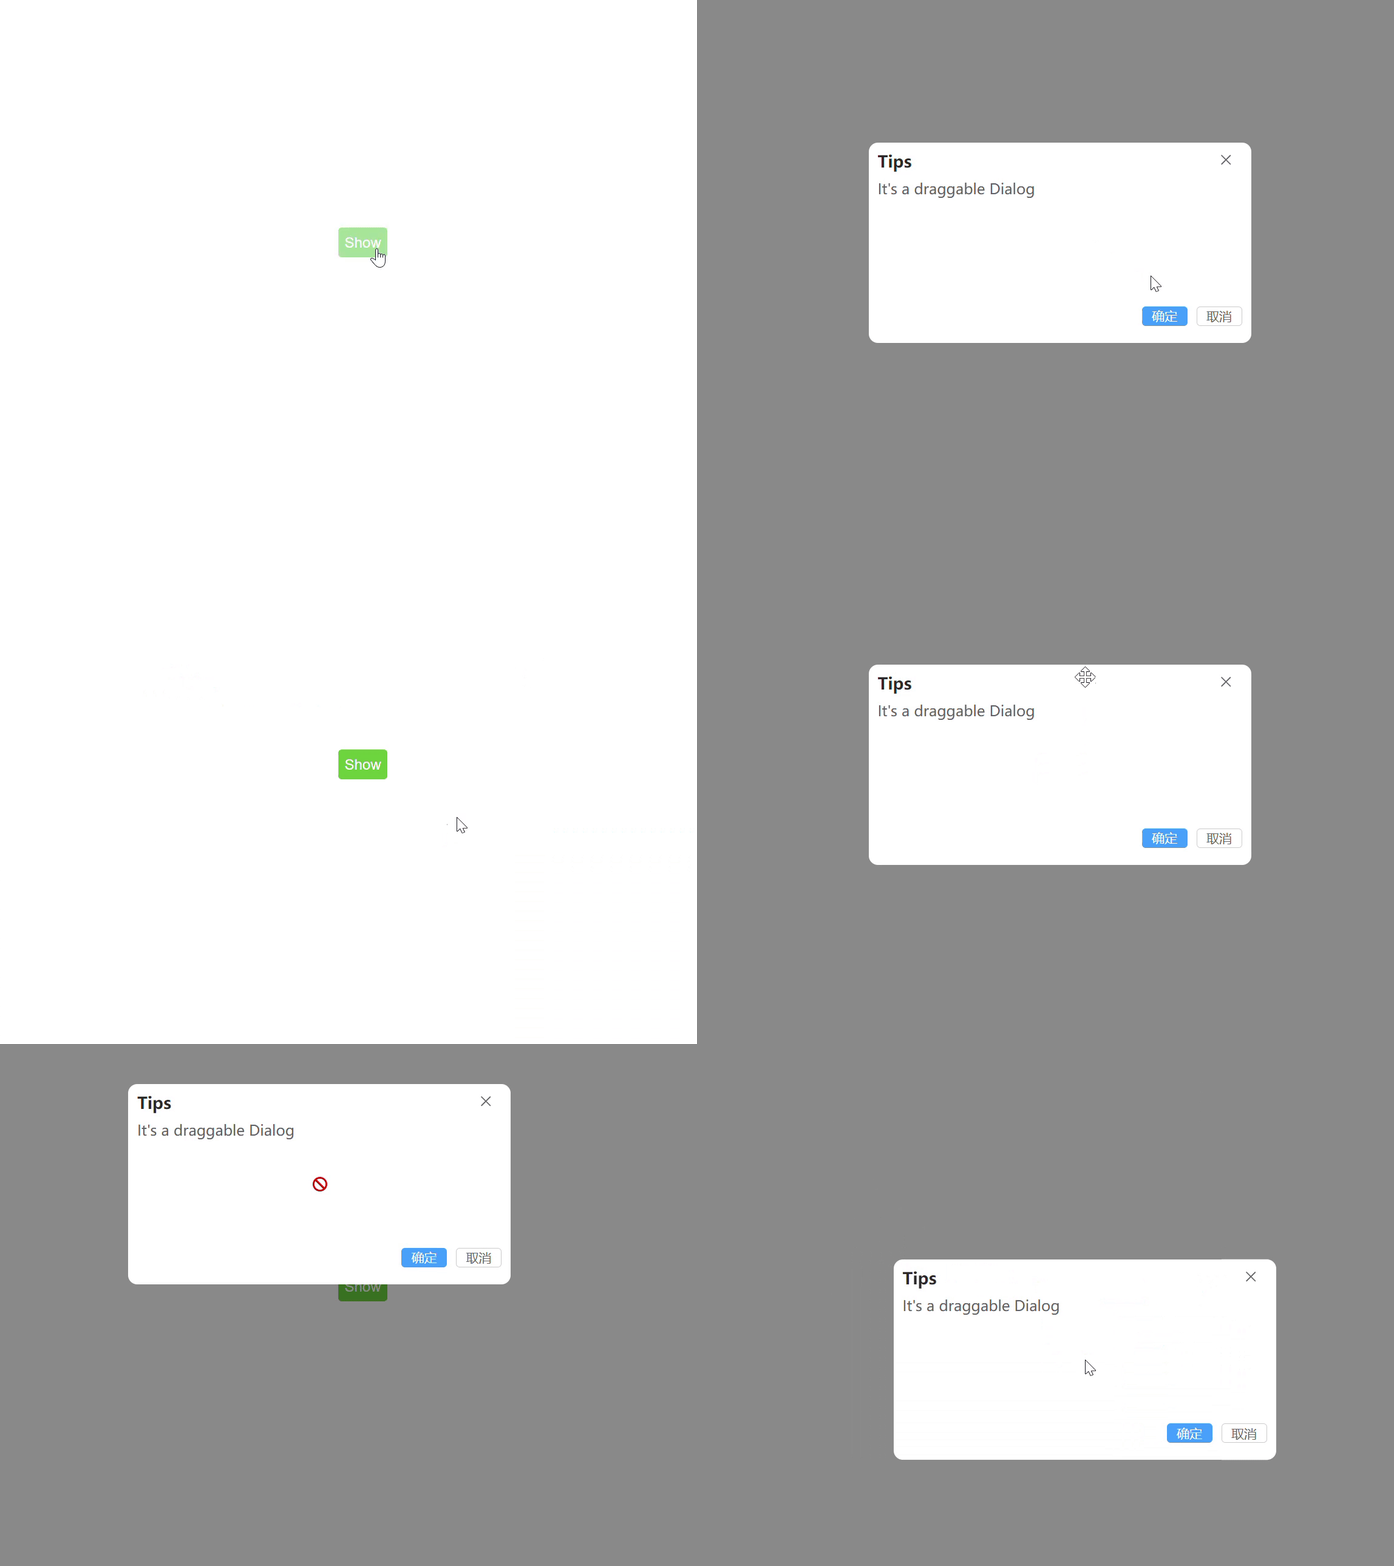
局部导入
import { cDialog } from 'clx-components'基本使用
   <c-button type="success" size="large" @click="show = true" >Show</c-button>

      <c-dialog v-model="show" height="200px"   >
        <template #default>
          <span>It's a draggable Dialog</span>
        </template>
        <template #footer>
          <div style="display: flex; gap: 10px;position: absolute;right: 10px;">
            <c-button type="primary" size="small" @click="show = false">确定</c-button>
            <c-button type="default" size="small" @click="show = false">取消</c-button>
          </div>
       </template>
      </c-dialog>
参数
| 名称 | 类型 | 默认值 | 说明 | | -------------------- | ------- | ------- | --------------------- | | modelValue /v-model | boolean | false | 控制显示隐藏 | | style | string | '' | 自定义样式 | | title | string | '标题' | 标题文字 | | width | string | '400px' | 宽度 | | height | string | ’200px' | 高度 | | modal | boolean | true | 是否显示遮罩层 | | closeModal | boolean | true | 是否点击遮罩层关闭 | | closeEscape | boolean | false | 是否按esc关闭 | | openDelay | number | 100 | 默认100ms 打开延迟 | | closeDelay | number | number | 默认100ms 关闭延迟 | | isclose | boolean | true | 是否显示闭按钮 | | isDrag | boolean | true | 是否可以拖拽 默认true |
插槽
| 插槽名 | 说明 | | ------- | ---------------------------------- | | header | 对话框标题的内容;会替换标题部分。 | | default | Dialog 的内容 | | close | 关闭按钮 | | footer | Dialog 按钮操作区的内容 |
事件
| 事件名 | 说明 | Type | | ------ | ----------------- | ----------- | | open | Dialog 打开的回调 | ()=> void | | close | Dialog 关闭的回调 | ()=> void |
c-cropper组件
这个组件是封装于GitHub上 vue-cropper开源的组件
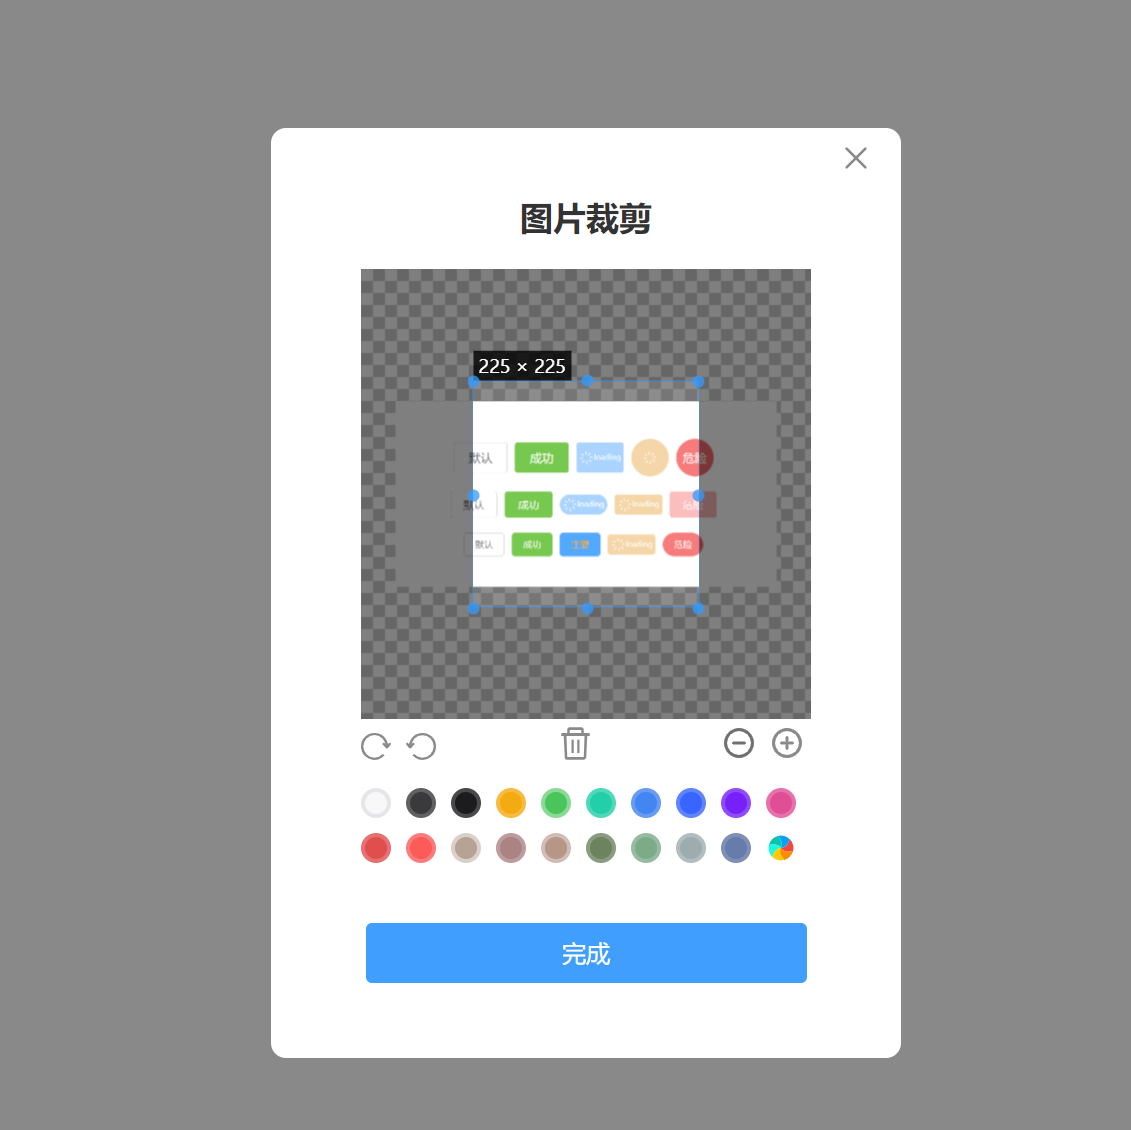
局部导入
import { cCropper } from 'clx-components'基本使用
<c-cropper v-model="show" :fixedNumber="[1,1]" action="/api/testUpload" @success="success" />参数
| 参数名 | 类型 | 默认值 | 说明 | | ----------- | --------------- | ---------- | -------------------------------- | | modelValue | boolean | false | 是否显示 | | action | string | '' | 图片上传地址(你自己配置跨域代理) | | background | string | '#fff' | 弹出框的背景色 | | fixedNumber | [number,number] | [1,1] | 裁剪框比例 | | closeModal | boolean | false | 是否可以通过点击遮罩层关闭弹窗 | | title | string | '图片裁剪' | 弹窗标题 | | btnBgColor | string | '#409eff' | 按钮背景色 | | outputType | string | 'png' | 可选值:'png'|'jpeg'|'webp' |
事件
| 事件名 | 类型 | 说明 | | -------- | ----------------- | --------------------------------- | | @success | (data:any)=> void | 上传成功回调 data是成功返回的数据 | | @error | (data:any)=> void | 上传失败回调data是失败的说明 |
插槽
| 插槽名 | 说明 | | ------ | -------- | | close | 关闭按钮 |
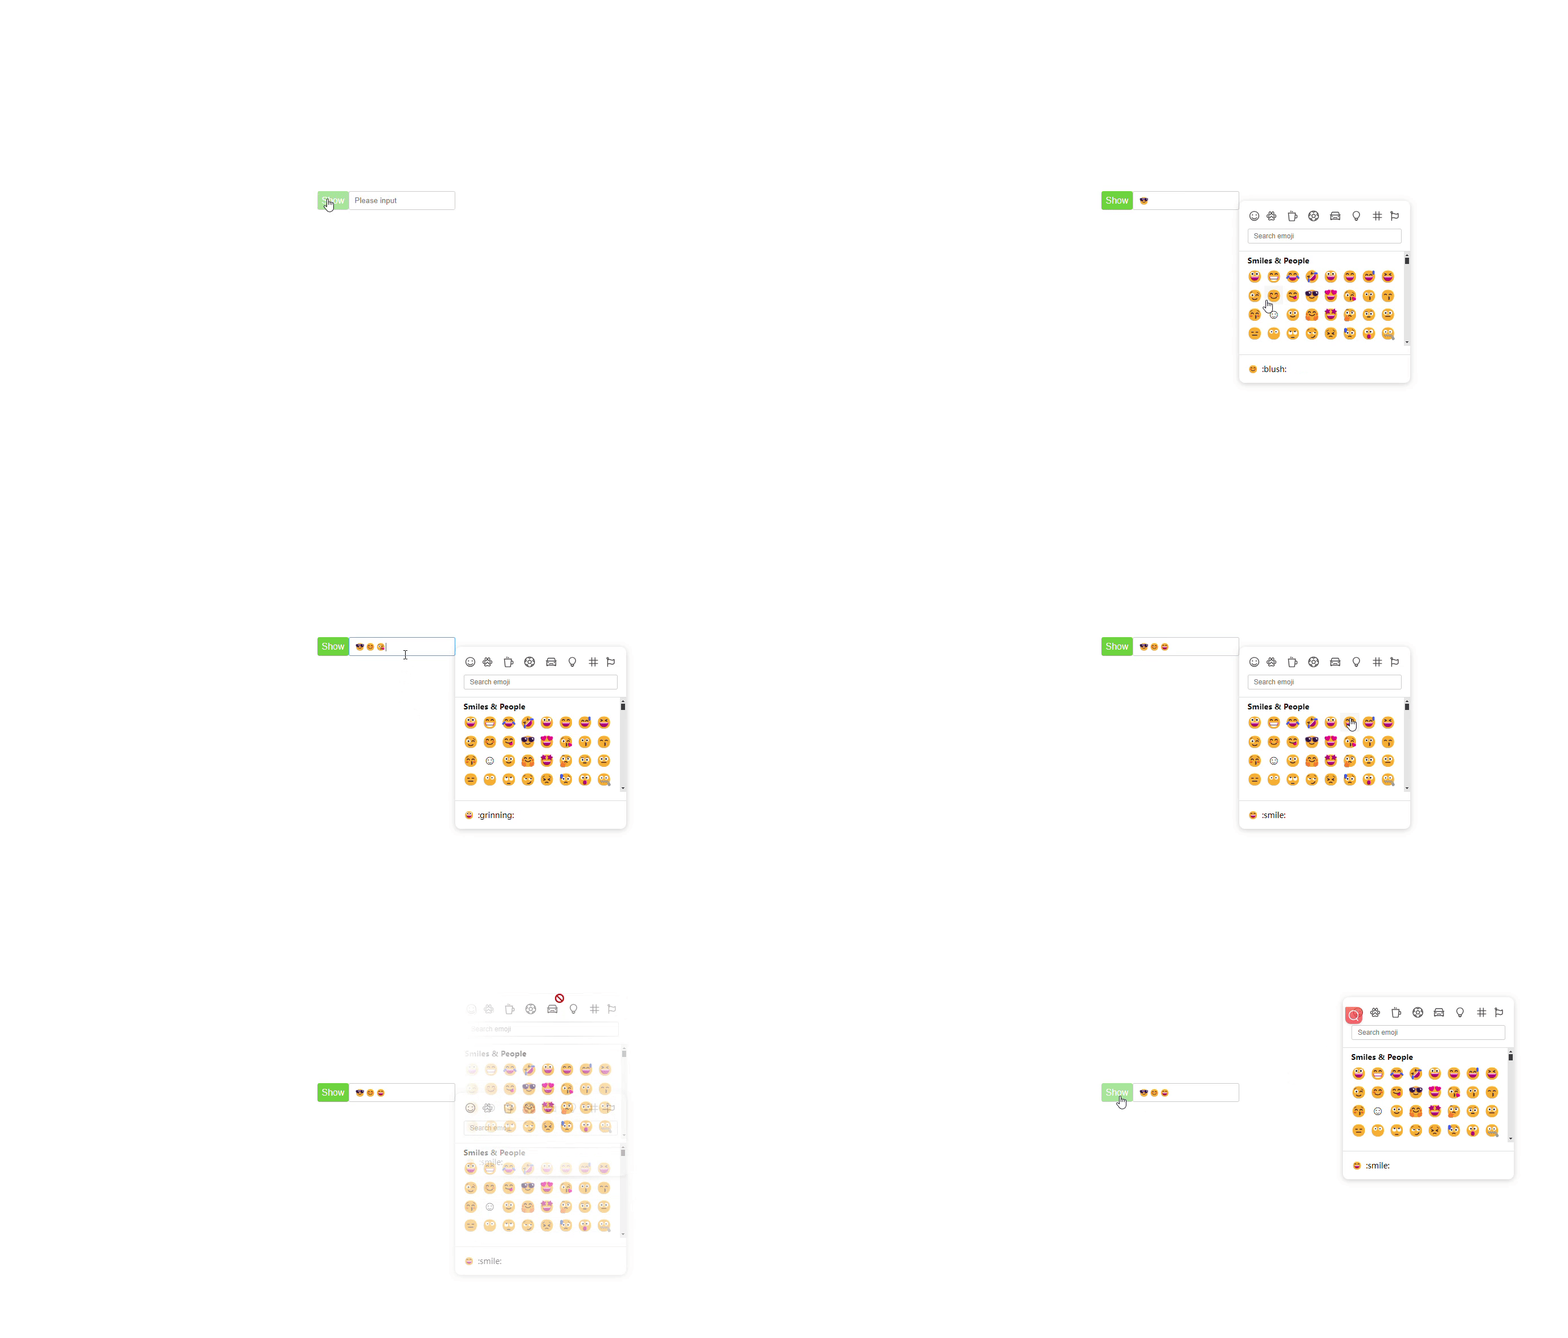
c-emoji组件
这个组件是封装于GitHub上 **vue3-emoji-picker**开源的组件
局部导入
import { cEmoji } from 'clx-components'基本使用
<template>
  <div style="display: flex;justify-content: center;align-items: center;height: 100vh;">
     <c-button type="success" size="large"  @click="show = !show" >Show</c-button>
     <c-input v-model="str"></c-input>
      <c-emoji v-model="show" @success="success" style="width: 300px;" ></c-emoji>
  </div>
</template>">

<script setup lang="ts">
import { ref } from "vue";

const show = ref(true)

let str = ref<string>('')
const success = (res: any) => {
  str.value+=res
}
</script>
参数
| 参数名 | 类型 | 默认值 | 说明 | | ---------------- | ------- | -------- | --------------------------- | | modelValue | boolean | false | 是否显示 | | theme | string | 'auto ' | 'light' | 'dark' | 'auto' | | displayRecent | boolean | false | 是否显示最近使用表情 | | disableSkinTones | boolean | true | 是否禁用肤色选择 | | draggable | string | true | 是否可拖动 默认 true | | style | string | '‘ | 表情选择器样式 |
事件
| 事件名 | 类型 | 说明 | | -------- | -------------------- | ---------------- | | @success | (data:string)=> void | data是表情包内容 |
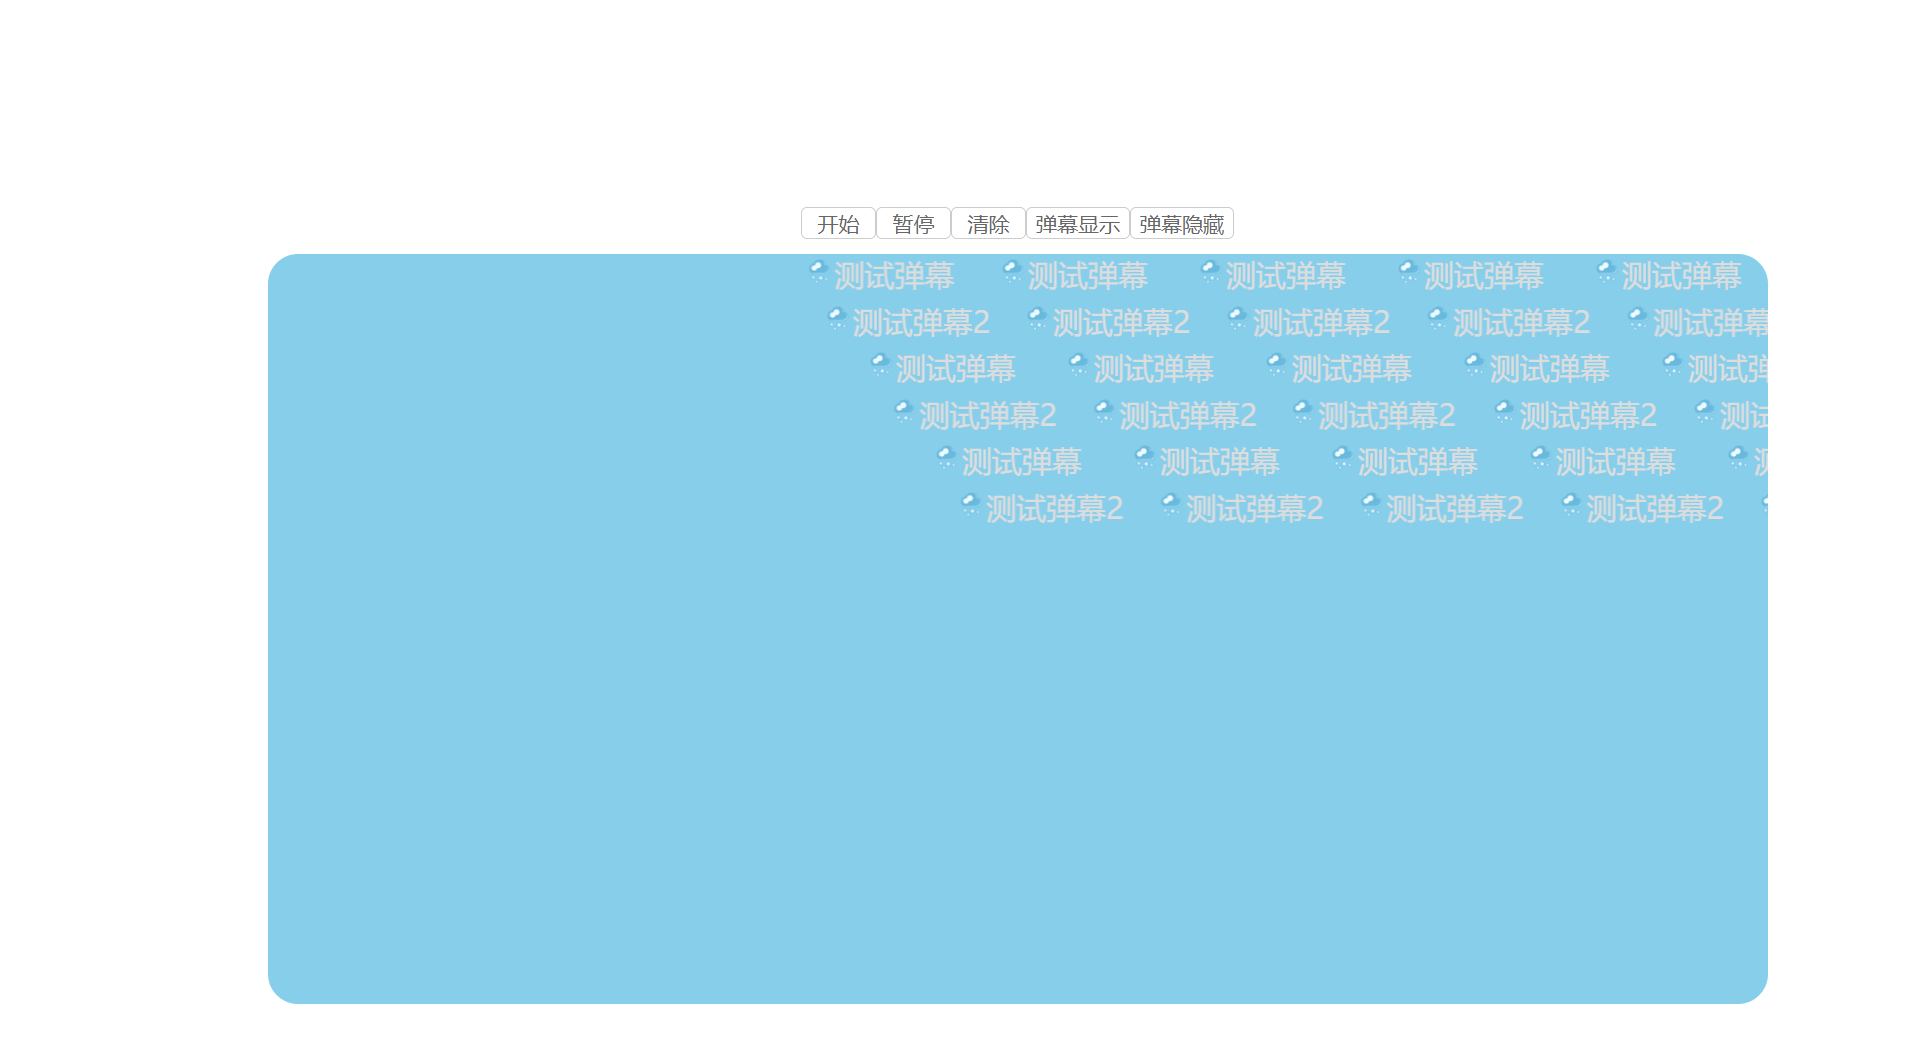
c-scrolling组件
这个组件是封装于GitHub上 **vue-danmaku**开源的组件
局部导入
import { cScrolling } from 'clx-components'基本使用
<script setup lang="ts">
import { onMounted, ref } from "vue";
const danmus = ref([
  {
    id:1,
    text:"测试弹幕",
    img:'src/assets/下雪.png',
    time:0
  },
  {
    id:2,
    text:"测试弹幕2",
    color:"red",
    img:'src/assets/下雪.png',
    time:0
  },

])
const scrolling = ref<any>()
</script>

<template>
  <div style="padding-top: 200px; display: flex;flex-direction: column;align-items: center;gap: 10px">
    <div style="display: flex;">
      <c-button @click="scrolling.danmakuRef.play()">开始</c-button>
      <c-button @click="scrolling.danmakuRef.pause()">暂停</c-button>
      <c-button @click="scrolling.danmakuRef.stop()">清除</c-button>
      <c-button @click="scrolling.danmakuRef.show()">弹幕显示</c-button>
      <c-button @click="scrolling.danmakuRef.hide()">弹幕隐藏</c-button>
    </div>
    <c-scrolling ref="scrolling"
    style="width: 1000px;height: 500px;background-color: skyblue;border-radius: 20px;"
        :channels="10"
        :useSlot="true"
        loop v-model="danmus"
        isSuspend
        :autoplay=false
         >
      <template #dm="{index,danmu}">
        <div>
          <img style="width: 20px;height: 20px;border-radius: 50%;" :src="danmu.img" alt="">
          <span>{{ danmu.text }}</span>
        </div>
      </template>
    </c-scrolling>
  </div>
</template>
参数
| 参数名 | 类型 | 默认值 | 说明 | | ---------------- | ------- | -------- | --------------------------- | | modelValue | Array[string|object] | [] | | | channels | number | 3 | 轨道数量条数 | | autoplay | boolean | true | 是否自动播放 | | useSlot | boolean | false | 是否使用插槽 | | loop | boolean | false | 是否循环播放 | | style | string | 'height:100px;width:300px | 弹幕轨道样式 | | debounce | number | 100 | 弹幕刷新频率(ms) | | speeds | number | 200 | 弹幕速度 | | randomChannel | boolean | false | 是否随机轨道 | | isSuspend | boolean | false | 是否开启弹幕悬浮暂停 | | top | number | 4 | 弹幕轨道顶部距离 | | right | number | 0 | 弹幕轨道右侧距离 |
内置方法
  <!-- <c-scrolling ref="scrolling"  :useSlot="true" loop v-model="danmus"  isSuspend :autoplay=false />
  <script lang="ts">


  const scrolling = ref<any>()
  // 开始播放
    scrolling.value.danmakuRef.play()
  </script> -->
| 方法名 | 说明 | 参数 | | ------------ | -------------------------------------------- | ----------------------------- | | paly | 开始/继续播放 | | | pause | 暂停弹幕播放 | | | stop | 停止播放并清空弹幕 | | | show | 弹幕显示 | | | hide | 弹幕隐藏 | | | reset | 重置配置 | | | resize | 容器尺寸改变时重新计算滚动距离(需手动调整) | danmu数据,可以是字符串或对象 | | push | 发送弹幕(插入到弹幕列表末尾,排队显示) | danmu数据,可以是字符串或对象 | | add | 发送弹幕(插入到当前播放位置,实时显示) | danmu数据,可以是字符串或对象 | | insert | 绘制弹幕(实时插入,不进行数据绑定) | | | getPlayState | 获取当前播放状态 | |
事件
| 事件名 | 类型 | 说明 | | -------- | ------------- | ------------------------------------------------------------ | | @ListEnd | ()=> void | 所有弹幕插入完毕 | | @playEnd | (index)=>void | 所有弹幕播放完成(已滚出屏幕)返回值 index(最后一个弹幕的下标) | | @dmOver | (danmu)=>void | 开启弹幕悬浮暂停时,当进入弹幕,暂停时触发 返回值 触发的弹幕对象元素 | | @dmOut | (danmu)=>void | 开启弹幕悬浮暂停时,当离开弹幕,恢复滚动时触发 返回值 触发的弹幕对象元素 |
插槽 dm
danmu是每个对象的值,或者字符串的值
 <template #dm="{index,danmu}">
    <span>{{ index }}{{ danmu }}:{{ danmu.text }}</span>
  </template>
c-checkbox组件
局部导入
import { cCheckbox } from 'clx-components'
基本使用
<c-checkbox v-model="checked" size="default" @change="console.log(checked)" border>123</c-checkbox>参数
| 参数名 | 类型 | 默认值 | 说明 | | ---------------- | ------- | -------- | --------------------------- | | modelValue | boolean | false | 是否勾选 | | size | string | default | 'default'|'small 'large ' 控制大小 | | disabled | boolean | false | 是否禁用 | | border | boolean | false | 是否有边框 | | label | string | checkbox | 显示的文字 | | value | string | number | '' | 标识值,在c-checkbox-group中必填!! |
事件
| 事件名 | 类型 | 说明 | | ------- | --------------------------- | -------------------------------------------------------- | | @change | ({done,value,label})=> void | 改变时触发done表示是否勾选,value表示值,label显示的文字 |
插槽
默认字体插槽
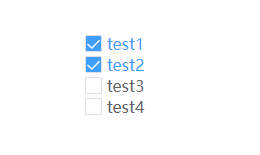
c-checkbox-group组件
max和min 这两个属性有点难,以后有空再仔细琢磨,
局部导入
import { cCheckboxGroup } from 'clx-components'基本使用
 <c-checkbox-group v-model="arr" @change="change" >
        <c-checkbox  label="test1"  value="1" ></c-checkbox>
        <c-checkbox  label="test2"  value="2" ></c-checkbox>
        <c-checkbox  label="test3"  value="3" ></c-checkbox>
        <c-checkbox  label="test4"  value="4" ></c-checkbox>
    </c-checkbox-group>
参数
| 参数名 | 类型 | 默认值 | 说明 | | ---------------- | ------- | -------- | --------------------------- | | modelValue | [string|number] | [] | 默认选中的值 |
事件
| 事件名 | 类型 | 说明 | | -------- | ------------- | ------------------------------------------------------------ | | @change | (val)=> void | 改变的value值 |
插槽
默认插槽 默认字体插槽
c-checkbox-group-inline组件
实现 max和min 功能
局部导入
import { cCheckboxGroupInline } from 'clx-components'
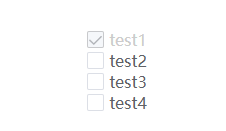
基本使用
<template>
	<c-checkbox-group-inline v-model="arr" @change="change1" :max="3" :min="1" style="" />
</template>

<script setup lang="ts">
import {ref} from 'vue'
//数据 label 是多选框的文字, value 是选中的值,done 表示 是否选中
const arr = ref([
   {label:'test1',value:'a',done:false},
   {label:'test2',value:'b',done:false},
   {label:'test3',value:'c',done:false},
   {label:'test4',value:'d',done:false},
])
</script>
参数
| 参数名 | 类型 | 默认值 | 说明 | | ---------------- | ------- | -------- | --------------------------- | | modelValue | [{}] | [] | 渲染的个数,label显示的文字,value标识,done是否显示 | | max | number | Infinity | 最多勾选值 | | min | number | 0 | 最少勾选值 | | style | string | '' | 默认样式 可以修改布局 |
事件
| 事件名 | 类型 | 说明 | | ------- | ----------- | -------------------------------------------- | | @change | ([])=> void | [{done:boolean,value:string}] 已经勾选的数组 |
c-calendar组件
日期和农历 组件
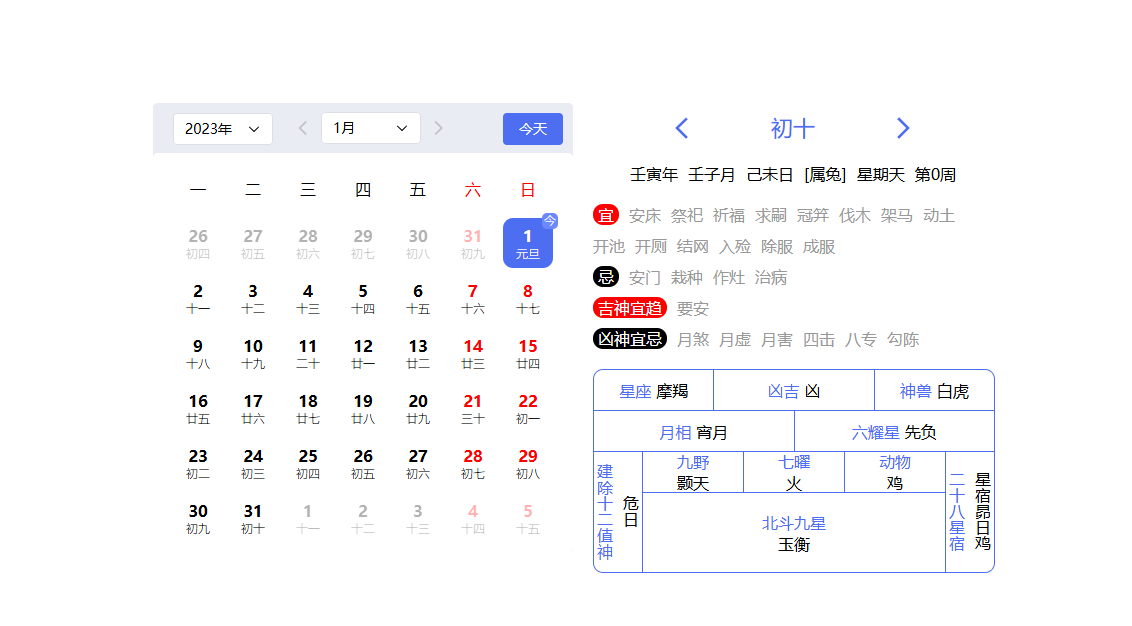
局部导入
import {cCalendar} from "clx-components";基本使用
<template>
	<c-calendar v-model="date" />
</template>
参数
| 参数名 | 类型 | 默认值 | 说明 | | ---------------- | ------- | -------- | --------------------------- | | v-model | Date | new Date() | 当前的时间 | | direction | string | 'vertical' | 日期选择器方向 默认垂直 vertical 水平 horizontal | | showDate | boolean | true | 是否显示日期选择器 | | showToday | boolean | true | 是否显示今天按钮 | | showLunar | boolean | true | 是否显示农历 | | dateColor | string | #fff | 日期背景颜色 | | calendarColor | string | #fff | 农历背景颜色 | | selectColor | string | #409eff | 选择日期背景颜色 |
事件
| 事件名 | 类型 | 说明 | | ------- | ------------ | --------------------------- | | @change | (val)=> void | 点击切换后的数据 类型看下方 |
val类型
selectDay 选中的日期Date
动物 :animal
九野:Kuchino
神兽:mythical
凶吉:avoid
星座:constellation
月相:Phase
六耀星:hexasterism
七曜: sevenLuminaries
北斗九星:sevenLuminaries
建除十二值神:twelve
农历年:yaerHeavenly
农历月:monthHeavenly
农历日:dayHeavenly
宜: goodGods[]
*忌:badGods[]
吉神: lucky[]
凶神:fierce[]
c-message组件
消息提示组件


局部导入
import {cMessage} from "clx-components";基本使用
<script setup lang="ts">
import {cMessage} from "../cComponents/cComponents.js";
</script>

<template>
<c-button size="small" type="primary" @click="cMessage({type: 'success', message: '获取成功', duration: 2000})">show</c-button>
<c-button type="warning"@click="cMessage({type: 'warning', message: '警告警告', duration: 2000})">inline</c-button>
<c-button type="gray" @click="cMessage({type: 'info', message: '默认默认', duration: 2000})">test</c-button>
<c-button type="danger" @click="cMessage({type: 'error', message: '获取失败', duration: 2000})">danyi</c-button>
</template>
参数
| 参数名 | 类型 | 默认值 | 说明 | | ---------------- | ------- | -------- | --------------------------- | | types | string | success | 'success'|'warning' |'info' |'error' | | message | string|number | '' | 提示内容, | | duration | number | 3000 | 消失的毫秒 |
