brickpi3
v0.9.8
Published
Control your BrickPi3 with nodejs
Downloads
14
Maintainers
Readme
BrickPi3 package for nodejs
With this package you can control your BrickPi3 with nodejs.
This package has the same interface as the python library and was copied 1:1 with sligth language adjustments (bitwise operators are a bit different and the return values are promises). So just look at their examples (https://github.com/DexterInd/BrickPi3/tree/master/Software/Python/Examples) to see, how you can archive different tasks. Just remember, that you get promises back from most of the methods.
If you find any bugs, please open an issue or submit a pull request. I couldn't test everything, because I only have ev3 large motors. So I need your help to know if everything else works :)
Install
npm install --save brickpi3Usage
const brickpi3 = require('brickpi3');

(async () => {
    try {
        let BP = new brickpi3.BrickPi3();

        //Make sure to stop and free all motors and sensors when the programm exits
        brickpi3.utils.resetAllWhenFinished(BP);

        //Resetting offset position of motor A to 0
        let encoder = await BP.get_motor_encoder(BP.PORT_A);
        await BP.offset_motor_encoder(BP.PORT_A, encoder);
        await BP.set_motor_power(BP.PORT_A, 10);
    } catch (err) {
        console.log(err);
    }
})();
Utils
When you need to find the extreme offsets of the motor (f.e. an arm can only get from point a to point b but not beyond), there is a helper function available like explained in this video: https://youtu.be/d0bghBZZMUg?t=1m35s
const brickpi3 = require('brickpi3');

(async () => {
    try {
        let BP = new brickpi3.BrickPi3();
        brickpi3.utils.resetAllWhenFinished(BP);

        await brickpi3.utils.resetMotorEncoder(BP, BP.PORT_A, brickpi3.utils.RESET_MOTOR_LIMIT.MIDPOINT_LIMIT);
        await BP.set_motor_position(BP.PORT_A, 0);
        console.log("Motor should now be in the middle of its two extremes");
    } catch (err) {
        console.log(err);
    }
})();
For easier working with motors and sensors, you can get an instance of each of them and then access their methods:
const brickpi3 = require('brickpi3');

(async () => {
    try {
        let BP = new brickpi3.BrickPi3();
        brickpi3.utils.resetAllWhenFinished(BP);

        //Get the instance of one motor and sensor
        let motor = brickpi3.utils.getMotor(BP, BP.PORT_A);
        //getSensor has an optional third parameter which allows to overwrite the default configuration time limit
        let sensor = brickpi3.utils.getSensor(BP, BP.PORT_2);

        //First set the type of the sensor
        await sensor.setType(BP.SENSOR_TYPE.EV3_TOUCH);

        //You can also change the default configuration time limit (3000ms) for the sensor configuration after initialization
        sensor.setConfigurationTimeLimit(4000);

        //Reset the motors encoder to 0
        await motor.resetEncoder();

        //Rotates the motor one revolution - will resolve only when finished
        await motor.setPosition(360);

        //Powers on the motor until the callback function is true (good to use with sensors f.e.)
        await motor.setPower(50, async () => {
            return await sensor.getValue() === 1;
        });
    } catch (err) {
        console.log(err);
    }
})();
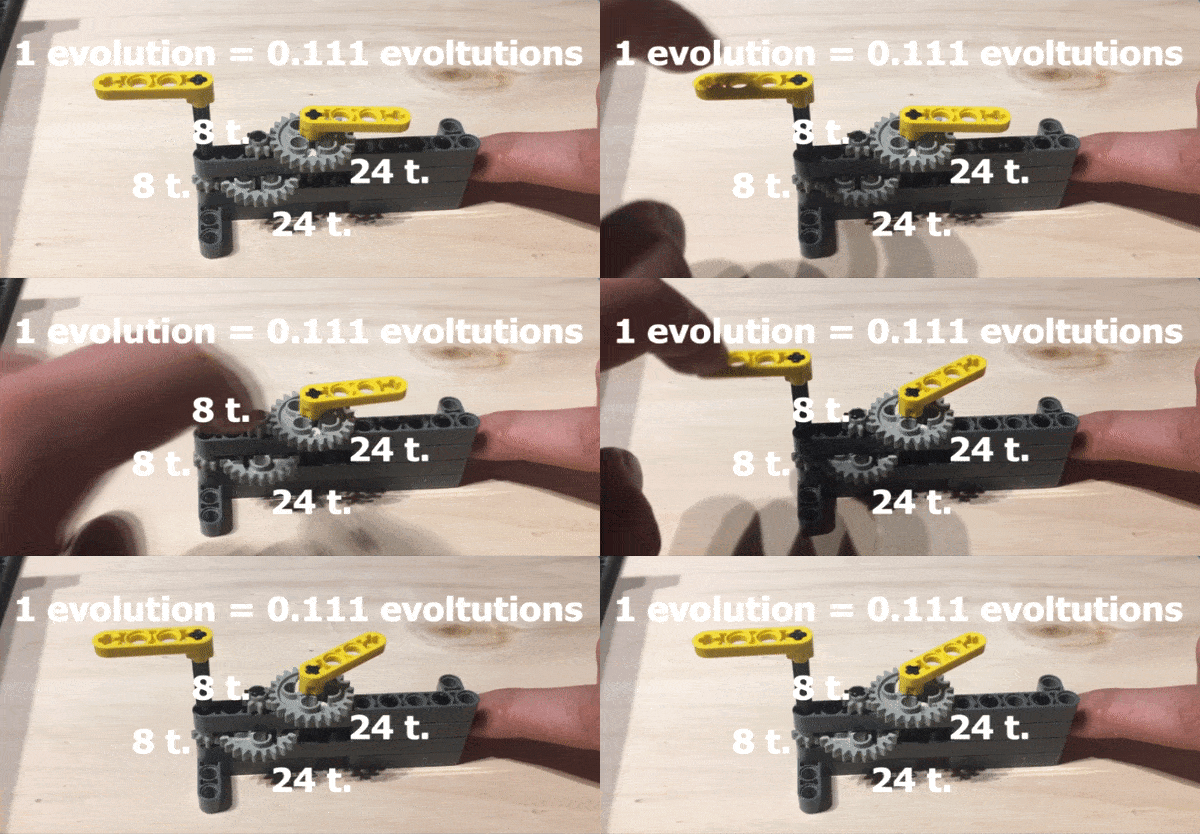
If you want to calculate, what gear ratio some connected gears have, there is also a helper:
const brickpi3 = require('brickpi3');

//A 8-teeth-gear drives a 24-teeth-gear, which is connected to another 8-teeth-gear, which drives another 24-teeth-gear
console.log(new brickpi3.utils.Gear(8).drive(24).connect(8).drive(24).getFactor());
// => 0.111 (so if you rotate the initial 8-teeth-gear one evolution, the last 24-teeth-gear will rotate 0.111 rounds in the same direction)
BrickPi3 Stacking
If you have multiple brickPi3's, you can stack them and control even more motors/sensors with a single raspberry pi.
First attach each brickPi separatly and execute the following script. You need to write down the id of each brickPi.
const brickpi3 = require('brickpi3');

(async () => {
    try {
        let BP = new brickpi3.BrickPi3();
        console.log(await BP.get_id());
    } catch (err) {
        console.log(err);
    }
})();
Then you can set the address for each of your brickPi's in the initializing part and access the four sensors and motors with each brickPi object instance.
const brickpi3 = require('brickpi3');

(async () => {
    try {
        await brickpi3.set_address(1, 'A778704A514D355934202020FF110722');
        await brickpi3.set_address(2, 'DF9E6AC3514D355934202020FF112718');

        const BP1 = new brickpi3.BrickPi3(1);
        const BP2 = new brickpi3.BrickPi3(2);

        brickpi3.utils.resetAllWhenFinished(BP1);
        brickpi3.utils.resetAllWhenFinished(BP2);

        const motor1 = brickpi3.utils.getMotor(BP1, BP1.PORT_A);
        const motor2 = brickpi3.utils.getMotor(BP2, BP2.PORT_A);

        //Reset Motor A offset of your first brickPi
        await motor1.resetEncoder();

        //Reset Motor A offset of your second brickPi
        await motor2.resetEncoder();

        //Let the motor A of your first brickPi turn constantly
        await motor1.setPower(10);

        //Let the motor A of your second brickPi rotate by 45° every two seconds.
        let target = 0;
        const moveOn = async () => {
            target = target + 45;
            await motor2.setPosition(target);

            setTimeout(moveOn, 2000);
        };
        moveOn();

    } catch(err) {
        console.log(err);
    }
})();
Special thanks
Thanks to Sumit Kumar (http://twitter.com/tweetsofsumit) for providing an example on how to communicate with the brickPi3 in nodejs on his repository.
