@wang1212/zrender-inspector
v0.1.2
Published
zrender element inspector, which can be used to assist the development of debugging.
Downloads
26
Readme
zrender-inspector
English | 简体中文
🔧 ZRender 元素检查器,可用来辅助开发调试。
该工具提供类似 ChromeDevtools 中 Element 标签调试页面 DOM 结构的方式来对 ZRender 元素进行检查,同时提供一些类似 document.querySelectorAll() 的 APIs 从全局对 ZRender 元素进行查询选择。

用法
npm
npm install -D @wang1212/zrender-inspector参考下面 esm 格式的用法。
cdn
// umd
<script src="path/to/bundle.umd.min.js"></script>;
const inspectorIns = zrenderInspector.Inspector.inspect(zrIns, config?);
// or
const inspectorIns = new zrenderInspector.Inspector(zrIns, config?);

// esm
import { Inspector } from 'path/to/bundle.esm.min.js';
const inspectorIns = Inspector.inspect(zrIns, config?);
// or
const inspectorIns = new Inspector(zrIns, config?);
new Inspector()
new Inspector(zrIns, config?)参数
| 名称 | 类型 | 是否可选 | 默认值 | 描述 | | :------------------ | :--------------------------- | :------- | :----- | :--------------------- | | zrIns |
ZRenderType| | | ZRender 实例 | | config |{ highlightCSS?: string; }| 是 | | | | config.highlightCSS |string| 是 | | 元素高亮样式cssText|
例如,对 echarts 图表库进行调试:
const chartIns = echarts.init(dom);
chartIns.setOption(option);

const inspectorIns = new Inspector(chartIns.getZr(), {
  highlightCSS: 'background-color: yellow; opacity: 0.25;'
});

// 开启鼠标悬浮高亮检查元素
inspectorIns.hoverHighlightEnable = true;
检查元素
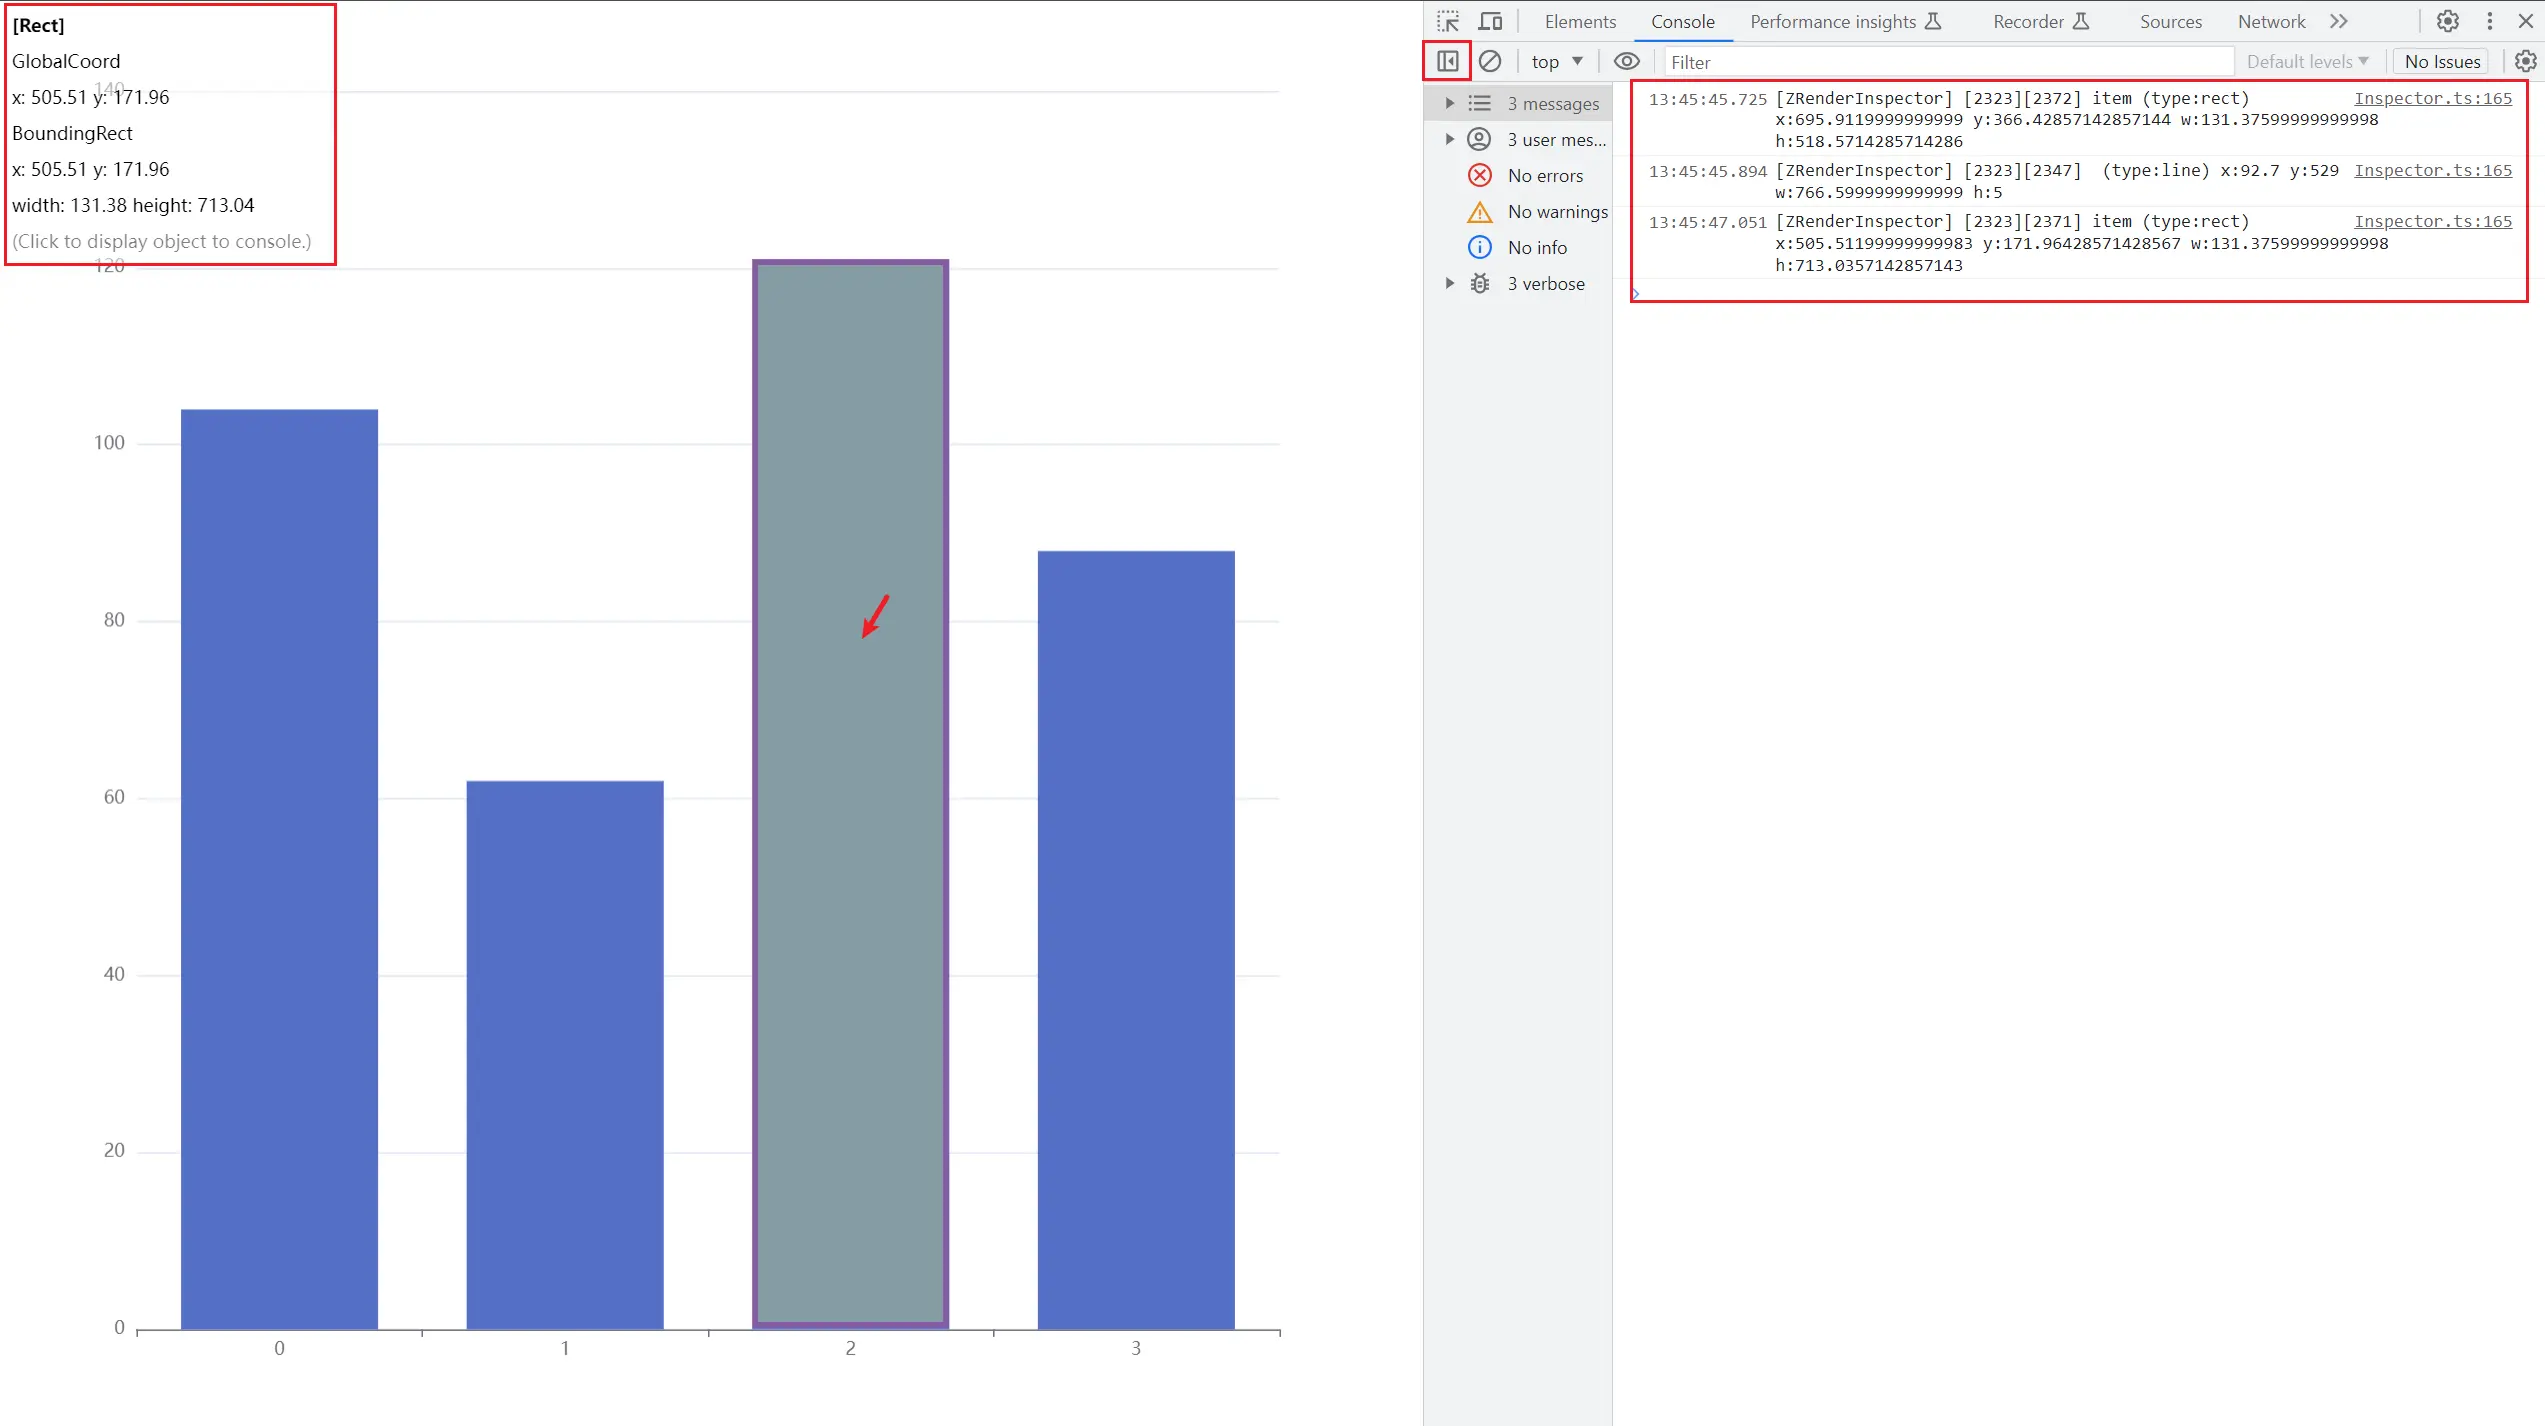
默认情况下,鼠标悬浮在可响应事件的元素上时,会在 ChromeDevtools 的 Console 中通过 console.debug() 打印元素的一些信息,但不会高亮元素。
hoverHighlightEnable
- 类型
boolean - 默认值
false
是否开启鼠标悬浮高亮元素。设置为 true 后,鼠标悬浮在可响应事件的元素上时会进行高亮,同时会在屏幕左上角显示一些元素的信息,点击高亮的元素可以将该元素实例打印在 ChromeDevtools 的 Console 中(通过 console.dir())。
inspectorIns.hoverHighlightEnable = true;debugLogger
- 类型
(el: Element) => string
设置通过 console.debug() 打印的日志内容。
默认情况下为:
[zrIns.id][el.id] el.name (type:el.type) X: Y: W: H: x: y: w: h:disableAllElementSilent()
disableAllElementSilent()
当元素设置了 silent: true 属性是不会响应鼠标事件的,如果为了调试方便,可以强制将所有元素的 silent 属性设置为 false。
inspectorIns.disableAllElementSilent();查询元素
querySelectorAll()
querySelectorAll(selector): Element[]参数
| 名称 | 类型 | 是否可选 | 默认值 | 描述 | | :------- | :------- | :------- | :----- | :--------- | | selector |
string| | | 元素选择器 |返回值
| 名称 | 类型 | 描述 | | :------- | :---------- | :----------------- | | elements |
Element[]| 匹配的所有元素集合 |
根据元素属性查询匹配到的所有元素集合。
其中,selector 可指定查询目标元素的属性键值对,支持多属性:
// 查询所有矩形(Rect)类型元素
const elements = inspectorIns.querySelectorAll('type=rect');
// 查询所有矩形(Rect)类型并且填充色为红色的元素
const elements = inspectorIns.querySelectorAll('type=rect,style.fill=#f00');
querySelector()
querySelector(selector): Element参数
| 名称 | 类型 | 是否可选 | 默认值 | 描述 | | :------- | :------- | :------- | :----- | :--------- | | selector |
string| | | 元素选择器 |返回值
| 名称 | 类型 | 描述 | | :------ | :-------- | :--------------- | | element |
Element| 匹配到的首个元素 |
根据元素属性查询匹配到的首个元素。
getElementById()
getElementById(id): Element参数
| 名称 | 类型 | 是否可选 | 默认值 | 描述 | | :--- | :------- | :------- | :----- | :--------------- | | id |
string| | | 元素id属性值 |返回值
| 名称 | 类型 | 描述 | | :------ | :-------- | :--------------- | | element |
Element| 匹配到的首个元素 |
根据元素的 id 属性查询匹配到的首个元素。
getElementsByName()
getElementsByName(name): Element参数
| 名称 | 类型 | 是否可选 | 默认值 | 描述 | | :--- | :------- | :------- | :----- | :----------------- | | name |
string| | | 元素name属性值 |返回值
| 名称 | 类型 | 描述 | | :------- | :---------- | :------------------- | | elements |
Element[]| 匹配到的所有元素集合 |
根据元素的 name 属性查询匹配到的所有元素集合。
开发
开发模式
npm run dev # or $ npm run esbuild-dev开发模式(Web 服务)
npm run dev-serve # or $ npm run esbuild-dev-serve运行测试
npm run test构建打包
npm run build从 Markdown 文档构建 Html 文档
npm run build:docs-html
更多命令查看 package.json 中 scripts 字段。
打包
运行 npm run build, 最终将生成以下捆绑包。
types/
build/
├── bundle.esm.js
├── bundle.esm.min.js
├── bundle.umd.js
└── bundle.umd.min.js
还将生成相应的 sourcemap 文件。
开发准则
Git 提交信息格式
采用社区提交格式最佳实践:
# 以前
git commit

# 现在
npm run commit
这种约束依赖于社区提供的工具 commitizen 和 commitlint。
npm 发布
该模块的版本管理采用社区推荐的规范语义化版本控制。跟随版本变动会维护一个变更日志(CHANGELOG.md)(了解为什么这么做)。
# 在发布到 npm 存储库之前更新版本并生成更改日志
npm run release
# 或者,进行预览
npm run release -- --dry-run

# 然后发布到 npm,如果在自动发布到 npm 时没有选择 yes
npm publish # npm publish --access public
这些工作是在社区提供的 release-it 工具的帮助下完成的。
许可
MIT.


