@video-face-recognition/face-recognition
v0.9.4-vfr.4
Published
Simple Node.js API for robust face detection and face recognition.
Downloads
25
Readme
Important Note
This package is pretty much obsolete. I recommend you to switch to face-api.js, which covers the same functionality as face-recognition.js in a nodejs as well as browser environment.
Simple Node.js API for robust face detection and face recognition. This a Node.js wrapper library for the face detection and face recognition tools implemented in dlib.

Examples
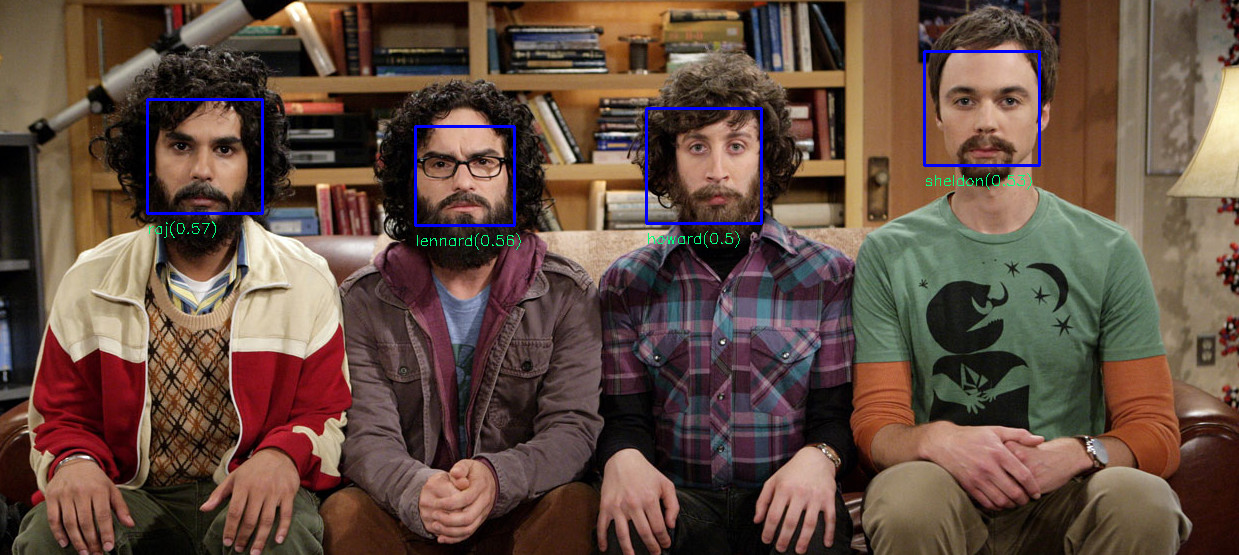
Face Detection


Face Recognition

Face Landmarks


Install
Requirements
MacOS / OSX
- cmake
brew install cmake - XQuartz for the dlib GUI (
brew cask install xquartz) - libpng for reading images (
brew install libpng)
Linux
- cmake
- libx11 for the dlib GUI (
sudo apt-get install libx11-dev) - libpng for reading images (
sudo apt-get install libpng-dev)
Windows
- cmake
- VS2017 build tools (not Visual Studio 2017) -> https://www.visualstudio.com/de/downloads/
Auto build
Installing the package will build dlib for you and download the models. Note, this might take some time.
npm install face-recognitionManual build
If you want to use an own build of dlib:
- set DLIB_INCLUDE_DIR to the source directory of dlib
- set DLIB_LIB_DIR to the file path to dlib.lib | dlib.so | dlib.dylib
If you set these environment variables, the package will use your own build instead of compiling dlib:
npm install face-recognitionBoosting Performance
Building the package with openblas support can hugely boost CPU performance for face detection and face recognition.
Linux and OSX
Simply install openblas (sudo apt-get install libopenblas-dev) before building dlib / installing the package.
Windows
Unfortunately on windows we have to compile openblas manually (this will require you to have perl installed). Compiling openblas will leave you with libopenblas.lib and libopenblas.dll. In order to compile face-recognition.js with openblas support, provide an environment variable OPENBLAS_LIB_DIR with the path to libopenblas.lib and add the path to libopenblas.dll to your system path, before installing the package. In case you are using a manual build of dlib, you have to compile it with openblas as well.
How to use
const fr = require('face-recognition')Loading images from disk
const image1 = fr.loadImage('path/to/image1.png')
const image2 = fr.loadImage('path/to/image2.jpg')
Displaying Images
const win = new fr.ImageWindow()

// display image
win.setImage(image)

// drawing the rectangle into the displayed image
win.addOverlay(rectangle)

// pause program until key pressed
fr.hitEnterToContinue()
Face Detection
const detector = fr.FaceDetector()Detect all faces in the image and return the bounding rectangles:
const faceRectangles = detector.locateFaces(image)Detect all faces and return them as separate images:
const faceImages = detector.detectFaces(image)You can also specify the output size of the face images (default is 150 e.g. 150x150):
const targetSize = 200
const faceImages = detector.detectFaces(image, targetSize)
Face Recognition
const recognizer = fr.FaceRecognizer()Train the recognizer with face images of atleast two different persons:
// arrays of face images, (use FaceDetector to detect and extract faces)
const sheldonFaces = [ ... ]
const rajFaces = [ ... ]
const howardFaces = [ ... ]

recognizer.addFaces(sheldonFaces, 'sheldon')
recognizer.addFaces(rajFaces, 'raj')
recognizer.addFaces(howardFaces, 'howard')
You can also jitter the training data, which will apply transformations such as rotation, scaling and mirroring to create different versions of each input face. Increasing the number of jittered version may increase prediction accuracy but also increases training time:
const numJitters = 15
recognizer.addFaces(sheldonFaces, 'sheldon', numJitters)
recognizer.addFaces(rajFaces, 'raj', numJitters)
recognizer.addFaces(howardFaces, 'howard', numJitters)
Get the distances to each class:
const predictions = recognizer.predict(sheldonFaceImage)
console.log(predictions)
example output (the lower the distance, the higher the similarity):
[
  {
    className: 'sheldon',
    distance: 0.5
  },
  {
    className: 'raj',
    distance: 0.8
  },
  {
    className: 'howard',
    distance: 0.7
  }
]
Or immediately get the best result:
const bestPrediction = recognizer.predictBest(sheldonFaceImage)
console.log(bestPrediction)
example output:
{
  className: 'sheldon',
  distance: 0.5
}
Save a trained model to json file:
const fs = require('fs')
const modelState = recognizer.serialize()
fs.writeFileSync('model.json', JSON.stringify(modelState))
Load a trained model from json file:
const modelState = require('model.json')
recognizer.load(modelState)
Face Landmarks
This time using the FrontalFaceDetector (you can also use FaceDetector):
const detector = new fr.FrontalFaceDetector()Use 5 point landmarks predictor:
const predictor = fr.FaceLandmark5Predictor()Or 68 point landmarks predictor:
const predictor = fr.FaceLandmark68Predictor()First get the bounding rectangles of the faces:
const img = fr.loadImage('image.png')
const faceRects = detector.detect(img)
Find the face landmarks:
const shapes = faceRects.map(rect => predictor.predict(img, rect))Display the face landmarks:
const win = new fr.ImageWindow()
win.setImage(img)
win.renderFaceDetections(shapes)
fr.hitEnterToContinue()
Async API
Async Face Detection
const detector = fr.AsyncFaceDetector()

detector.locateFaces(image)
  .then((faceRectangles) => {
    ...
  })
  .catch((error) => {
    ...
  })

detector.detectFaces(image)
  .then((faceImages) => {
    ...
  })
  .catch((error) => {
    ...
  })
Async Face Recognition
const recognizer = fr.AsyncFaceRecognizer()

Promise.all([
  recognizer.addFaces(sheldonFaces, 'sheldon')
  recognizer.addFaces(rajFaces, 'raj')
  recognizer.addFaces(howardFaces, 'howard')
])
  .then(() => {
    ...
  })
  .catch((error) => {
    ...
  })

recognizer.predict(faceImage)
  .then((predictions) => {
    ...
  })
  .catch((error) => {
    ...
  })

recognizer.predictBest(faceImage)
  .then((bestPrediction) => {
    ...
  })
  .catch((error) => {
    ...
  })
Async Face Landmarks
const predictor = fr.FaceLandmark5Predictor()const predictor = fr.FaceLandmark68Predictor()Promise.all(faceRects.map(rect => predictor.predictAsync(img, rect)))
.then((shapes) => {
...
})
.catch((error) => {
...
})With TypeScript
import * as fr from 'face-recognition'Check out the TypeScript examples.
With opencv4nodejs
In case you need to do some image processing, you can also use this package with opencv4nodejs. Also see examples for using face-recognition.js with opencv4nodejs.
const cv = require('opencv4nodejs')
const fr = require('face-recognition').withCv(cv)
Now you can simple convert a cv.Mat to fr.CvImage:
const cvMat = cv.imread('image.png')
const cvImg = fr.CvImage(cvMat)
Display it:
const win = new fr.ImageWindow()
win.setImage(cvImg)
fr.hitEnterToContinue()
Resizing:
const resized1 = fr.resizeImage(cvImg, 0.5)
const resized2 = fr.pyramidUp(cvImg)
Detecting faces and retrieving them as cv.Mats:
const faceRects =  detector.locateFaces(cvImg)
const faceMats = faceRects
  .map(mmodRect => fr.toCvRect(mmodRect.rect))
  .map(cvRect => mat.getRegion(cvRect).copy())