@tencentcloud/react-native-push
v1.0.1
Published
For React Native, based on Tencent Cloud Push service (Push), supports iOS and Android push notifications, and is also compatible with push notifications from Android major manufacturers.
Downloads
4,267
Readme
简介
基于腾讯云推送服务(Push),支持 iOS 和 Android 推送,同时适配各大厂商推送。
腾讯云推送服务(Push)提供一站式 App 推送解决方案,助您轻松提升用户留存和互动活跃度,支持与腾讯云即时通信 IM SDK、实时音视频 TRTC SDK、音视频通话 SDK、直播 SDK等音视频终端产品协同集成,在不同场景联合使用,提升业务整体功能体验。
数据可视化,辅助运营策略
支持推送消息全链路问题排查
六地服务部署,严守数据安全
提供了中国、东南亚(新加坡、印尼雅加达)、东北亚(韩国首尔)、欧洲(德国法兰克福)以及北美(美国硅谷)数据存储中心供选择,每个数据中心均支持全球接入。如果您的应用在境外上线且用户主要在境外,您可以根据消息传输需求及合规要求,选择适合您业务的境外数据中心,保障您的数据安全。
快速跑通
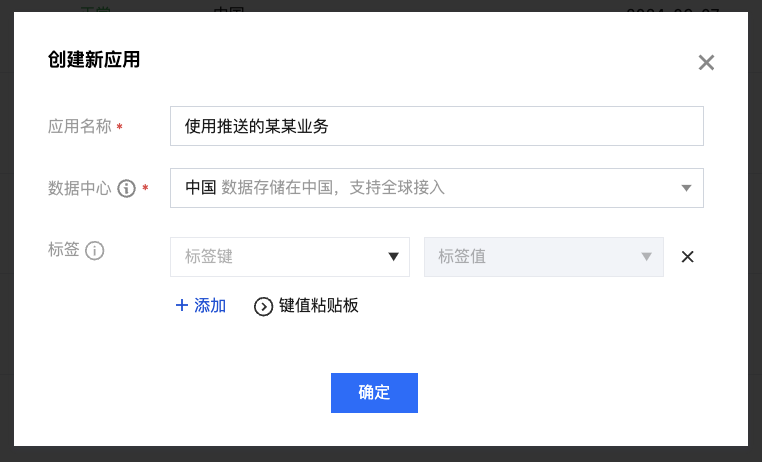
步骤1:创建应用
进入 控制台 ,单击创建应用,填写应用名称,选择数据中心,单击确定,完成应用创建。

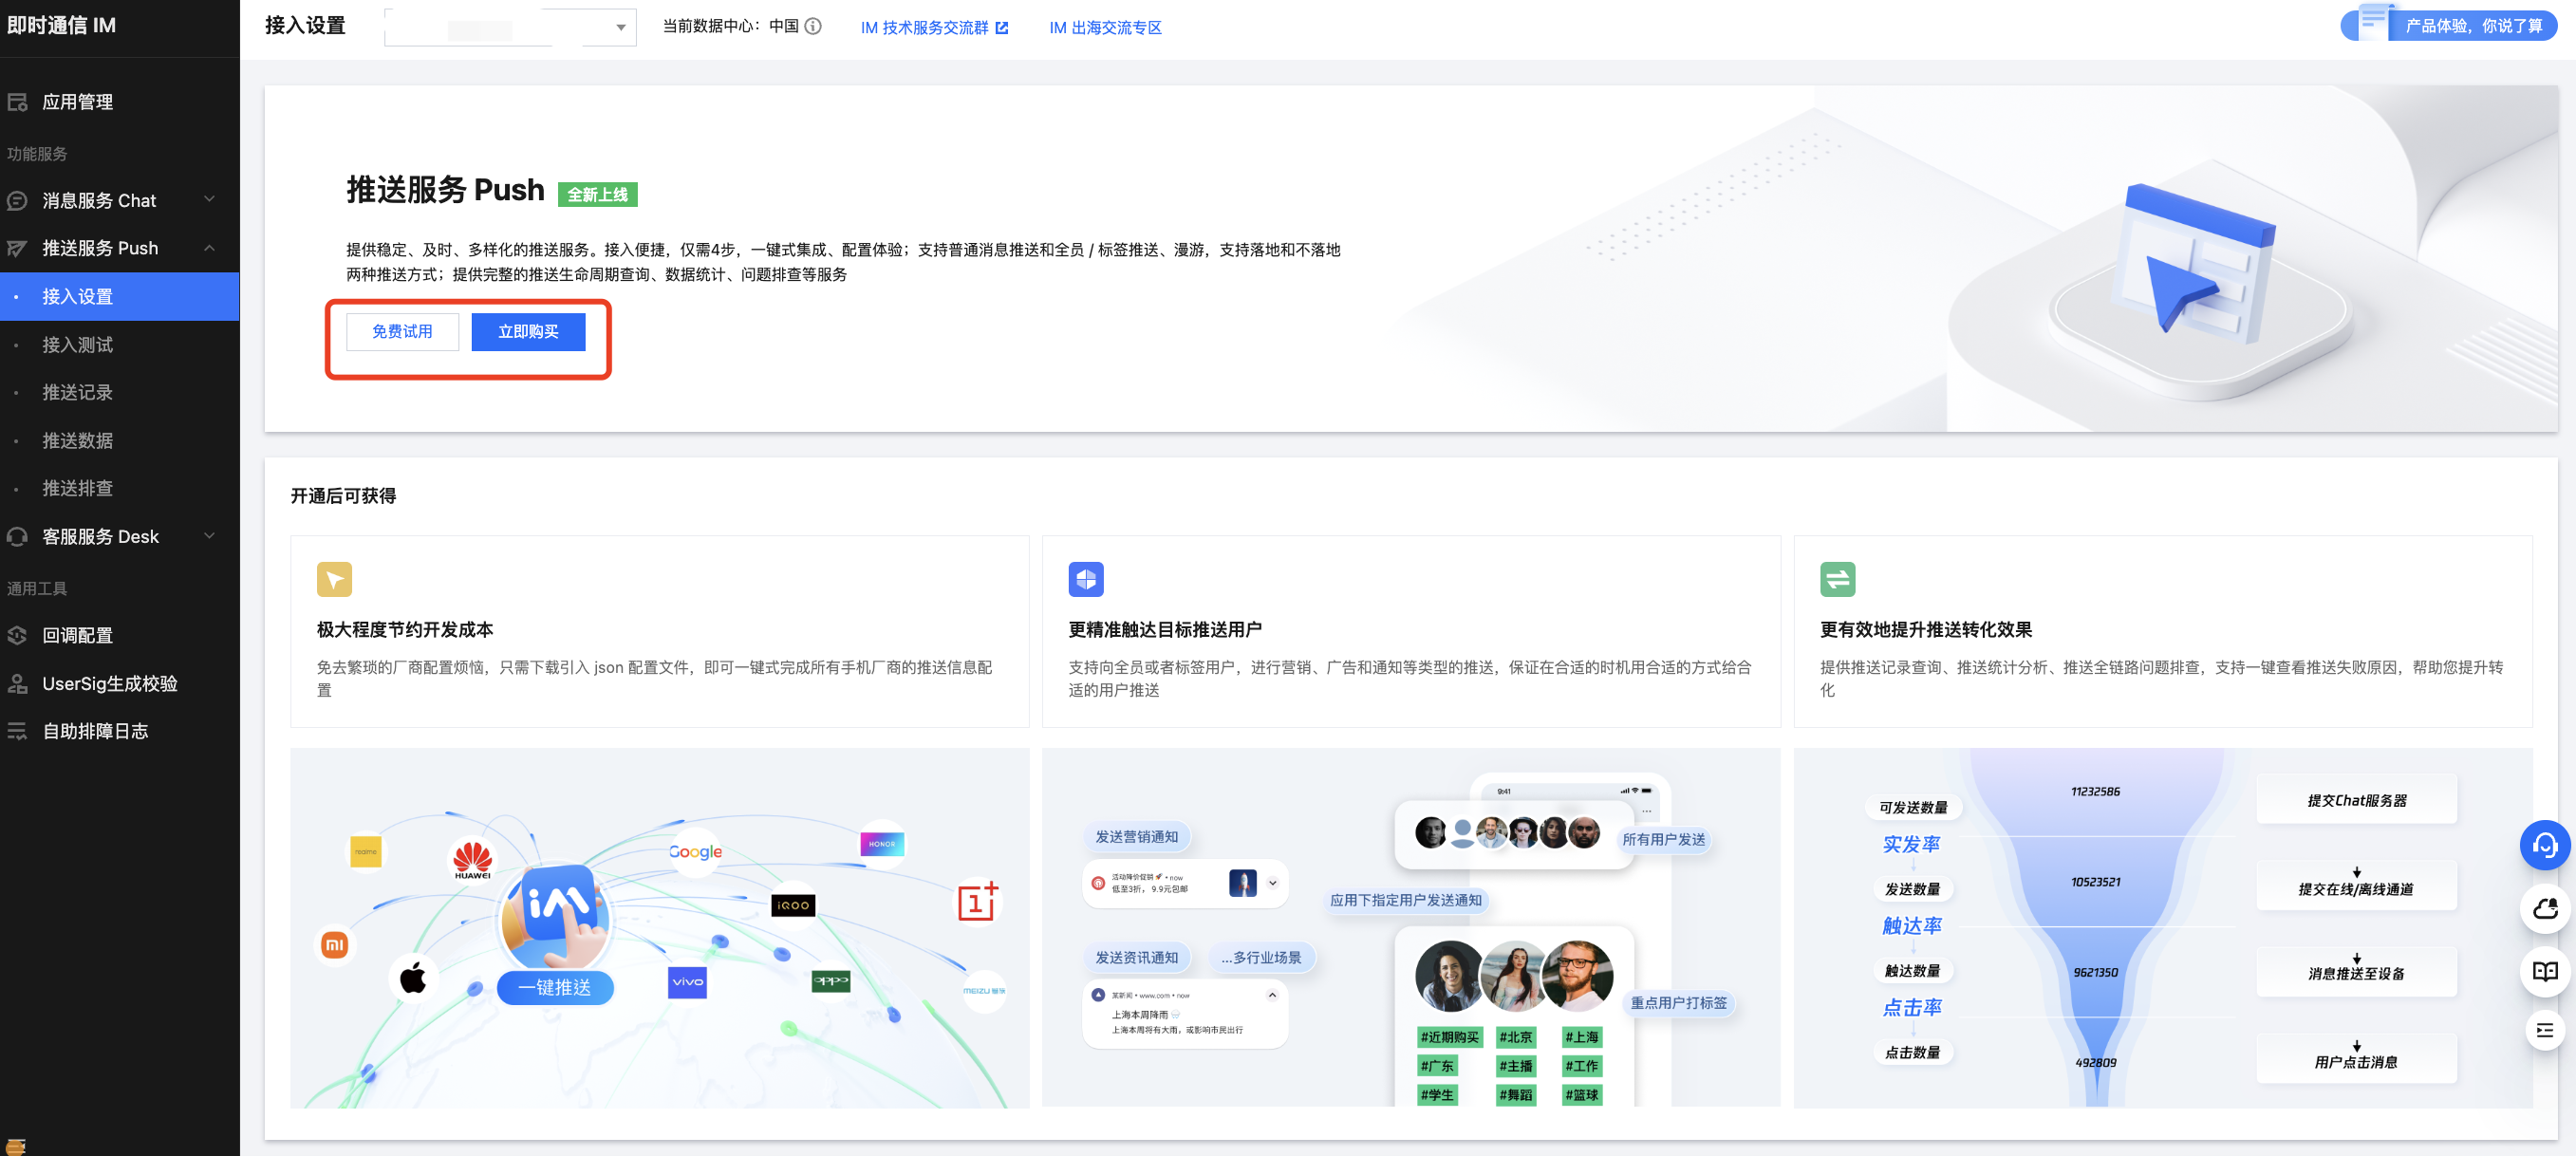
步骤2:开通推送服务 Push
进入 推送服务 Push,单击立即购买或免费试用 。(每个应用可免费试用一次,有效期7天)

步骤3:创建一个 React Native 项目(已有项目可忽略此步骤)
npx @react-native-community/cli@latest init MyReactNativeApp --version 0.75.0步骤4:集成 @tencentcloud/react-native-push
npm install @tencentcloud/react-native-push --save步骤5:注册推送
复制下面的代码到 App.tsx,并将 SDKAppID 和 appKey 替换为您的应用的信息

import Push from '@tencentcloud/react-native-push';

const SDKAppID = 0; // 您的 SDKAppID
const appKey = ''; // 客户端密钥
if (Push) {
  Push.registerPush(SDKAppID, appKey, (data) => {
    console.log('registerPush ok', data);
    Push.getRegistrationID((registrationID) => {
      console.log('getRegistrationID ok', registrationID);
    });
  }, (errCode, errMsg) => {
    console.error('registerPush failed', errCode, errMsg);
  });

  // 监听通知栏点击事件,获取推送扩展信息
  Push.addPushListener(Push.EVENT.NOTIFICATION_CLICKED, (res) => {
      // res 为推送扩展信息
      console.log('notification clicked', res);
  });

  // 监听在线推送
  Push.addPushListener(Push.EVENT.MESSAGE_RECEIVED, (res) => {
    // res 为消息内容
    console.log('message received', res);
  });

  // 监听在线推送被撤回
  Push.addPushListener(Push.EVENT.MESSAGE_REVOKED, (res) => {
    // res 为被撤回的消息 ID
    console.log('message revoked', res);
  });
}
步骤6:配置 Native Modules 和相关依赖
For Android:
1)使用 Android Stuido 打开 MyReactNativeApp 目录下的 android 项目。
2)如果您的项目入口文件是 MainApplication.kt,请按如下方式修改:
...
import com.tencent.qcloud.rntimpush.TencentCloudPushApplication

// Replace Application with TencentCloudPushApplication
class MainApplication : TencentCloudPushApplication(), ReactApplication {
  ...
  //  add TencentCloudPushPackage to the list of packages returned in ReactNativeHost's getPackages() method
  override fun getPackages(): List<ReactPackage> =
    PackageList(this).packages.apply {
        // Packages that cannot be autolinked yet can be added manually here, for example:
        // add(MyReactNativePackage())
    }
}
3)如果您的项目入口文件是 MainApplication.java,请按如下方式修改:
...
import com.tencent.qcloud.rntimpush.TencentCloudPushApplication;

// Replace Application with TencentCloudPushApplication
public class MainApplication extends TencentCloudPushApplication implements ReactApplication {
  ...
  // add TencentCloudPushPackage to the list of packages returned in ReactNativeHost's getPackages() method
  @Override
  protected List<ReactPackage> getPackages() {
    List<ReactPackage> packages = new PackageList(this).getPackages();
    // Packages that cannot be autolinked yet can be added manually here, for example:
    // packages.add(new MyReactNativePackage());
    return packages;
  }
  ...
}
4)编辑 android/build.gradle 文件,更新 repositories,dependencies 和 allprojects。
buildscript {
    ...
    repositories {
        ...
        google()
        mavenCentral()
        maven { url 'https://mirrors.tencent.com/nexus/repository/maven-public/' }
        // 配置 HMS Core SDK 的 Maven 仓地址。
        maven { url 'https://developer.huawei.com/repo/' }
        maven { url 'https://developer.hihonor.com/repo' }
    }
    dependencies {
        ...
        // 如果您创建的项目 com.android.tools.build:gradle 未带版本号,请设置为 8.5.0
        // classpath("com.android.tools.build:gradle:8.5.0")
        classpath 'com.google.gms:google-services:4.3.15'
        classpath 'com.huawei.agconnect:agcp:1.9.1.301'
        classpath 'com.hihonor.mcs:asplugin:2.0.1.300'
    }
}

allprojects {
    repositories {
        mavenCentral()
        maven { url 'https://mirrors.tencent.com/nexus/repository/maven-public/' }
        // 配置HMS Core SDK的Maven仓地址。
        maven { url 'https://developer.huawei.com/repo/' }
        maven { url 'https://developer.hihonor.com/repo' }
    }
}
...
5)编辑 android/app/build.gradle 文件,更新 plugin 和 defaultConfig。
...
// 如果您的 APP 需要 FCM 推送,请取消下面的注释
// apply plugin: 'com.google.gms.google-services'
apply plugin: 'com.huawei.agconnect'
apply plugin: 'com.hihonor.mcs.asplugin'

...

android {
    ...
    defaultConfig {
        ...
        manifestPlaceholders = [
            "VIVO_APPKEY" : "0",
            "VIVO_APPID" : "0",
            "HONOR_APPID" : ""
        ]
    }
}
6)以上操作完成后,选择 File > Sync Project with Gradle Files。
For iOS:
1)安装 TIMPush 组件。
pod install
# 如果无法安装最新版本,执行以下命令更新本地的 CocoaPods 仓库列表
pod repo update
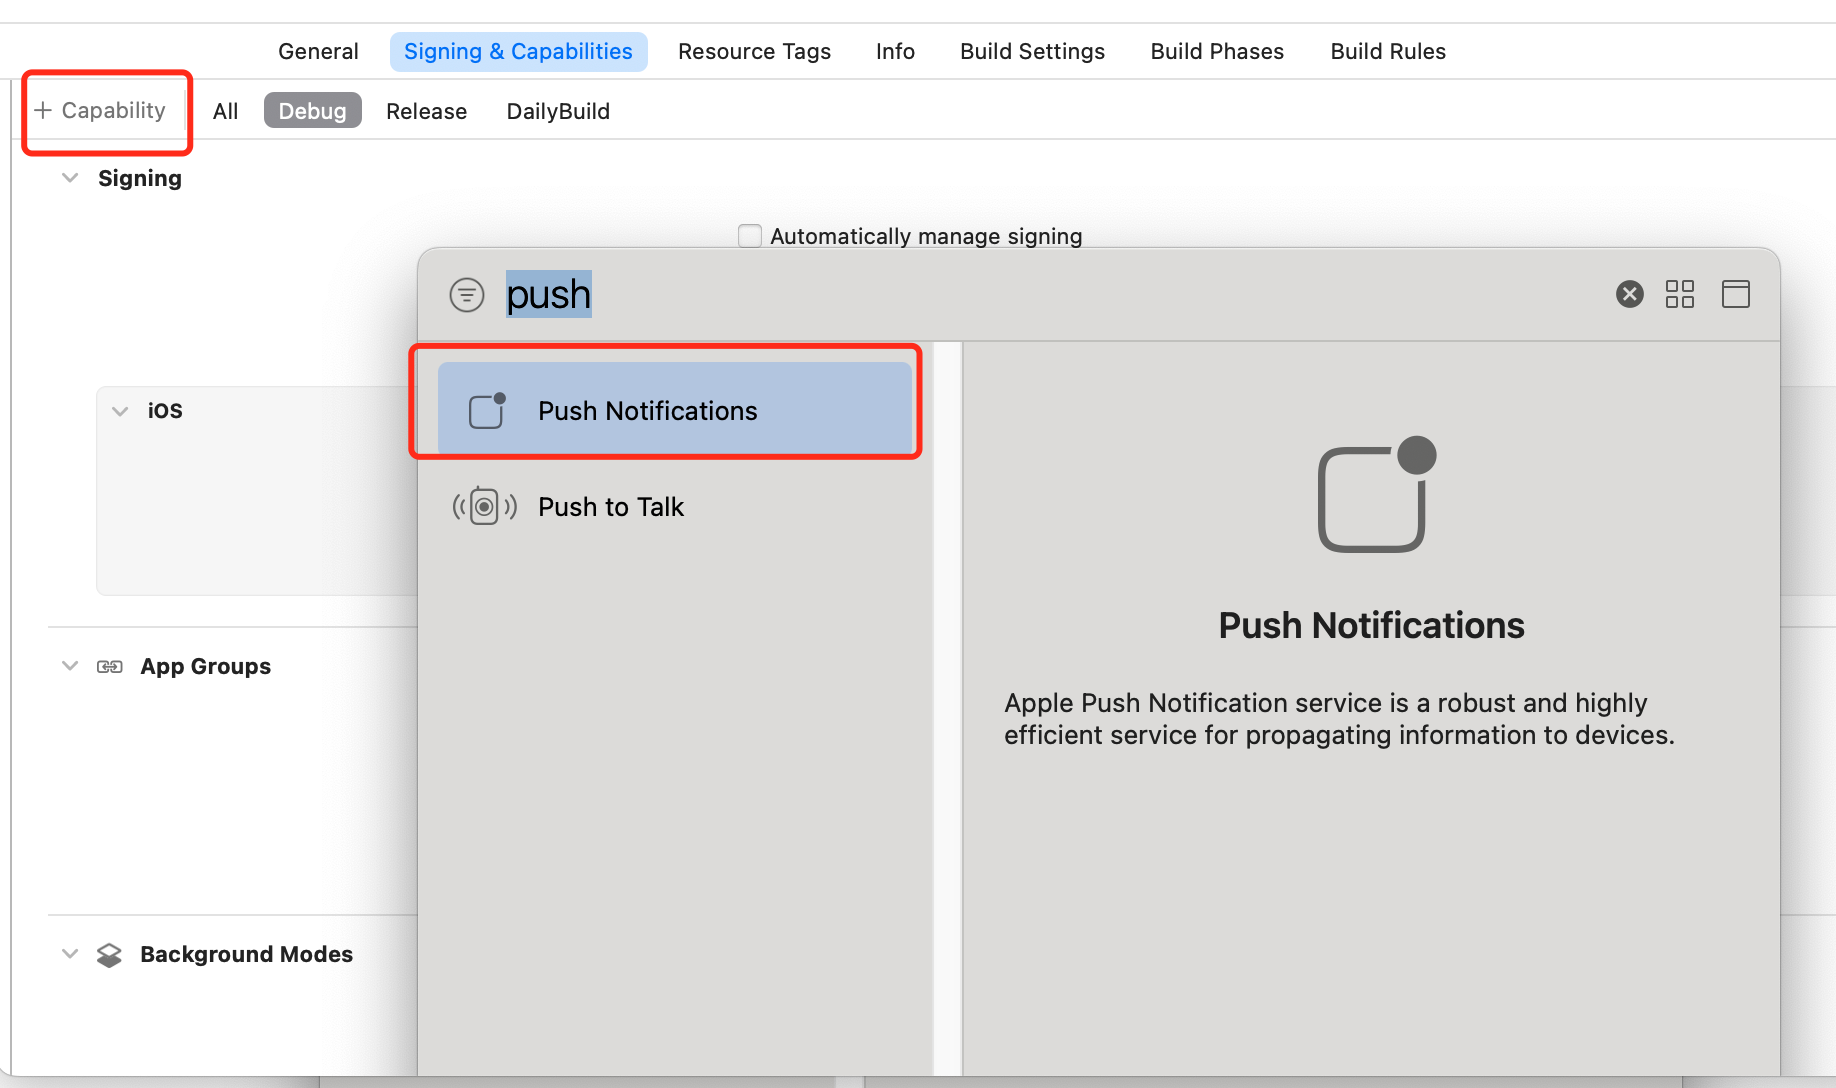
2)在App中添加推送权限,请在 Xcode 项目中启用推送通知功能。打开 Xcode 项目,在 Project > Target > Capabilities 页面中点击红框中的加号按钮,然后选择并添加 Push Notifications 。

添加后的结果如图中红框所示。

步骤7:在真机上运行(测试前请务必打开手机通知权限,允许应用通知。)
从项目根目录开始,在命令提示符中运行以下命令,在设备上安装并启动您的应用程序:
For Android:
npm run androidFor iOS:
npm run ios步骤8:登录 控制台,使用测试工具进行在线推送测试。

离线推送厂商 Push Channel 配置
For Android:
1)Android 厂商较多,详细配置指引请参考 厂商配置。
2)配置完成后,从控制台下载 timpush-configs.json 文件并添加到项目的 android/app/src/main/assets 目录下,如果该目录不存在,请手动创建。
For iOS:
1)iOS 详细配置指引请参考 厂商配置。
2)在 MyReactNativeApp/ios/MyReactNativeApp 目录下新建 Resources 目录,在 Resources 目录下新建 timpush-configs.json 文件,将您控制台的证书 ID 填入后保存,如下所示:
{
  "businessID": "您的证书 ID"
}
3)使用 XCode 打开 MyReactNativeApp/ios/MyReactNativeApp.xcworkspace,右键点击项目 > Add Files to "MyReactNativeApp",添加上一步创建的 timpush-configs.json 文件夹到工程,然后重新构建 app 安装到手机运行。
接口
| API | 描述| |----|---| | registerPush | 注册推送服务 (必须在 App 用户同意了隐私政策,并且允许为 App 用户提供推送服务后,再调用该接口使用推送服务)。首次注册成功后,TencentCloud-Push SDK 生成该设备的标识 - RegistrationID。 业务侧可以把这个 RegistrationID 保存到业务服务器。业务侧根据 RegistrationID 向设备推送消息或者通知。| | unRegisterPush | 反注册关闭推送服务。| | setRegistrationID | 设置注册推送服务使用的推送 ID 标识,即 RegistrationID。如果业务侧期望业务账号 ID 和推送 ID 一致,方便使用,可使用此接口,此时需注意,此接口需在 registerPush(注册推送服务)之前调用。| | getRegistrationID | 注册推送服务成功后,获取推送 ID 标识,即 RegistrationID。| | getNotificationExtInfo | 收到离线推送时,点击通知栏拉起 app,调用此接口可获取推送扩展信息。| | addPushListener | 添加 Push 监听器。| | removePushListener | 移除 Push 监听器。| | disablePostNotificationInForeground | 应用在前台时,开/关通知栏通知(默认开)。| | createNotificationChannel | 创建客户端通知 channel。|
registerPush(SDKAppID: number, appKey: string, onSuccess: (data: string) => void, onError?: (errCode: number, errMsg: string) => void);|属性|类型|必填|说明| |----|---|----|----| |SDKAppID|number|是|推送(Push)应用 ID| |appKey|string|是|推送(Push)应用客户端密钥| |onSuccess|function|是|接口调用成功的回调函数| |onError|function|否|接口调用失败的回调函数|
unRegisterPush(onSuccess: () => void, onError?: (errCode: number, errMsg: string) => void): void;|属性|类型|必填|说明| |----|---|----|----| |onSuccess|function|是|接口调用成功的回调函数| |onError|function|否|接口调用失败的回调函数|
setRegistrationID(registrationID: string, onSuccess: () => void): void;|属性|类型|必填|说明| |----|---|----|----| |registrationID|string|是|设备的推送标识 ID,卸载重装会改变。| |onSuccess|function|是|接口调用成功的回调函数|
getRegistrationID(onSuccess: (registrationID: string) => void): void;|属性|类型|必填|说明| |----|---|----|----| |onSuccess|function|是|接口调用成功的回调函数|
getNotificationExtInfo(onSuccess: (extInfo: string) => void): void;|属性|类型|必填|说明| |----|---|----|----| |onSuccess|function|是|接口调用成功的回调函数|
addPushListener(eventName: string, listener: (data: any) => void);|属性|类型|必填|说明| |----|---|----|----| |eventName|string|是|推送事件类型| |listener|function|是|推送事件处理方法|
removePushListener(eventName: string, listener?: (data: any) => void);|属性|类型|必填|说明| |----|---|----|----| |eventName|string|是|推送事件类型| |listener|function|否|推送事件处理方法|
disablePostNotificationInForeground(disable: boolean);|属性|类型|必填|说明| |----|---|----|----| |disable|boolean|是|应用在前台时,开/关通知栏通知,默认开 - true: 应用在前台时,关闭通知栏通知。 - false: 应用在前台时,开启通知栏通知。|
createNotificationChannel(options: Record<string, any>, onSuccess: (data: any) => void);|属性|类型|必填|说明|
|----|---|----|----|
|options.channelID|string|是|自定义 channel 的 ID|
|options.channelName|string|是|自定义 channel 的名称|
|options.channelDesc|string|否|自定义 channel 的描述|
|options.channelSound|string|否|自定义 channel 的铃音,音频文件名,不带后缀,音频文件需要放到 MyReactNativeApp/android/app/src/main/res/raw 中。例如:options.channelSound = private_ring, 即设置 MyReactNativeApp/android/app/src/main/res/raw/private_ring.mp3 为自定义铃音|
|onSuccess|string|是|接口调用成功的回调函数|
