@circlerich/chat-uikit-react
v1.0.17
Published
>The web demo is implemented based on the IM chat-uikit-react. chat-uikit-react provides features such as management of conversations, chats, groups, and profiles. With chat-uikit-react, you can quickly build your own business logic.
Downloads
37
Maintainers
Readme
Chat UIKit React for Tencent Cloud IM
The web demo is implemented based on the IM chat-uikit-react. chat-uikit-react provides features such as management of conversations, chats, groups, and profiles. With chat-uikit-react, you can quickly build your own business logic.
Quick Links
Example App
We have built sample demo applications showcasing chat use cases,You can preview these demo on our website. Also, the code is open source.

Try chat-uikit-react
Step 1.Installation
$ npm i @tencentcloud/chat-uikit-reactStep 2.Usage
import React, { useEffect, useState } from 'react';
import { TUIKit } from '@tencentcloud/chat-uikit-react';
import '@tencentcloud/chat-uikit-react/dist/cjs/index.css';
import TIM, { TIMUploadPlugin } from 'tim-js-sdk';

const init = async () => {
   return new Promise((resolve, reject) => {
      const tim = TIM.create({ SDKAppID: 000 });
      tim?.registerPlugin({ 'tim-upload-plugin': TIMUploadPlugin });
      const onReady = () => { resolve(tim); };
      tim.on(TIM.EVENT.SDK_READY, onReady);
      tim.login({
         userID: 'xxx',
         userSig: 'xxx',
      });
   });
}

export function SampleChat() {
   const [tim, setTim] = useState<TIM>();
   useEffect(() => {
      (async ()=>{
         const tim = await init()
         setTim(tim)
      })()
   }, [])

   return (
           <div style={{height: '100vh',width: '100vw'}}>
              <TUIKit tim={tim}></TUIKit>
           </div>
   );
}
Customizing Styles
The preferred method for overriding the pre-defined styles in the library is to two step process. First, import our bundled CSS into the file where you instantiate your chat application. Second, locate any TencentCloud styles you want to override using either the browser inspector or by viewing the library code. You can then add selectors to your local CSS file to override our defaults. For example:
import '@tencentcloud/chat-uikit-react/dist/cjs/index.css';
import './App.css';
Running the demo
Step 1. Download the source code
# Run the code in CLI
$ git clone https://github.com/jiushu531/circlerich-chat-uikit-react.git
# Go to the project
$ cd circlerich-chat-uikit-react/sample-chat
# Install dependencies of the demo
$ npm install
Step 2. Initialize the demo
- Open the project, and find the
GenerateTestUserSig.jsfile via the path/src/debug/GenerateTestUserSig.js. - Set required parameters in the
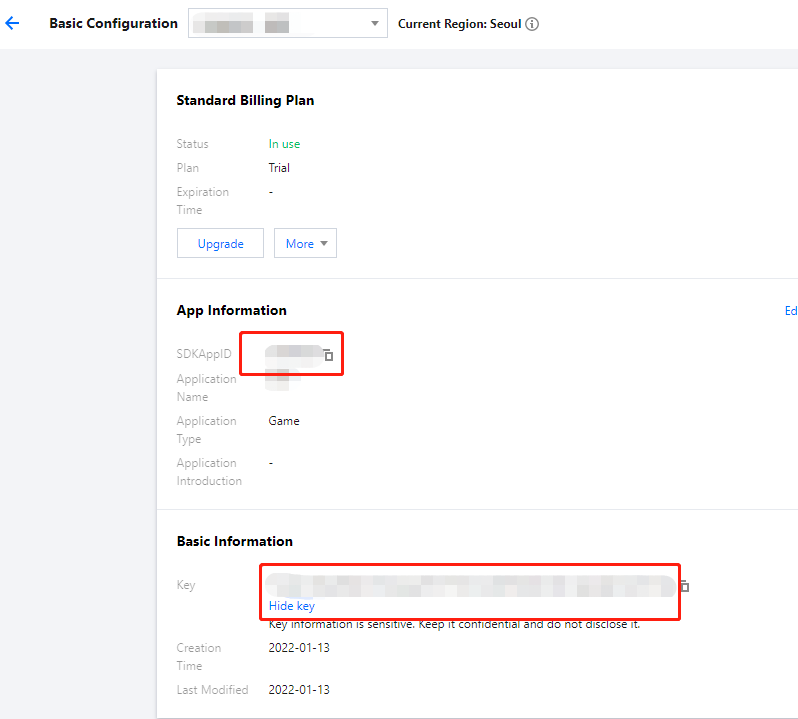
GenerateTestUserSigfile, whereSDKAppIDandKeycan be obtained in the IM console. Click the target app card to go to its basic configuration page.
- In the Basic Information area, click Display key, and copy and save the key information to the
GenerateTestUserSigfile.
In this document, the method to obtain
UserSigis to configure aSECRETKEYin the client code. In this method, theSECRETKEYis vulnerable to decompilation and reverse engineering. Once yourSECRETKEYis disclosed, attackers can steal your Tencent Cloud traffic. Therefore, this method is only suitable for locally running a demo project and feature debugging. The correctUserSigdistribution method is to integrate the calculation code ofUserSiginto your server and provide an application-oriented API. WhenUserSigis needed, your application can send a request to the business server for a dynamicUserSig. For more information, see the "Calculating UserSig on the Server" section of Generating UserSig.
Step 3. Launch the project
# Launch the project
$ npm run start
Contributing
We welcome code changes that improve this library or fix a problem. Please make sure to follow all best practices and add tests, if applicable, before submitting a pull request on GitHub. We are pleased to merge your code into the official repository if it meets a need.
